Opportunities
A sales opportunity is a lead that is now almost ready to buy in other words, it is a deal that you are ready to win.
The difference, however, is that with a sales opportunity, you can estimate revenue, set a potential close date, and factor in a probability of the sale.
When you create an opportunity, you must specify an existing record for a company or contact. If you add a price list to an opportunity, it will help to automatically calculate the prices for the suggested products that the opportunity is interested in buying.
At this point in the sales process, you are likely to move to the Develop or Propose phase (see the section Working in the Sales Process).
Table of contents
- Create or edit an opportunity
- Use the sales process
- Adding products to an opportunity
- Closing an opportunity as won or lost
Create or edit an opportunity
You can create a new opportunity from scratch or convert qualified leads into opportunities without having to re-enter the data. Then, track the opportunities in the sales cycle. When converting a qualified lead to a company, contact, or opportunity, you can access the lead record in the opportunity form, which includes activities and notes. Also, when creating a new opportunity, you can access the lead information and link the opportunity to a lead record. An opportunity cannot be converted to a lead. Opportunities can only be closed.
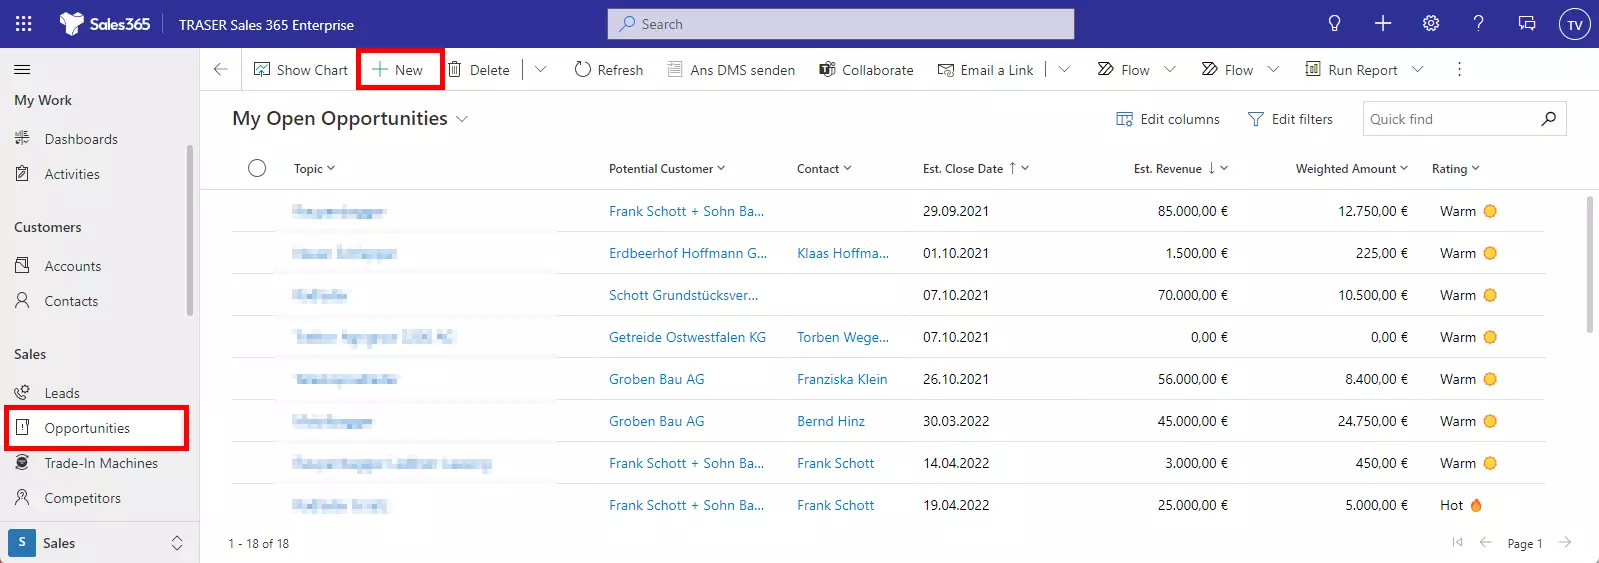
Sales opportunities can be created in different ways:
- Qualify or convert a lead. Learn more: Qualifying a lead and converting it to an opportunity
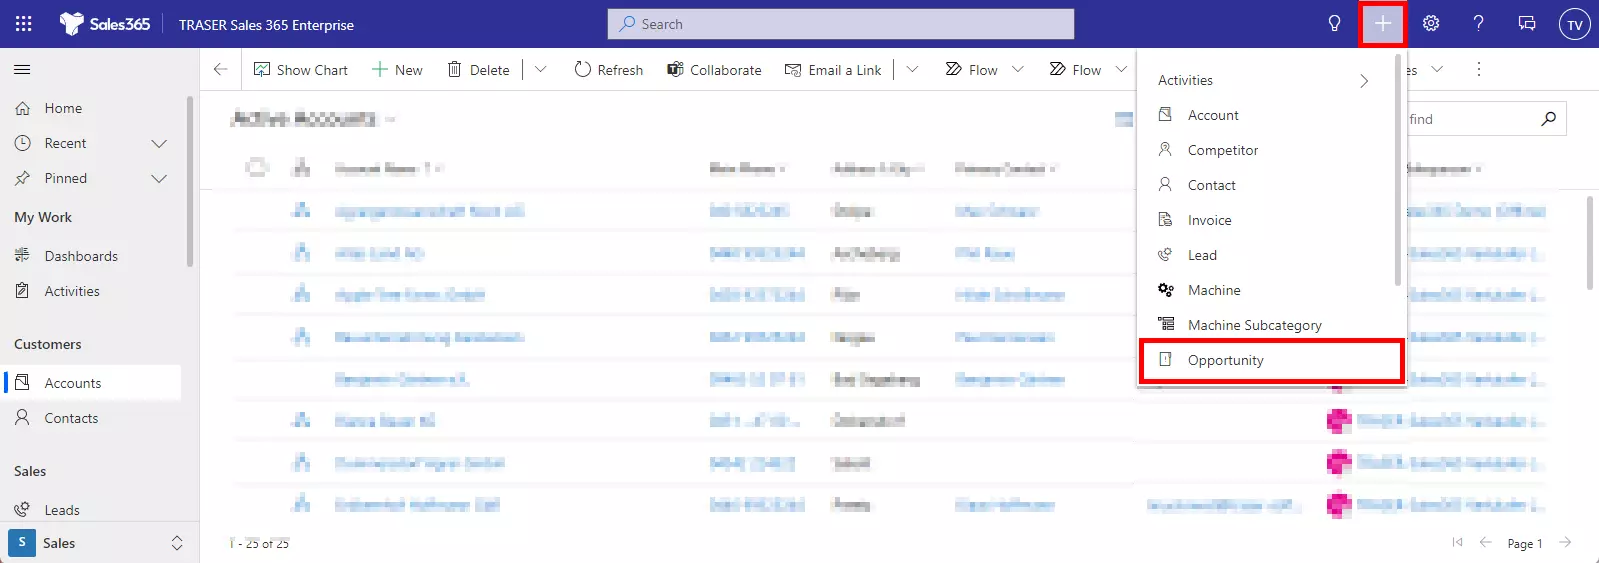
- Create an opportunity using the Quick Create option in the command bar.
- Wählen Sie in der Liste Verkaufschance die Option Neu aus.
You can then enter important details about the potential customer. Once you qualify a lead for an opportunity, most fields from the lead record are populated automatically.
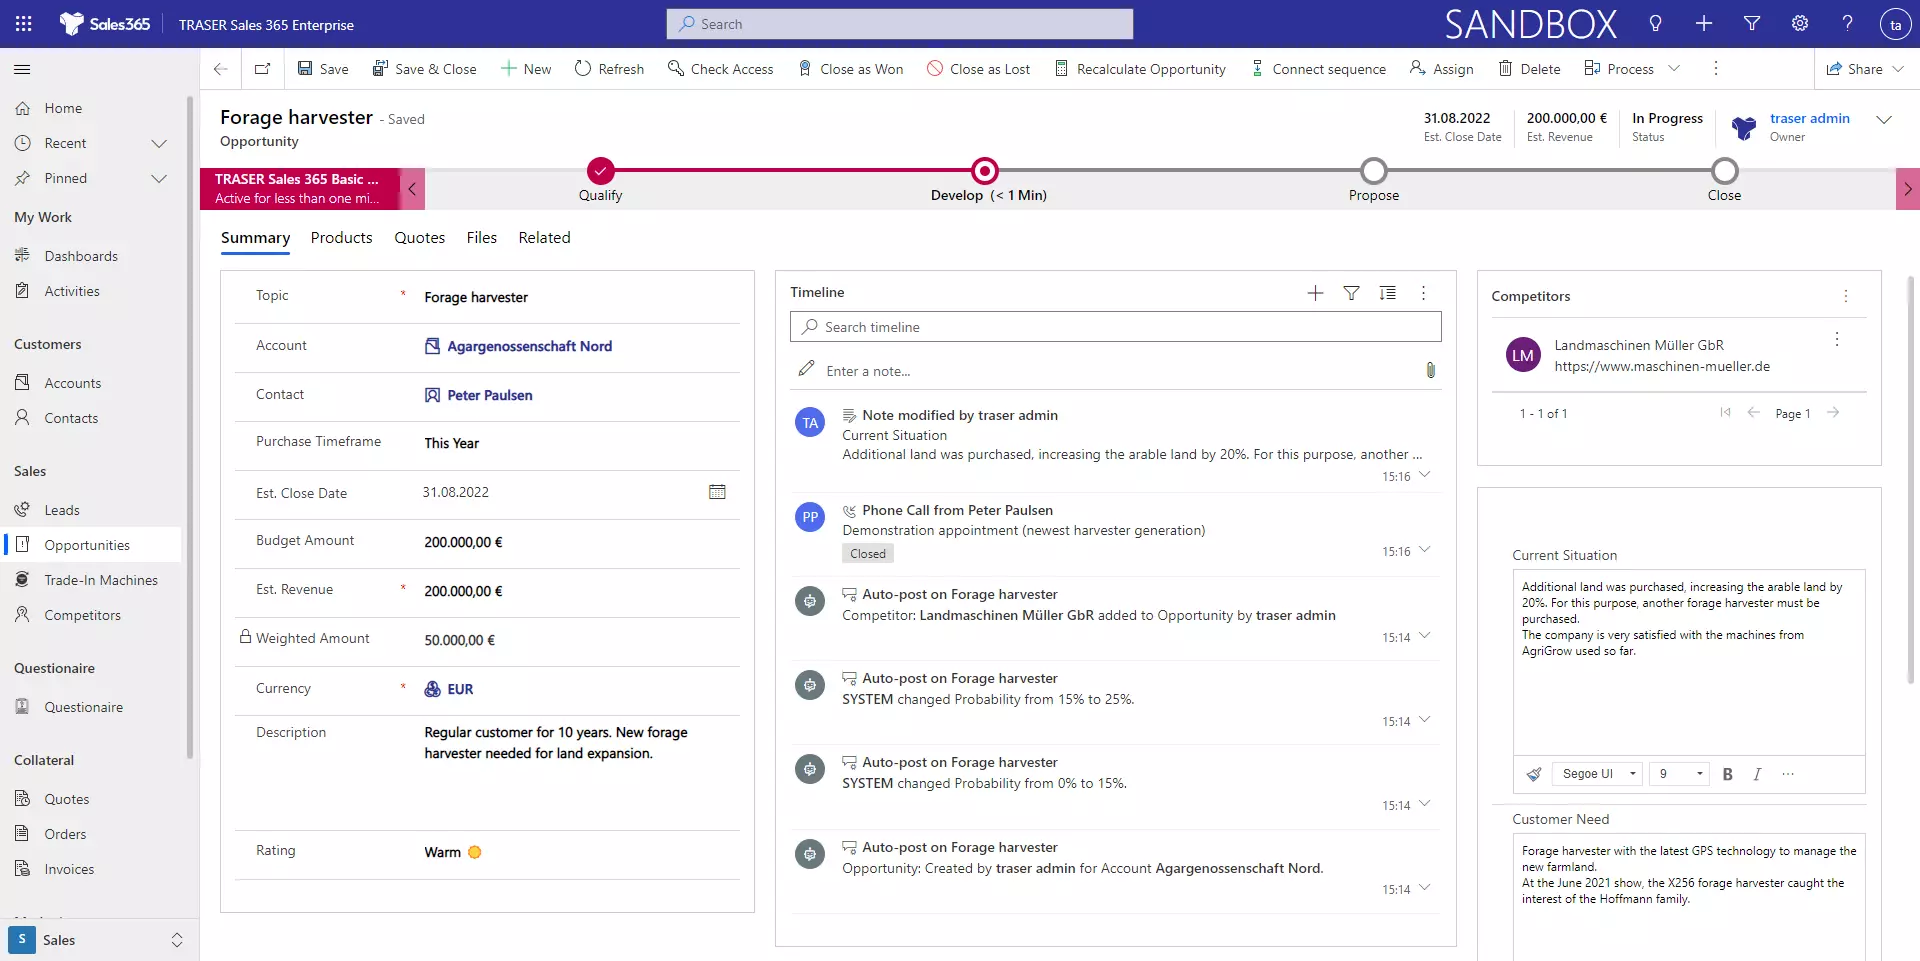
- Topic: What is the customer interested in.
- Account: The account associated with this sales opportunity.
- Contact: The contact that is assigned to the opportunity. The contact you select here will be added as a stakeholder in the opportunity.
- Purchase Timeframe: The timeframe by which the account or contact is likely to purchase.
- Est. Close Date: An estimated date by which the opportunity is expected to close.
- Currency: Select the currency for the opportunity. Here is the currency that will be calculated in the sales opportunity amount.
- Budget Amount: Enter a value to indicate the customer's potential budget.
- Weighted Amount: A calculated field that weights the expected sales based on the valuation and the current stage of the opportunity. Administrators can specify the calculation base on the configuration page.
- Est. Revenue: A calculated field for opportunities that have associated products. The estimated revenue is calculated based on the product's base price, volume discounts, taxes, manual discounts, and other price changes. (When opportunities are saved, Dynamics 365 Sales recalculates the estimated revenue based on any changes to the products or product quantities assigned to the opportunity).
- Rating: Select from the three ratings "Least Promising", "Promising" and "Very Promising" to assess the likelihood of successful completion.
- Competitors: Select those competitors who also has contact with the customer in relation to this sales project.
- Current situation: You have 2,000 characters of space to describe the current situation of the customer. If the sales opportunity arose from a lead, this and the two following fields were taken from the lead.
- Customer Need: Explain the specific need of the customer.
- Proposed solution: Note which solution from your portfolio best fits the customer's need, or which solution has already been proposed.
In the upper right corner, the most important data of the sales opportunity are summarized. Using the Down arrow, depending on the user's authorization, the Status and Owner fields can be adjusted.

- Status: The status in which the opportunities are located.
- Owner: Displays the owner of the opportunities. You can assign the opportunity to another user or team. To change the owner, you can select another user or team in this field or use the Assign button in the command bar to assign the opportunity to another user or team.
Use the sales process
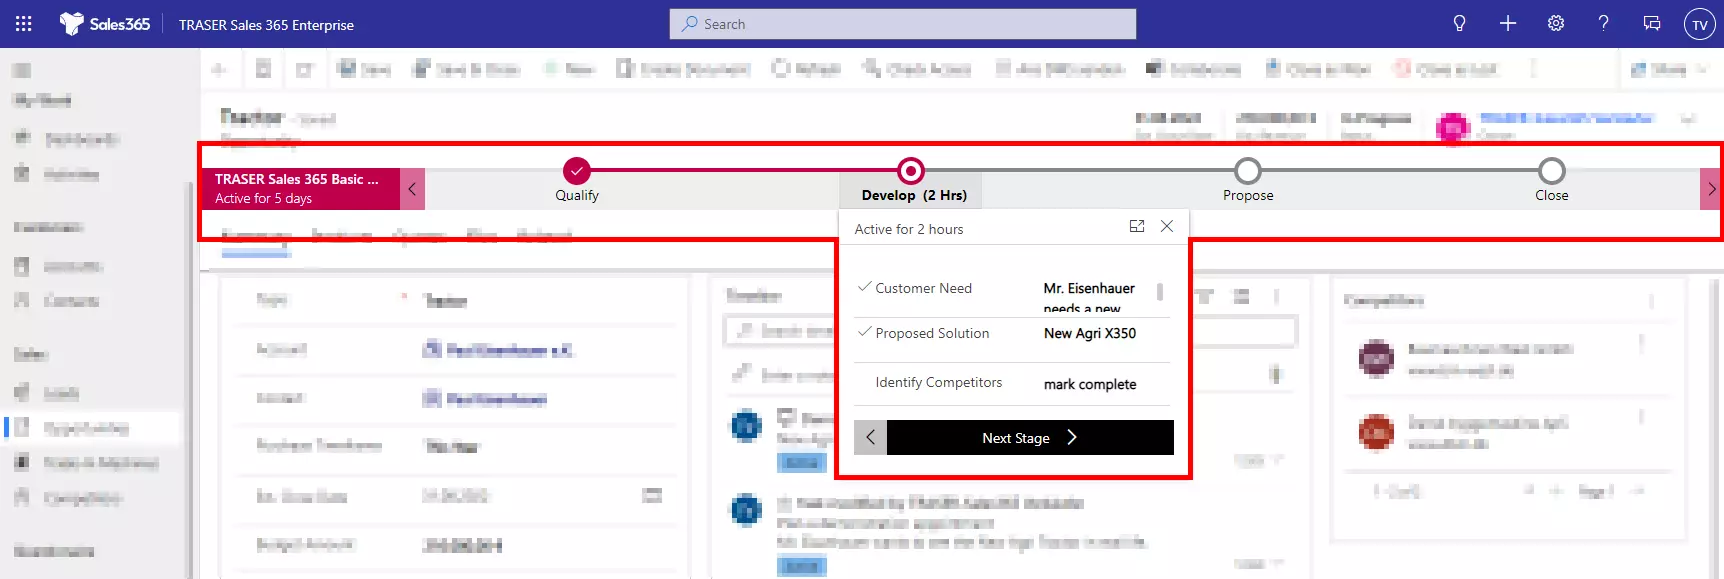
The sales process described in Working in the Sales Process is displayed at the top of the lead and opportunity forms. This representation of the sales process is intended to assist the salesperson in completing tasks during the process and documenting them. In each stage, fields are to be filled out and tasks are to be marked as "completed". Once all tasks in a stage have been completed, the Next Stage button can be used to activate the next stage. This has the effect of increasing the weighted sales and assigning the opportunity to the next stage in the sales to funnel display (see Power-BI Reports).
The administrator can configure the stages of the sales process. Partially, fields in this process representation and the form below are synchronized. Mandatory fields are marked with an asterisk *. To switch to the next stage, these fields must be filled or the tasks must be marked as completed.
Adding products to an opportunity
You can add a product that is already in the TRASER Sales 365 product catalog or add a write-in product. All products added to an opportunity are automatically assigned to quotes generated by the opportunity.
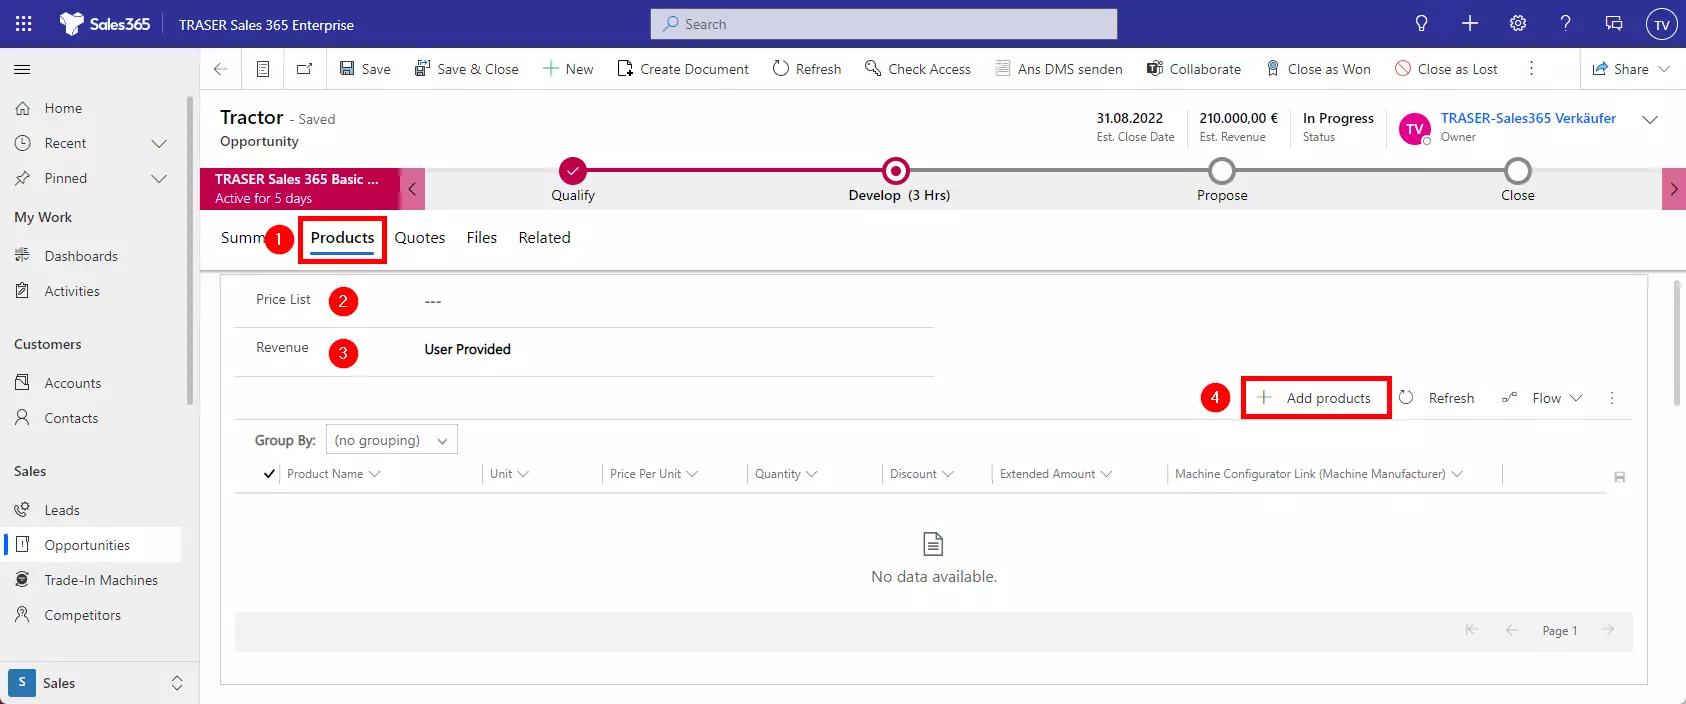
- In the form of an opportunity, select the Products tab.
- Select a price list. The price list determines the cost of the product and the products you can select.
- Under Sales, proceed as follows:
a. Select to calculate the estimated sales of the opportunity based on all products added to the opportunity and select System Calculated.
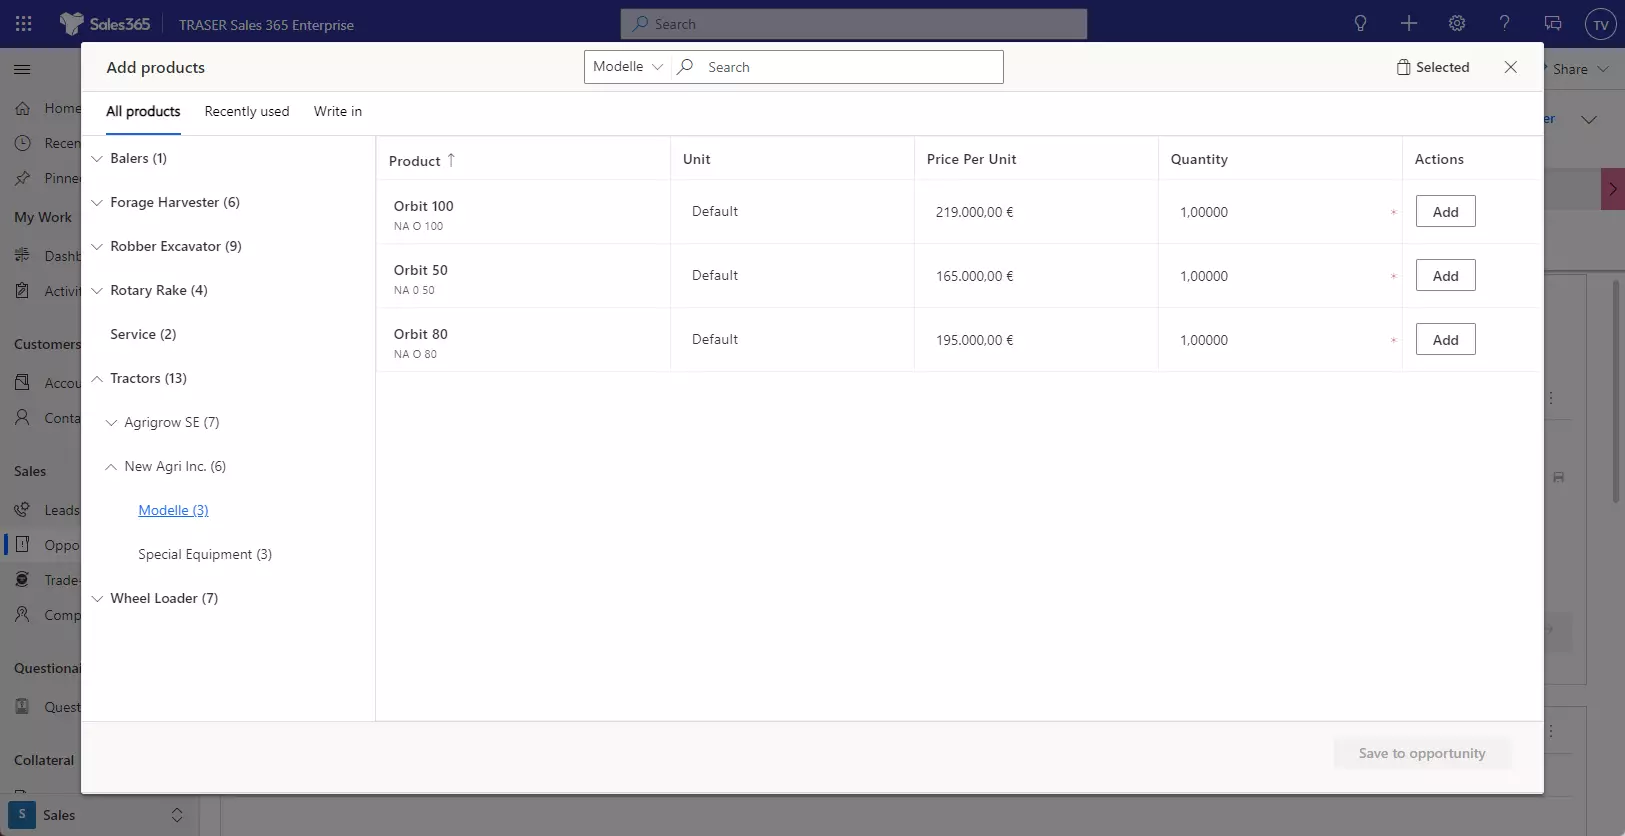
b. If you want to use a custom pre-calculated turnover, select User Provided. - Select Products and Add products to the grid.
- Use one of the following options to identify and add products:
a. If you know the product names, just search for them and add them.
b. If you want to select products from a specific product family, use the left pane or the drop-down menu in front of the search box to filter products by family.
c. If you want to add products that you have recently selected for another opportunity, open the Recently Used tab.
d. If you want to add a product or service that is not in the standard product catalog but is specific to the opportunity, open the Enroll tab and create a product on the fly. - In the Price Per Unit column, do one of the following:
a. If no price list is assigned to the product, enter the price manually.
b. If a standard price list is assigned to the product, the Price Per Unit will be filled in according to the associated price list. - Enter the desired quantity and select Add.
- Repeat steps 5 to 7 for each product you want to add.
- Select Save to Opportunity when you are finished.
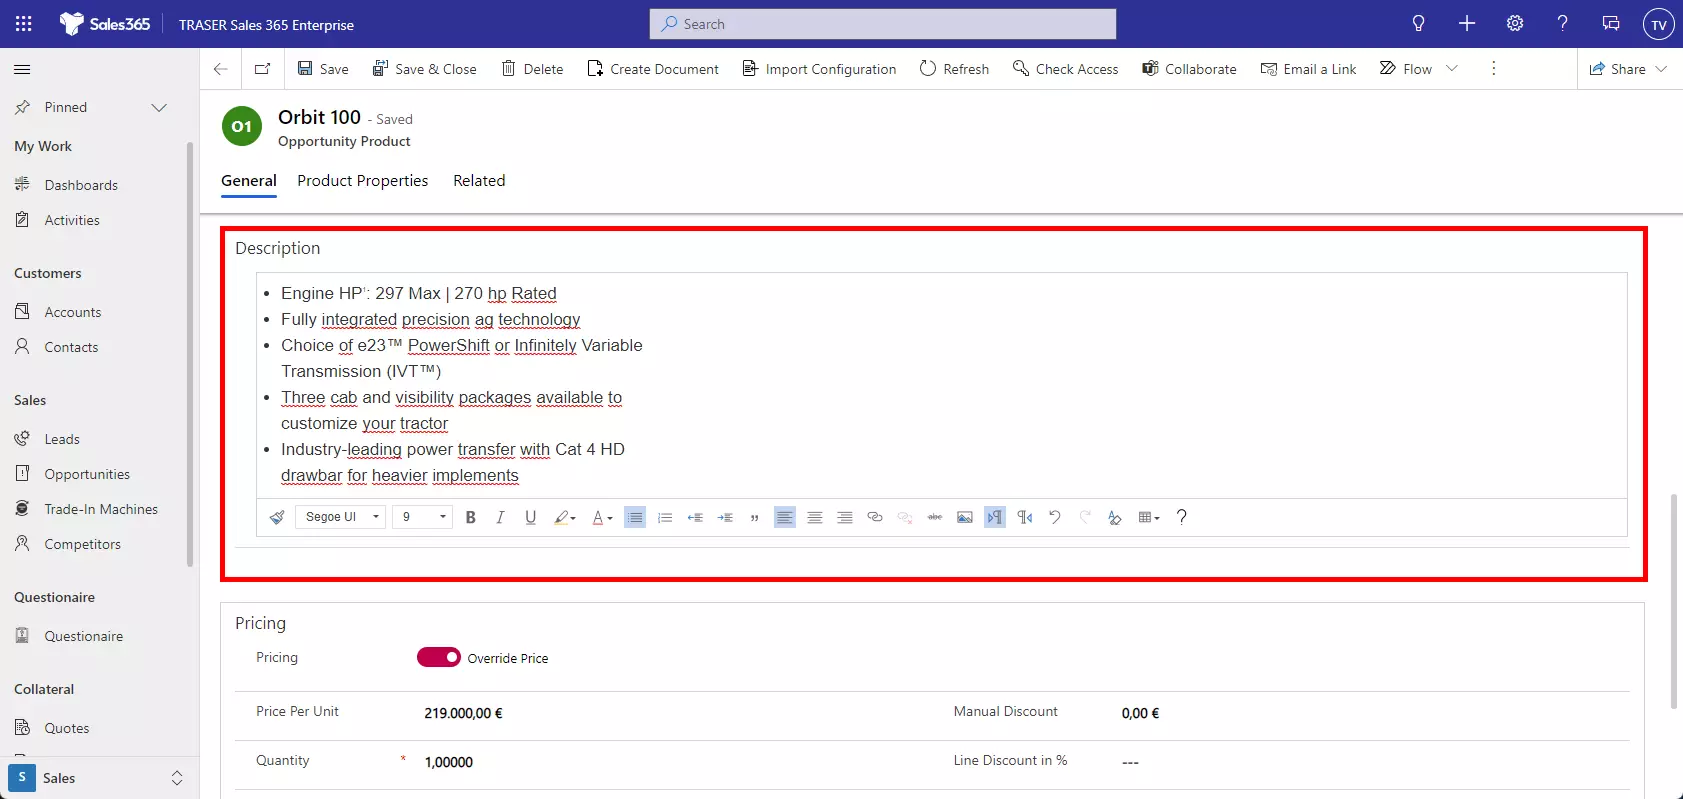
After adding the products to the sales opportunity, you can edit and describe these products in more detail. Quantity, Line Discount in %, and a Manual Discount can be entered directly in the line. To add more details, double-click on a product or the 
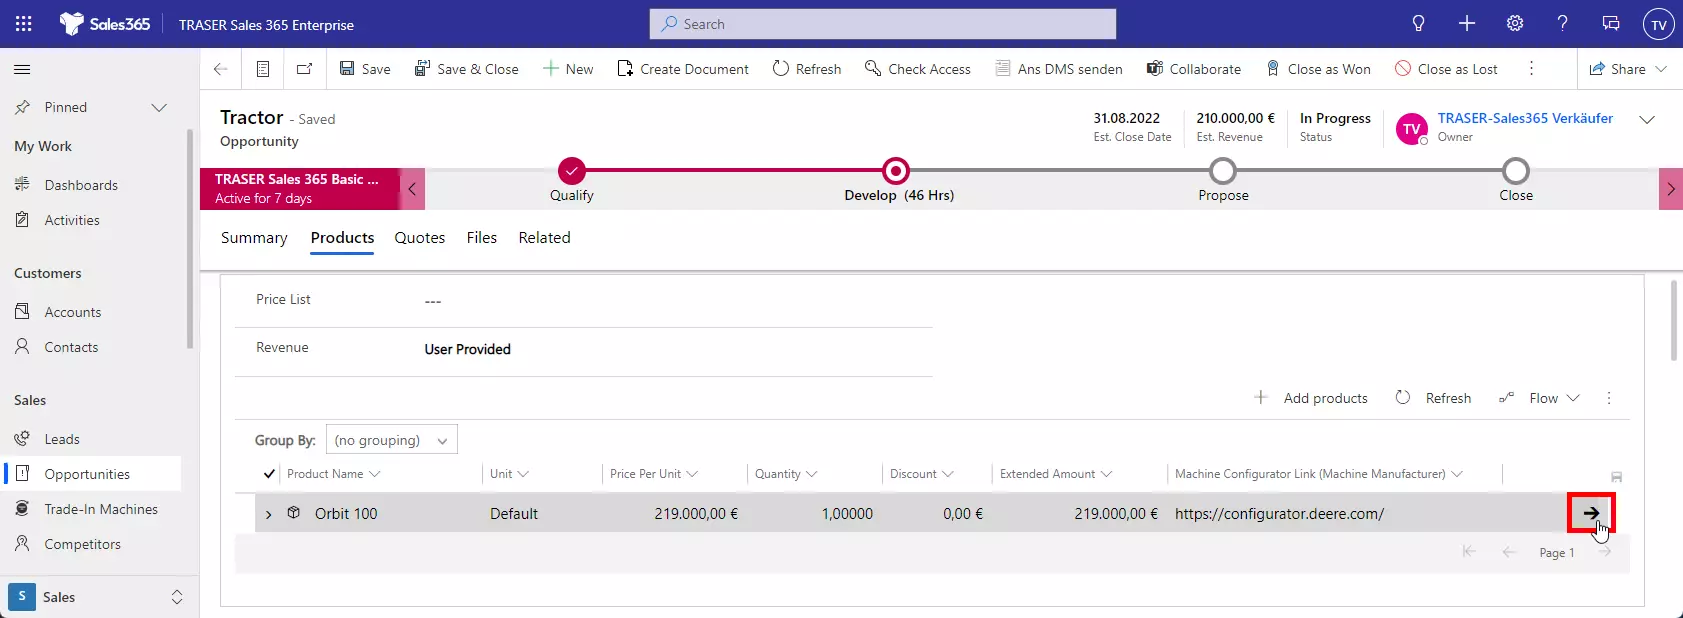
The form of the selected sales opportunity line will open. In the Description section, you can add a long description text (up to 10,000 characters) for this product. This text will be applied when creating a quote and can also be printed on the PDF export.
If you want to delete products from an opportunity, select the products you want to remove in the subgrid and then select Delete Opportunity Product. The selected products will be removed from the opportunity after you confirm the deletion.
Closing an opportunity as won or lost
Once your customer has accepted or rejected your quote, it's time to close the opportunity.
-
Open the corresponding sales opportunity
-
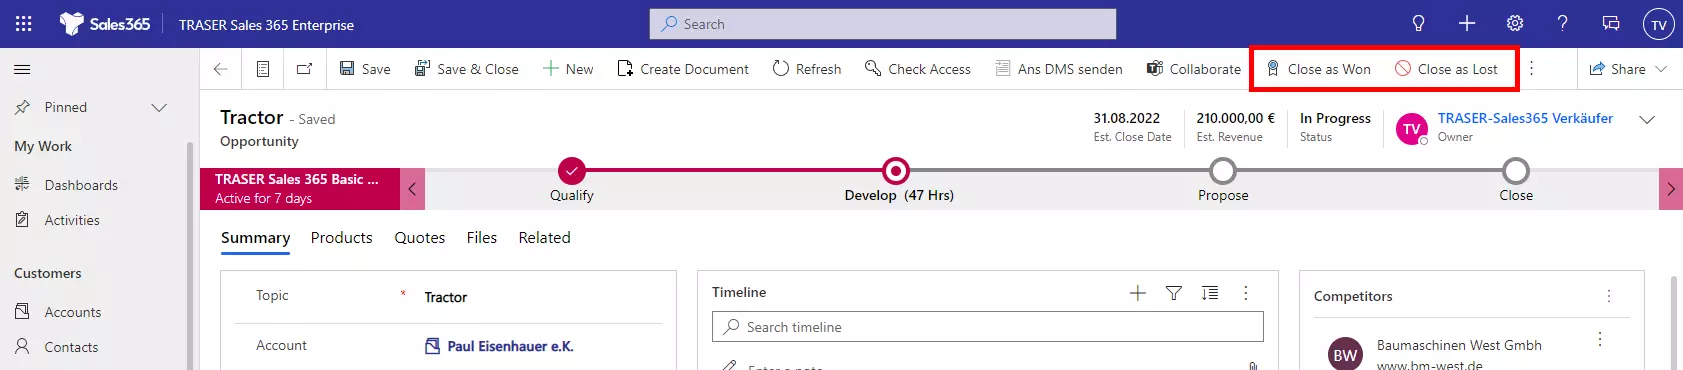
In the upper part of the Opportunity form, perform one of the following actions:
a. To close the opportunity as won, select Close as Won.
b. To close the opportunity as lost, select Close as Lost.
-
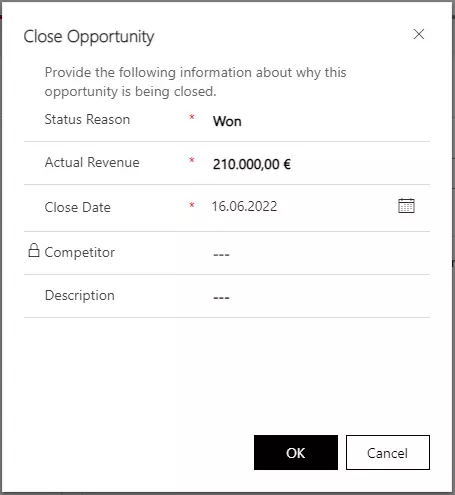
If you close the opportunity as Won in the Close Opportunity dialog box, perform the following steps and select OK:
a. Actual Revenue: confirm the quantity and make a change if necessary.
b. Description: enter details about what contributed to winning this sales opportunity.
-
If you close the opportunity as Lost in the Close Opportunity dialog, perform the following steps and select OK:
a. Competitor: select a competitor to whom you have lost this sales opportunity.
b. Description: add more details about why the opportunity was lost.