Products and price lists
Table of contents
Define unit groups
Units are the quantities or measurements in that you sell your products or services in. For example, if you sell gardening supplies, you might sell seeds in units of packets, boxes, and pallets. A unit group is a collection of these different units.
In TRASER Sales 365, you first create a unit group and then create units within that group.
In the Setup area, navigate to Unit Groups from the site map, and then click New or an existing unit group.
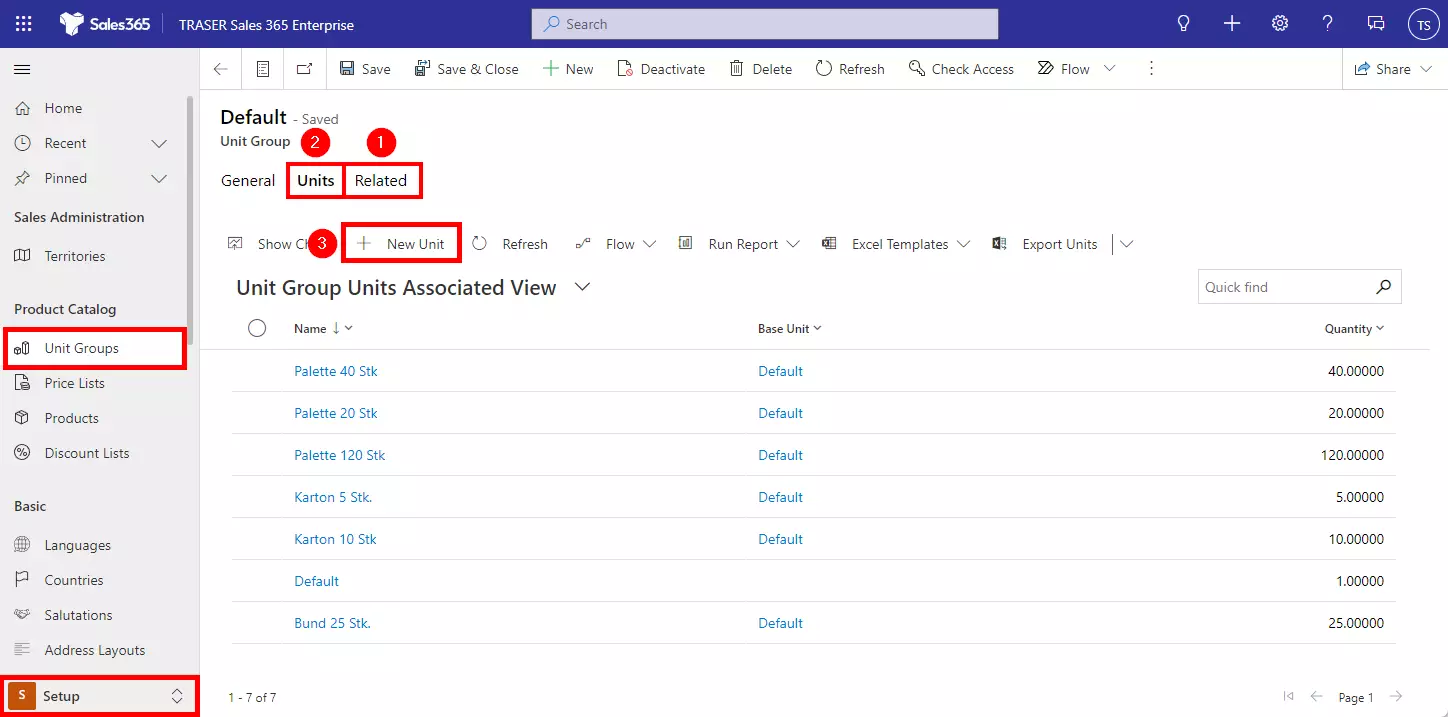
In the unit group tab, click Related (1) to display the Units tab (2). There you can see all stored units and their absolute quantities. Click on Create unit to add another unit.
Set up product families
Make it easier for salespeople to find products and services in a product catalog by creating a product family and classifying similar products.
A product family lets you group and categorize products, making it easier for you to manage them. With product families, you can:
- Categorize your products in whichever way is most meaningful to your organization.
- Create child products and product bundles within a product family. (Product bundles allow you to sell multiple items together.)
- Create as many levels of product families as you want by creating a family within a family.
Important!
To create products and product families, first you must set the language of your profile to English. You can undo this after the setup. To do so, follow this explanation.
To add product families, navigate to the Setup area (1) and select Products (2) in the sitemap. Click the Add Family button (3). Specify the name of the product family under Name. A Product ID must also be specified. Click Save & Close to complete the creation of this product family.
Set up products
Your sales reps use the products to generate sales quotes, marketing campaigns, orders, and invoices.
Note
Before you start creating products, first create a default price list. To do this, navigate to the Setup area and select Pricelists in the sitemap. Click the New button, define the name (e.g. "Default Price List") and click Save & Close. Learn more: Create price lists.
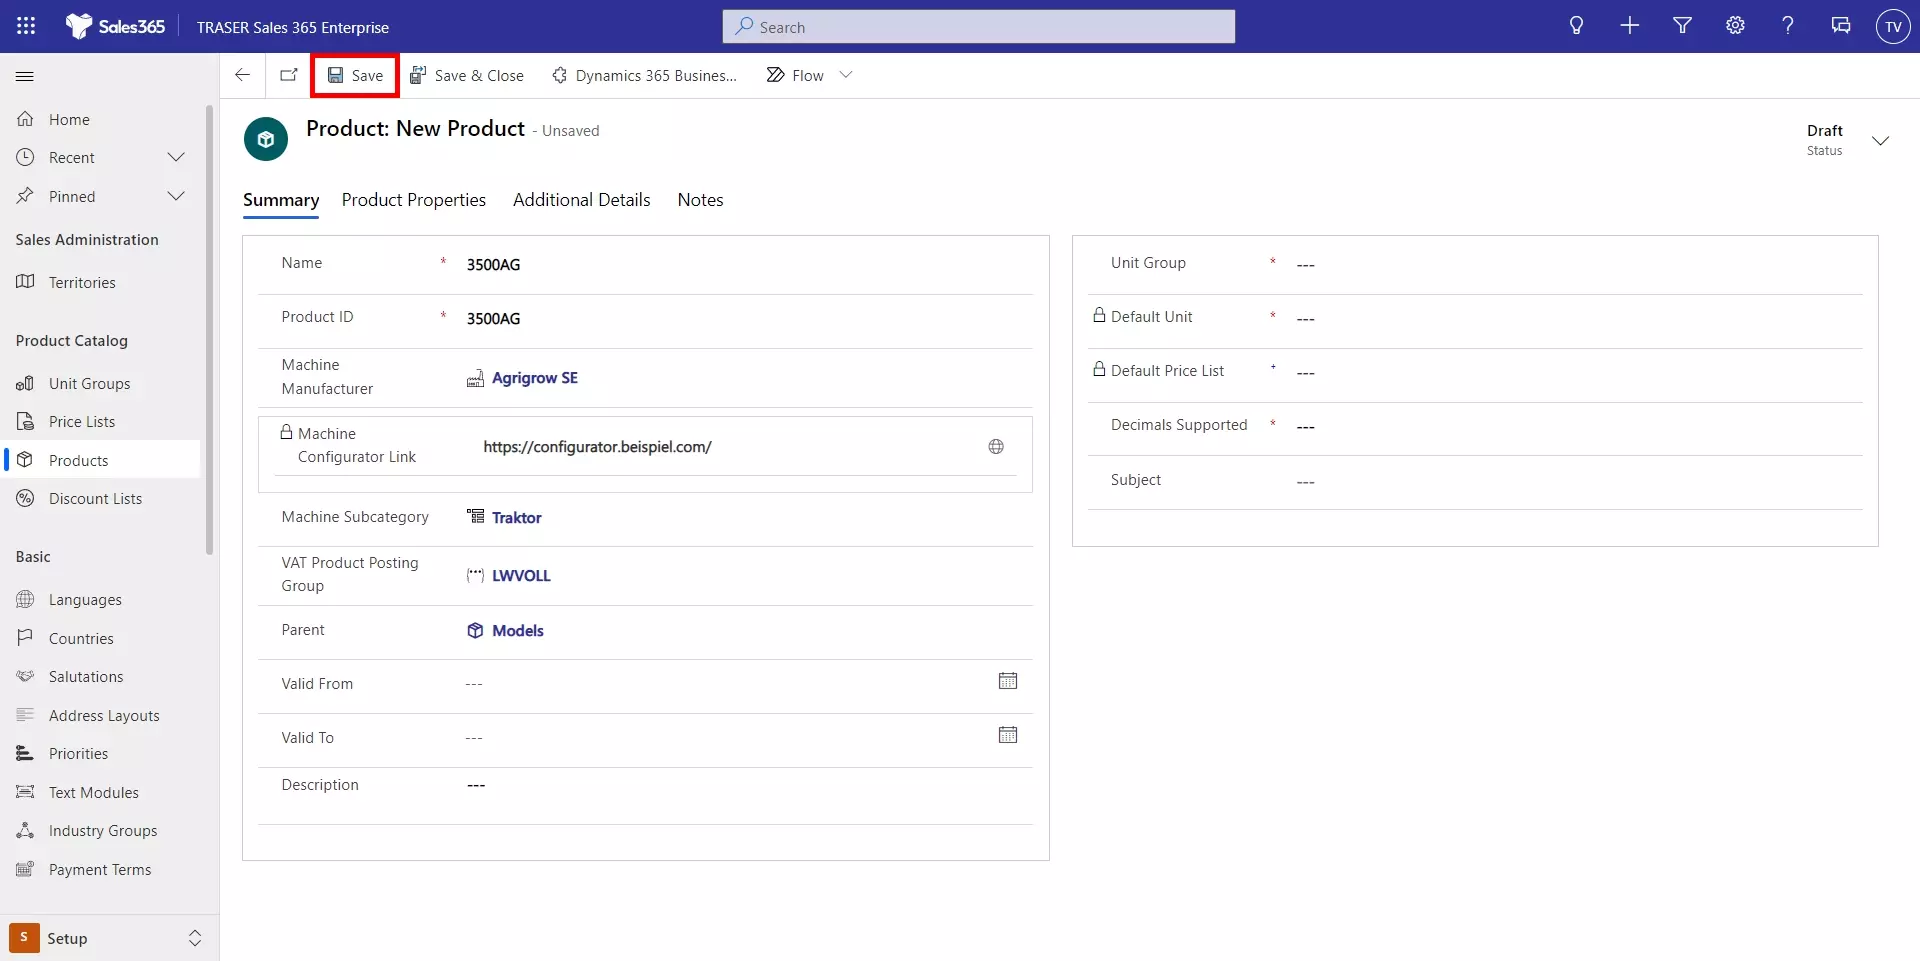
Navigate to the Setup section (1) and select Products (2) from the sitemap. Click the Add Product button (3).
Enter the following information in the product form and then click Save:
- Product Name
- Product ID
- Machine Manufacturer and Machine Subcategory: If you use TRASER Sales 365 Machine Dealer you can select here the manufacturer of the machine and the corresponding machine category. This is necessary if you want to use the import of configuration files or machine attributes.
- MwSt. Product Posting Group: Select the VAT product posting group here. Product Posting Group. This defines the calculation of tax for this product. Learn more about the tax calculation in TRASER Sales 365.
- Parent: Select a product family to which the product belongs. To learn how to set up product families, click here: Set up product families.
- Valid From/Valid To: Define the period during which the product is valid by selecting a Valid From and Valid To date.
- Unit Group: Select a unit group. A unit group is a collection of different units in which a product is distributed, and it defines how individual items are grouped into larger quantities. For example, if you add seeds as a product, you may have created a Seeds unit group, and its primary unit is defined as a package.
- Default Unit: Select the most common unit in which the product is calculated. Units are the quantities or measurements in which you sell your products. For example, if you add seeds as a product, you can sell them in packages, boxes, or in pallets. Each of these becomes a unit of the product. If seeds are mostly sold in packages, select this as the unit.
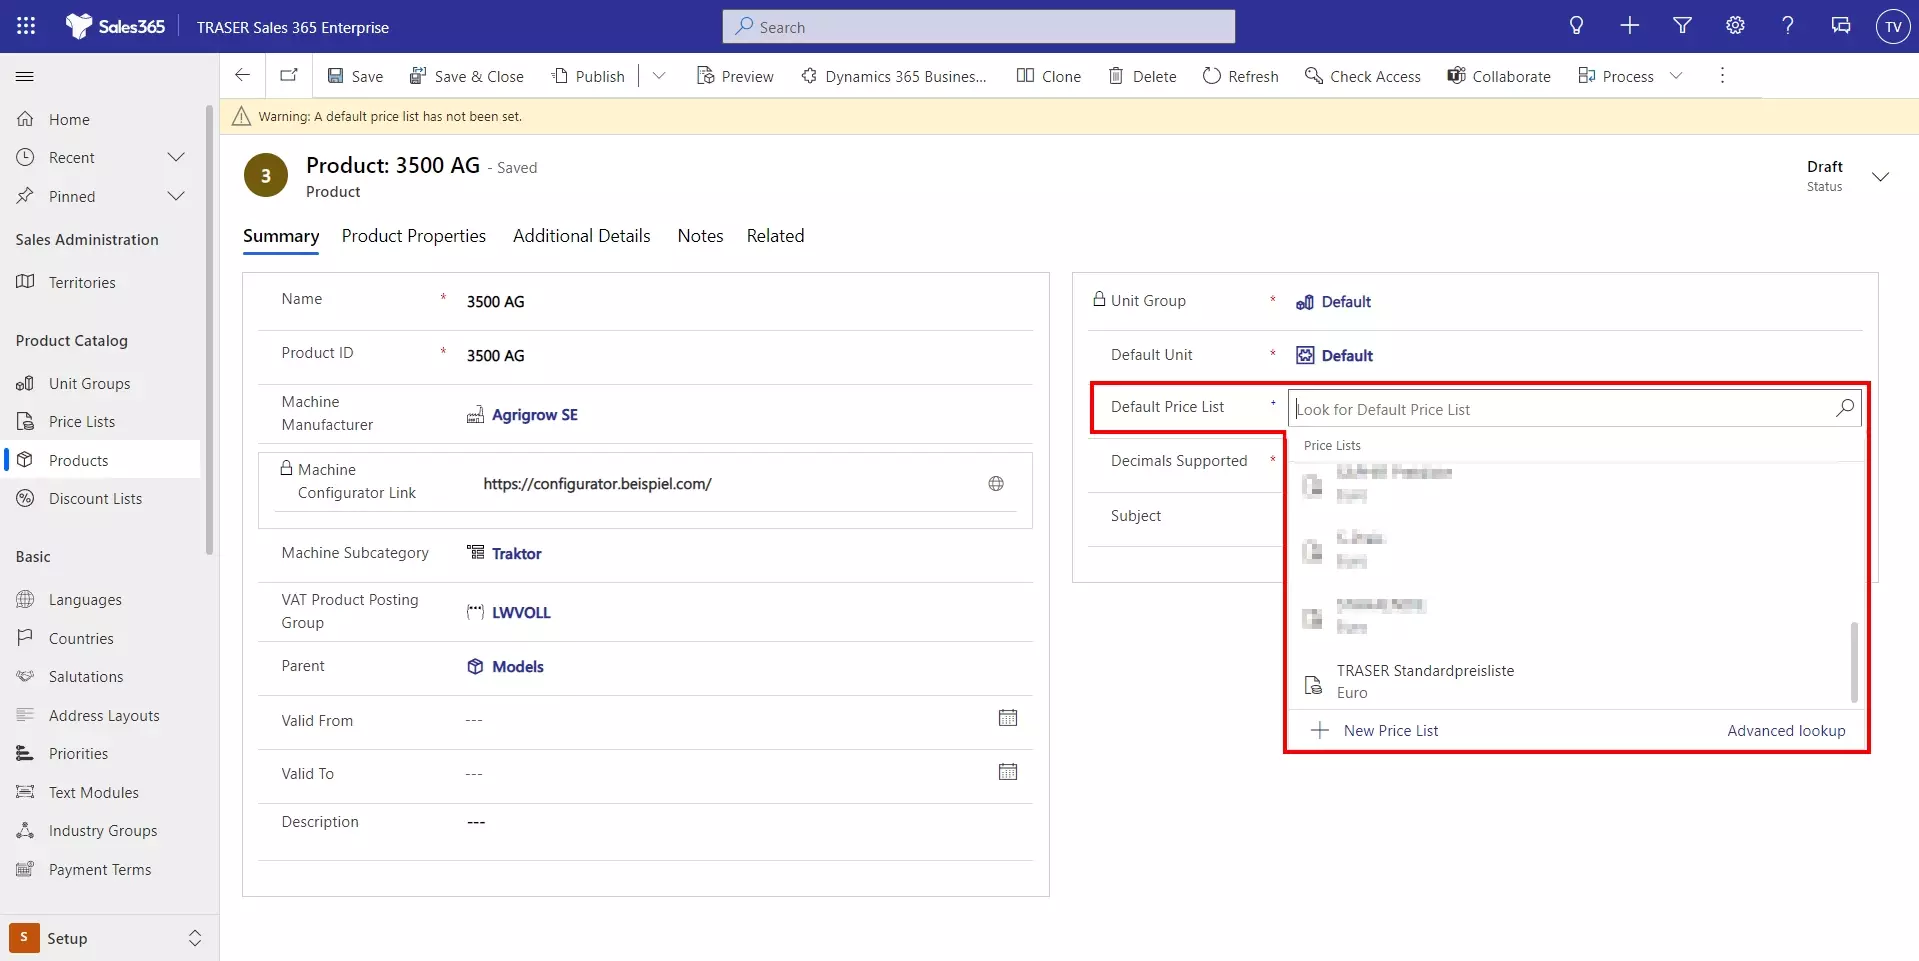
- Default Price List: For a new product, this field is read-only. Before you can select a default price list, you must complete all required fields and save the record. While the default price list is not required, it may prove useful to set a default price list for each product after saving the product record. Then, if a customer record does not contain a price list, Sales' default price list can be used to create quotes, orders, or invoices.
- Decimals Supported: Enter an integer between 0 and 5. If the product cannot be divided into subsets, enter 0. The number of digits in the Quantity field in the quote, order, or invoice product record is compared to the value in this field if the product does not have a price list associated with it.
- Subject: You can assign this product to a subject. You can use subjects to divide products into categories and filter reports.
After saving you will get a warning message. Now select the default price list in the Default Price List field. Learn how to create price lists here: Create Price Lists.
After the product is created, you can add it to a price list so that the products in the opportunities, quotes, orders, and invoices will have a price directly assigned to them. To do this, navigate to the Additional Details tab and then click the New Price List Item button.
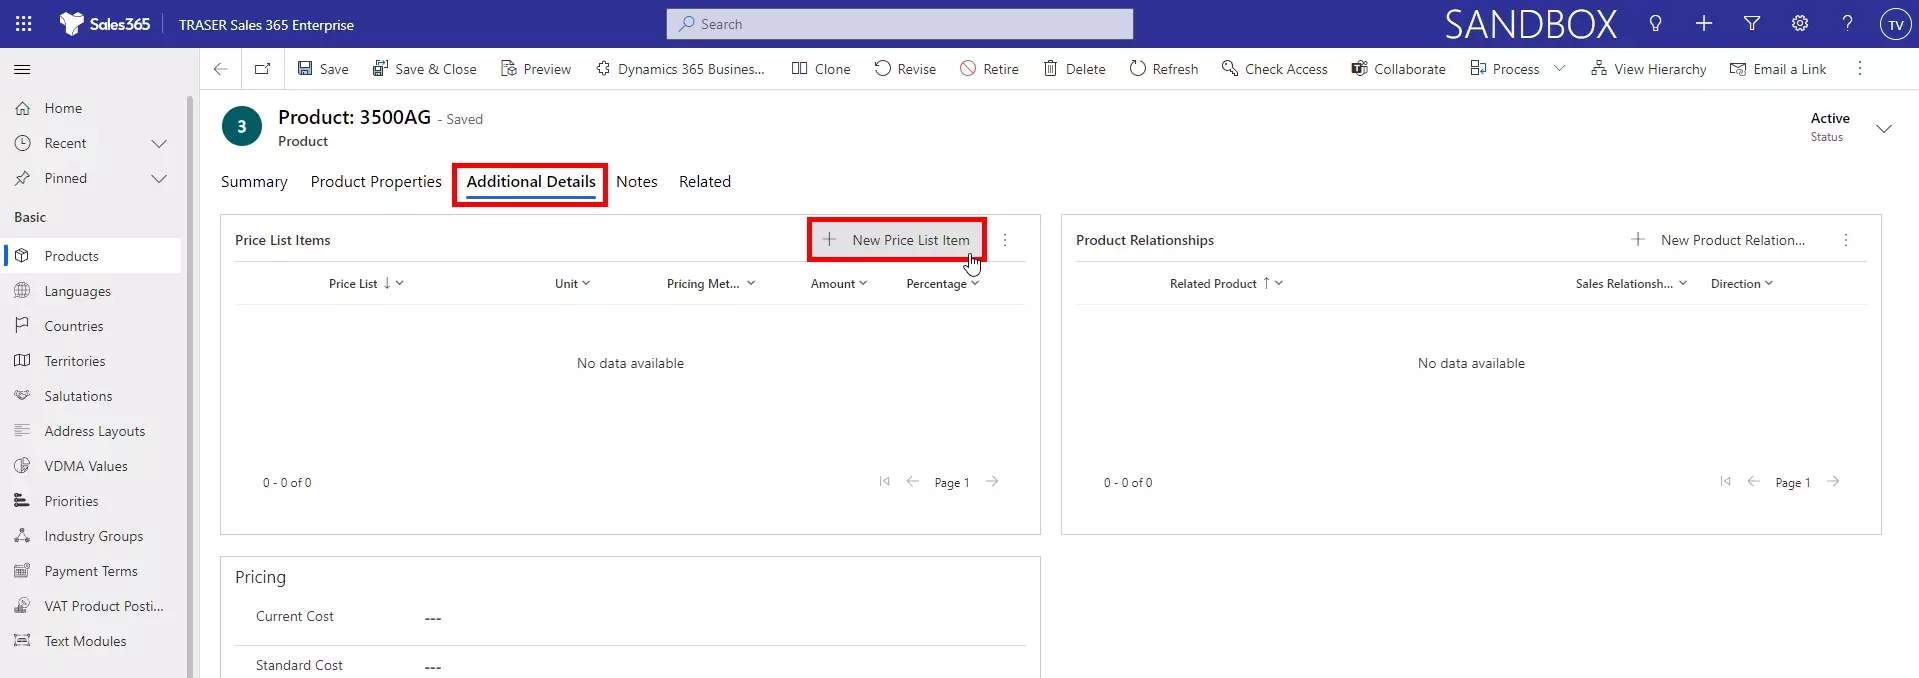
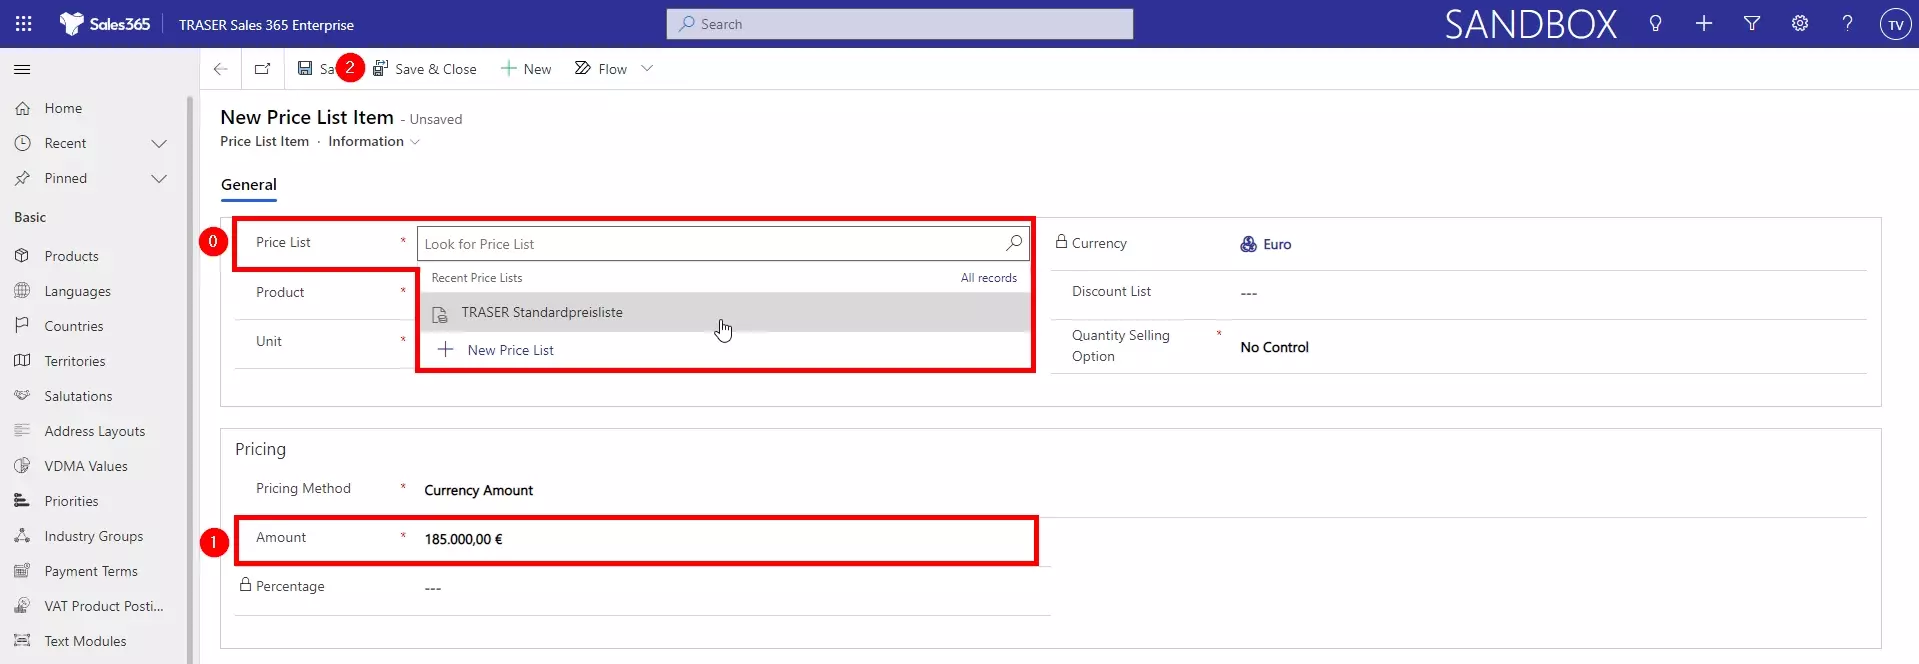
The form of the Price List row will open. Under Price List (1), select the price list where you want to add the product and its price. Under Amount (2), enter the net amount of the product in this price list and then click Save & Close (3).
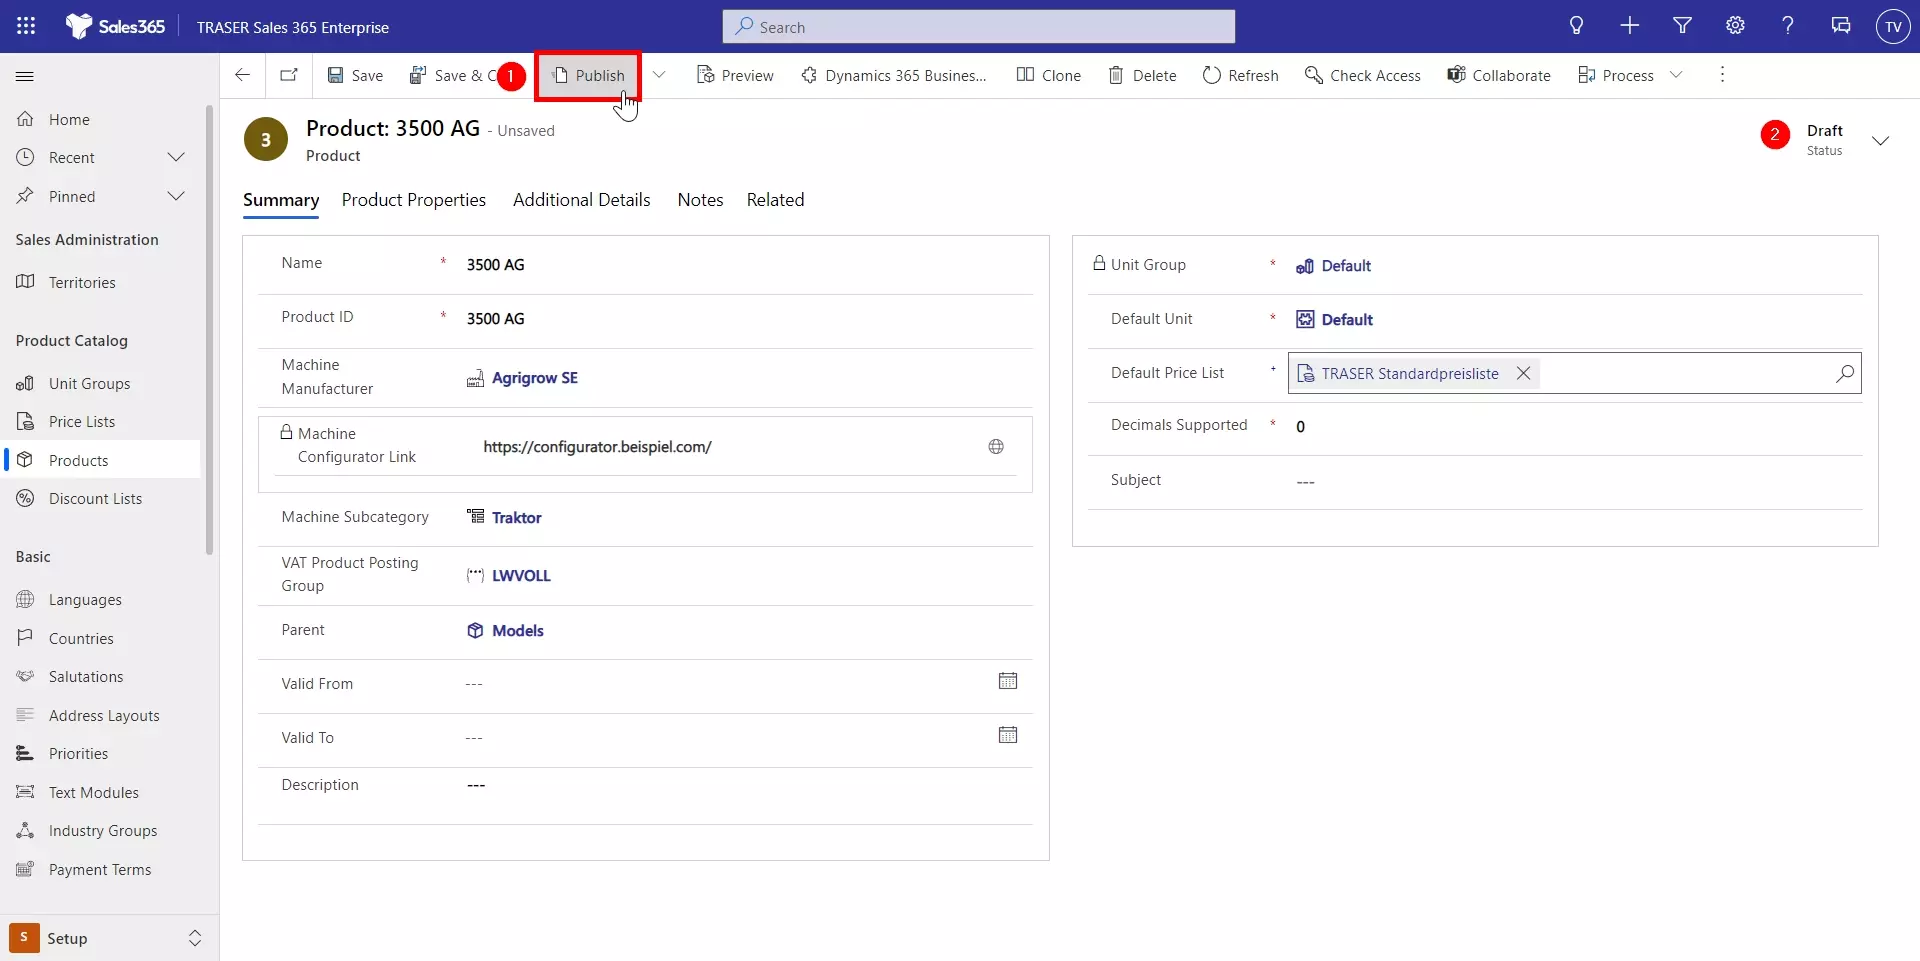
Now you need to publish the product to be able to use it in opportunities, quotes, orders, and invoices. To do this, click Publish (1) and click Confirm in the dialog box. The status of your created product changes from Draft to Active (2).
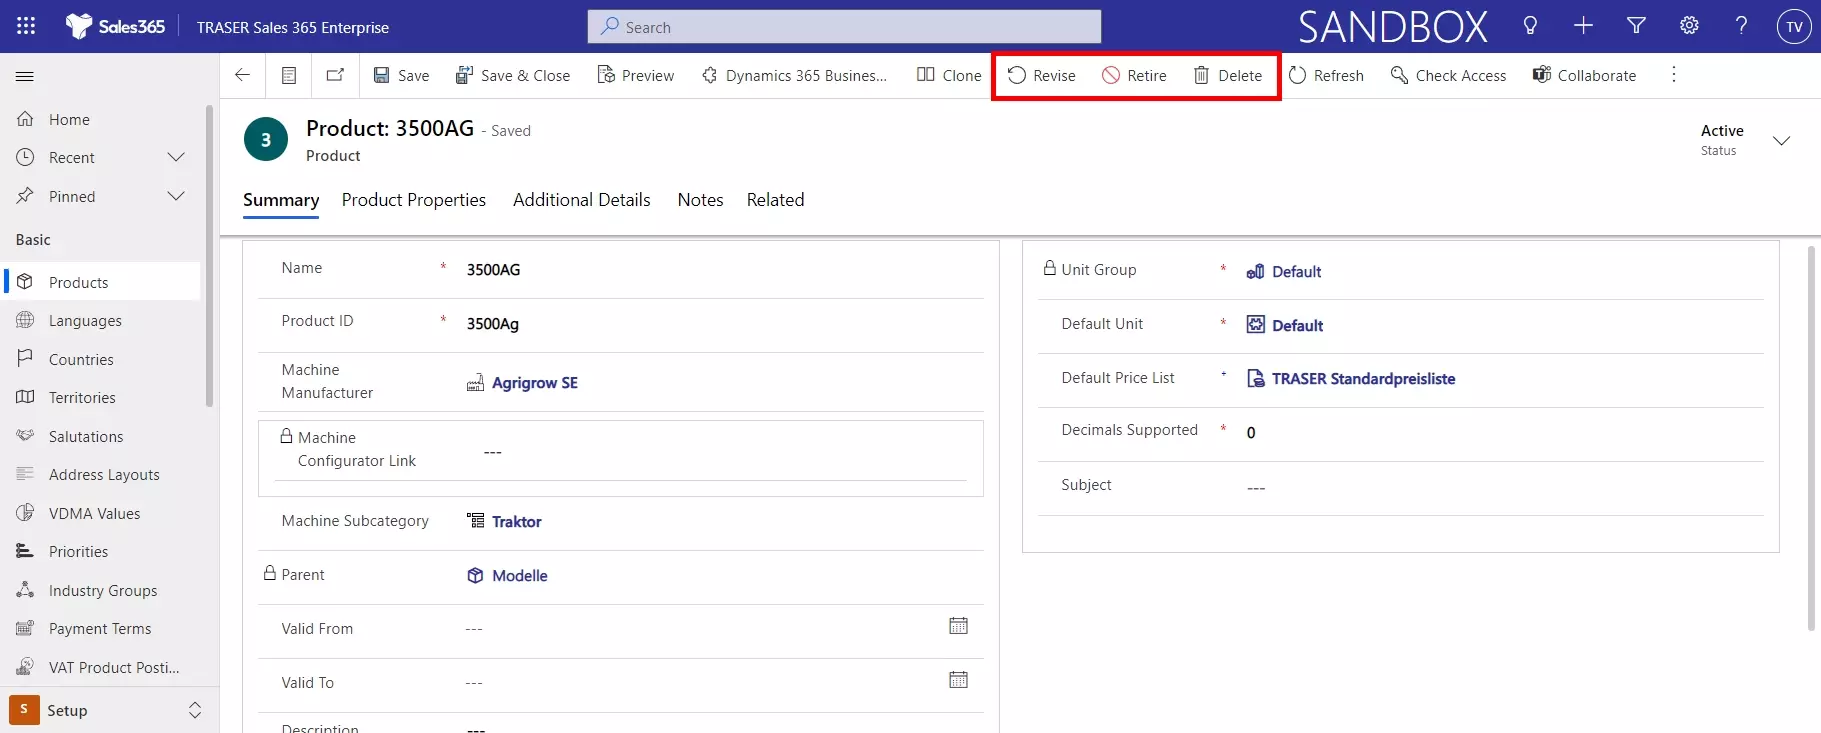
Important!
To make changes to the product properties or temporarily disable the product, click the Revise button. If you use the Retire button, the product will be permanently disabled and cannot be reactivated. However, you can still open and view the product record in this state. Use the Delete button to irrevocably delete the record from the system.
Set up discount lists
Motivate customers to buy more by offering them discounts on bulk purchases. To offer discounts, you need to set up a discount list.
In the Setup area, navigate to Discount Lists in the sitemap and click New.
Enter the information and select Save:
- Name: enter a name that vividly describes the type of discount in the list.
- Type: To calculate the discount as a percentage of the item's price, select Percent, or to apply the discount as a fixed amount, select Amount.
-
Currency: If you decided to give the discount as a fixed amount, select the currency.
If you want to add discount details to the list, select the Related tab, and then select Discounts.
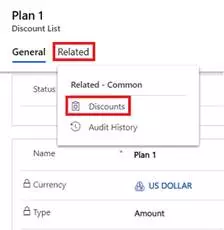
On the Discounts tab that opens, click the New Discount option.

In the New Discount form, fill in the following information, and select Save & Close:
- Begin quantity: Enter the minimum quantity a customer should purchase to be eligible for the discount.
- End quantity: Enter the maximum quantity for which the discount is applicable.
- Percentage or Amount: Enter the percentage of the amount of discount the customer will receive.
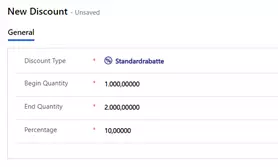
For example, this discount list offers a 10% discount whenever the customer buys between 1,000 - 2,000 pieces.
Create price lists
Price lists tell your sales agents what to charge for your products or services. You can create multiple price lists so that you can maintain separate price structures for different regions, sales channels, or sales territories.
Price lists tie the unit, product, and pricing details together, so before you create a price list, make sure the units and products are in place.
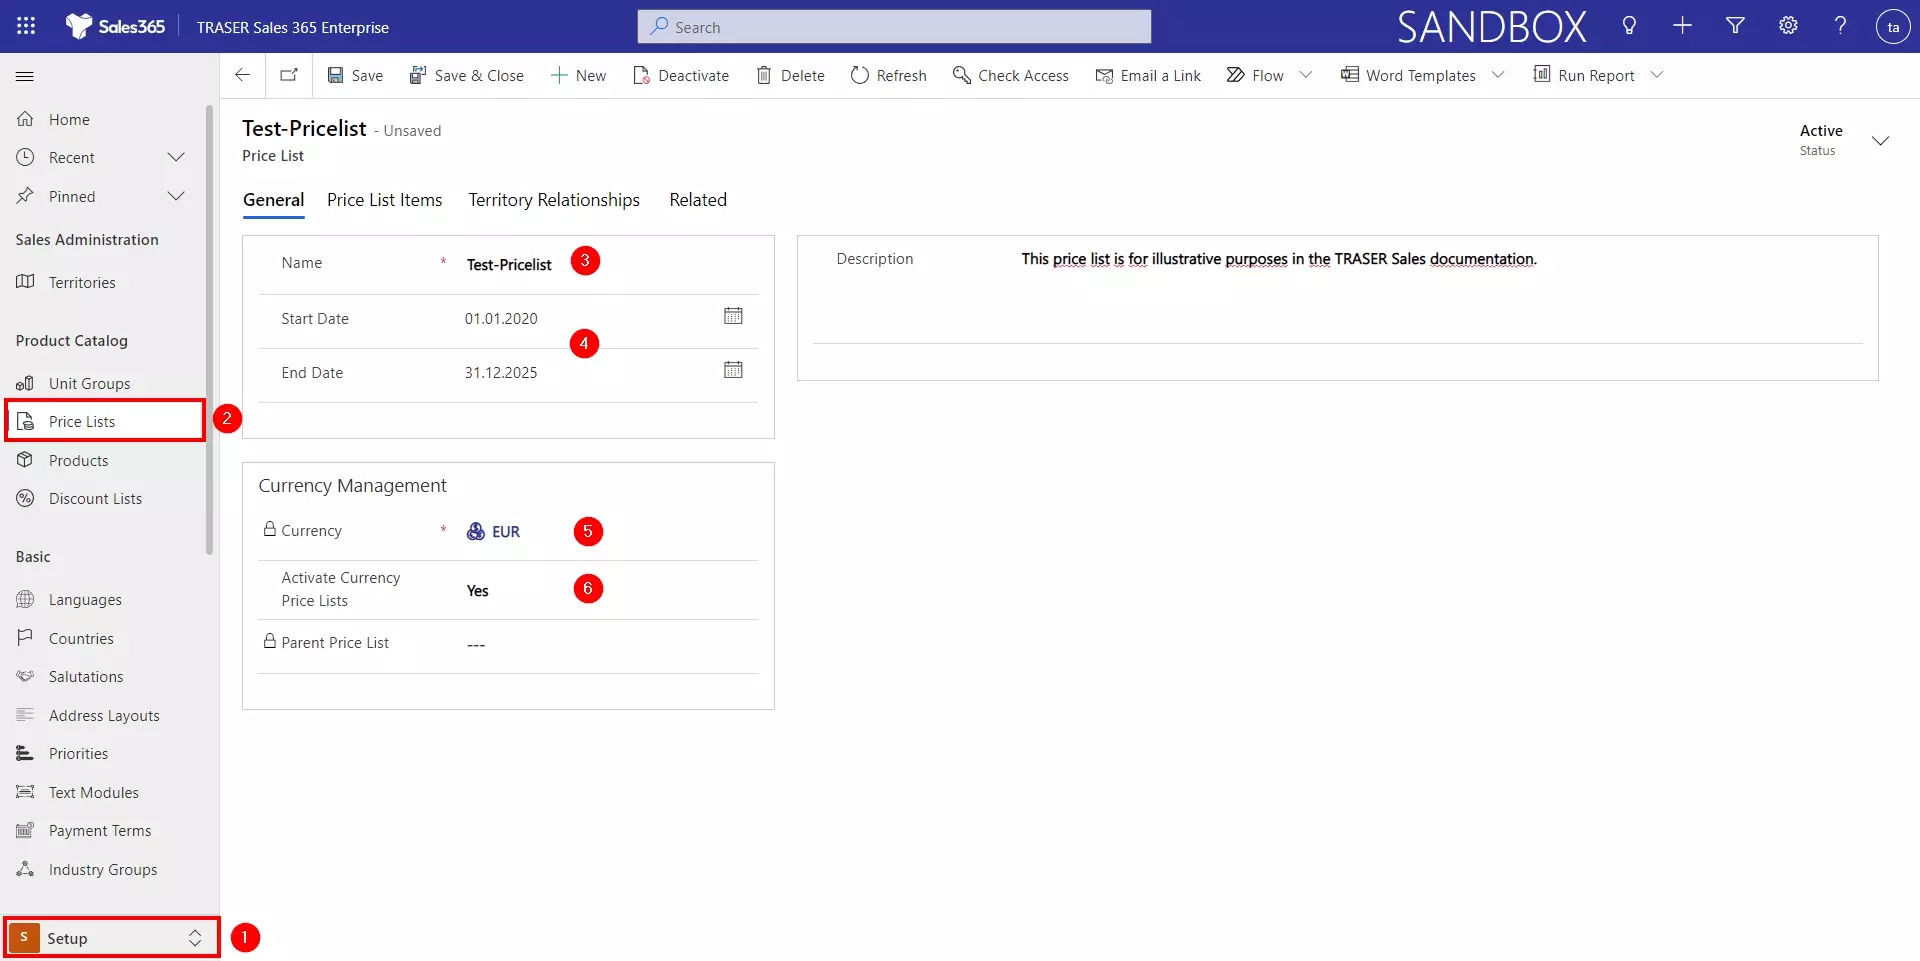
In the Setup (1) section of the sitemap, navigate to Price Lists (2). Create a new price list by clicking the New button or selecting an existing price list. On the first tab, you can define not only the Name (3) but also the validity (4) and, in the case of a new creation, the Currency (5).
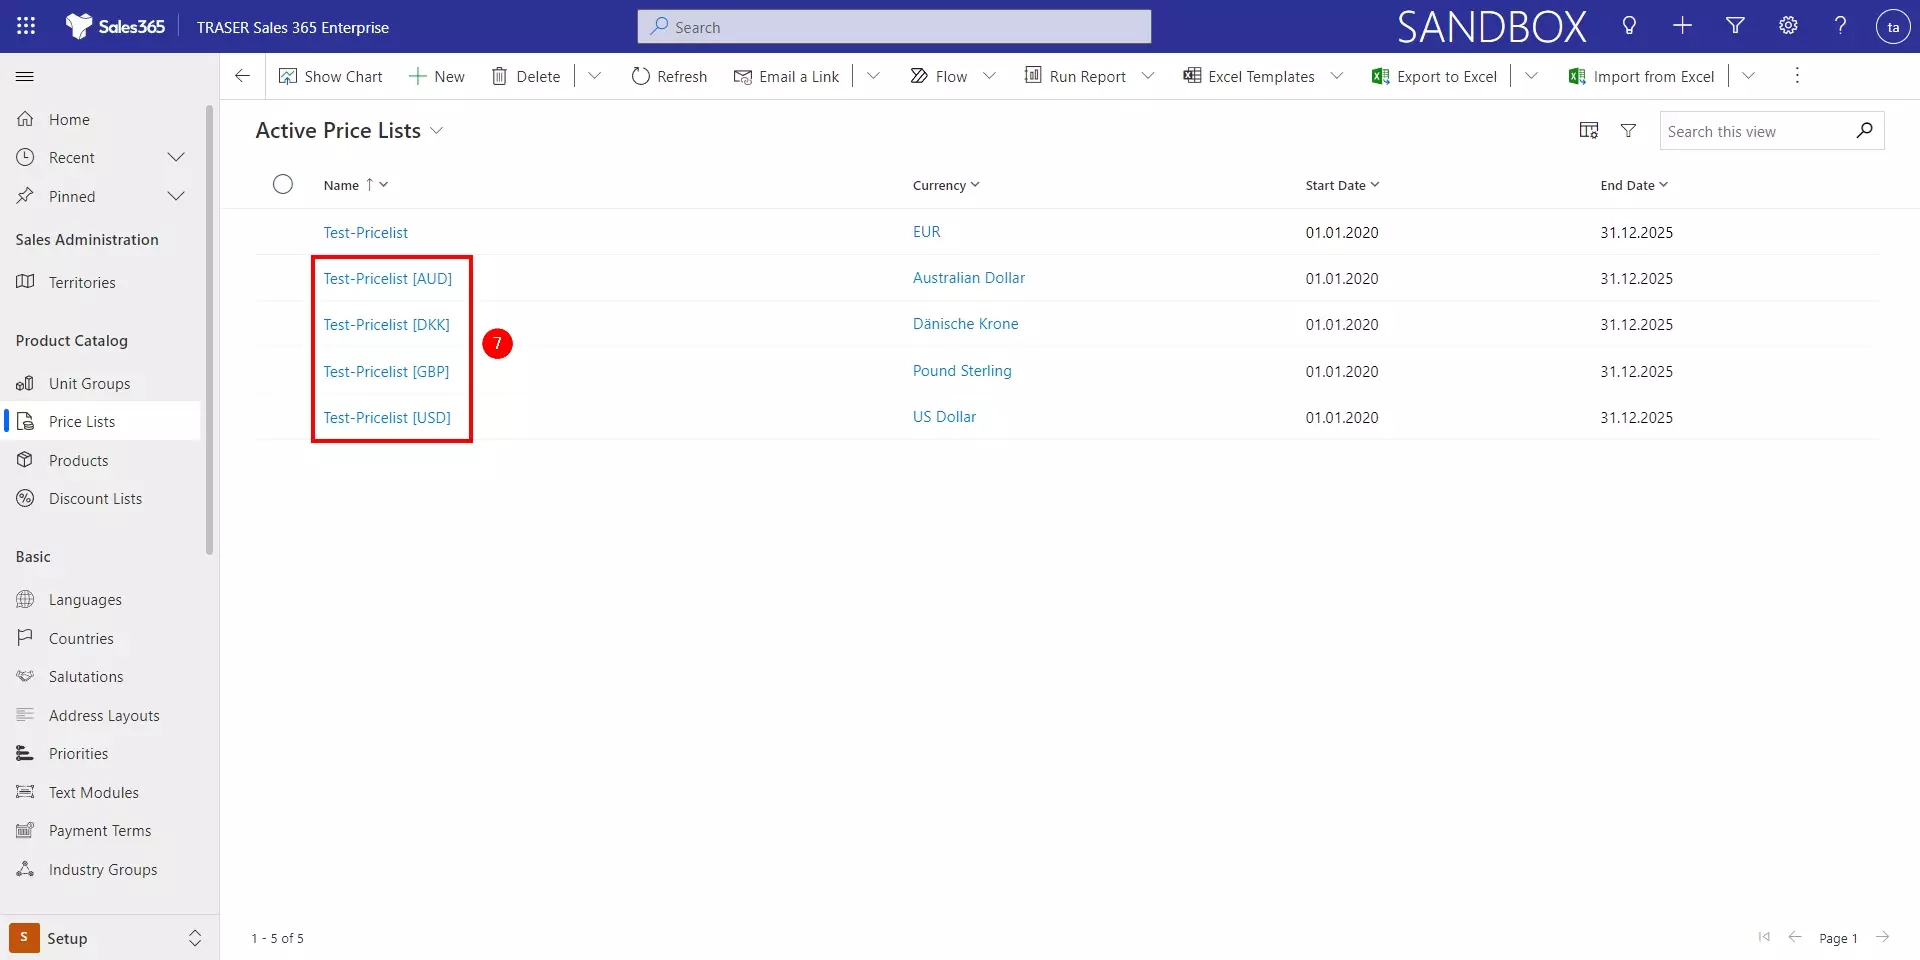
TRASER Sales 365 offers the function to automatically create subordinate price lists in other currencies. For this, you have to set the option Activate Currency Price List in the parent price list to Yes (6). In the background, a new price list with the name "Name Parent Price List" ["Currency Code"] is created for each currency created (7). The currency price lists inherit the properties and price list elements of the initial price list. On the configuration page, you set up whether the currency price lists and their elements are read-only or remain editable (see Locking currency price lists).
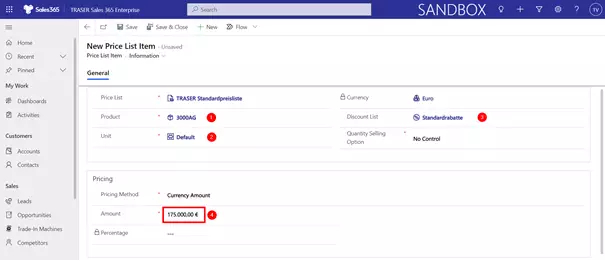
On the second tab Price List Items of the form add the products and their prices to this list. To do this, click the New Price List Item button.
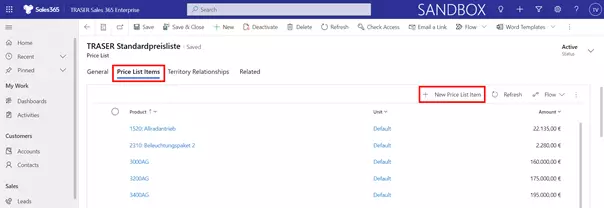
In the form of the price list item you select the Product whose price you want to store in this price list (1), the Unit of this product (2) and, if desired and available, a Discount List for this product in this price list (3). Finally, under Amount (4), enter the sales price. Finally, click Save & Close and continue with other products.