Checklists for Rental Orders
After planning and setting up the rental parameters as described in Rental Contracts, Reservations and Assign Rental Objects, the rental objects have to be delivered to the customer. In order to take into account and record important information, you can create customized and process-coordinated checklists for delivery and return as well as repair and replacement.
This chapter is divided into the following sections:
- Creating a Checklist Template
- Assigning Checklist Template
- Editing Checklist Template
- Copy Checklist Template
- Deleting Checklist Template
Creating a Checklist Template
Checklist templates serve as a framework for checklists that you can structure and set up as you like. You can only select, fill or check fields that have been defined in a checklist template.
This section describes how to create a checklist that can be used to check certain conditions and record processes. To do so, please proceed as follows:
- Use the quick search (ALT+Q) to find the page Checklists Template List in TRASER DMS 365.
- A list containing all checklist templates opens.
- Click on New to create a new checklist template.

- An empty checklist template card opens.
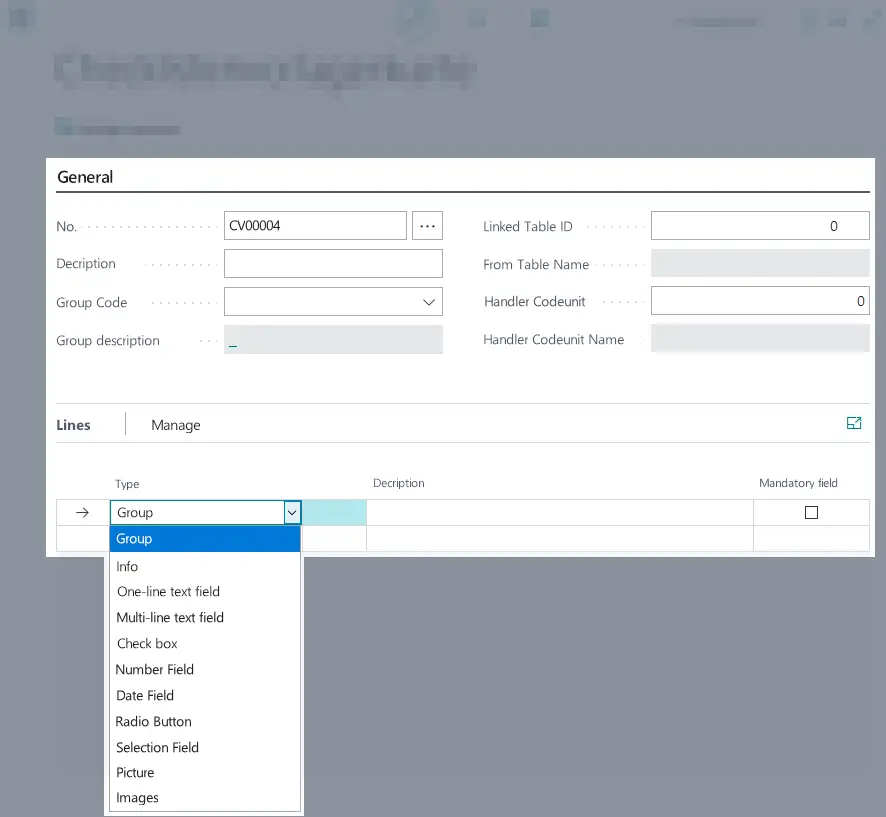
- Use the No. field to enter a unique identification number for the checklist template or click the tab key to let the system choose a value for you.
- Use the Description field to enter a significant description for the checklist template.
Add important differentiating features to separate similar checklist templates, e.g., Sales Agricultural Machine Private vs. Sales Agricultural Machine Trade or Rental Delivery Service Item vs. Rental Return Service Item. - Optional Select a category for the checklist template from the Group Code dropdown list. This allows for easier filtering of many checklist templates, e. g. Purchase, Sales, Rental, Repair.
The field Group Description will be filled automatically. - In the Linked Table ID field, select the number of the linked table. The different parameters are added to the checklist via this number.
The field From Table Name will be filled automatically with the selected table. - In the Handler Codeunit field, select the number of the linked codeunit. The codeunit enables the automatic transfer of defined variables into a checklist. The field Handler Codeunit Name will be filled automatically with the selected codeunit.
Note
Codeunits have to be programmed first. Please talk to your contact person from TRASER Software.
- Scroll to the Lines register to set up the checklist contents.
Important!
You cannot change the order of the contents once a checklist has been set up! The order corresponds to the order in which you set up the checklist template. Please make sure from the outset to set up the contents in the right order. If you want to change the order at a later time, you have to delete and create a new checklist template (please see Editing Checklist Template).
- From the drop-down list for the Type column, select the checklist field type. In the following table the different options are defined.
| Type | Description | Possible Usage |
|---|---|---|
| Group | This field creates a headline for the following checklist lines. | Headline | Category |
| Information | A unique text has been added to the checklist. You cannot add a value to this field as it is only there for information purposes. | Description/Explanation for a specific field | Introduction Tex | Free Text |
| Single-line Text Field | A single-line text field is added to the checklist. | Name | Order Type | Product |
| Multi-Line Text Field | An editable multi-line text field is added to the checklist. | Equipment | Scope of delivery | Damage | Special Agreement | Comments |
| Check box | A check box is added to the checklist. | Yes/No Question | Option | Equipment Feature |
| Number Field | A field is added to the checklist which can only contain numbers. | Consumption Data | Number of Rent Days | Purchase/Rent Price |
| Date Field | A field is added to the checklist which can only contain a date in the format TT.MM.JJJJ. | Current Date | Completion Date | Return Date | Year of Manufacture |
| Option Field | A list with various options is added to the checklist. You can only select one option. | Boolean Question without predefined Answers | Option | Equipment Feature |
| Selection Field | A field with a drop-down list is added to the checklist. You can only select one option. | Machine Status |
| Image | A field which allows you to upload 1 picture is added to the checklist. | Product Picture | Picture of damage |
| Images | A field which allows you to upload multiple pictures is added to the checklist. | Product Pictures | Picture of one or multiple damages |
- Use the Description field to enter a clear description or headline for the checklist field.
Tip
When filling out the checklist at a later time, it must be visible what kind of value has to be entered in a field. Please take into account that all description text will be shown on the print-out of the checklist.
- Optional Activate the check box Mandatory Field if you want the line to be mandatory for the completion of the checklist.
You can find information on the status of the toggle switch in the 'Toggle Switch' Table.
Configuring Checklist Lines
You can further define the lines, e. g. you can add a type code or mark a field as write-protected. To do so, please proceed as follows:
- Click on the line you would like define more precisely.
- In the Lines register, click on Manage > Details.

- In addition to the given values (Type, Description, Mandatory Field, Group Code) you can define the following information:
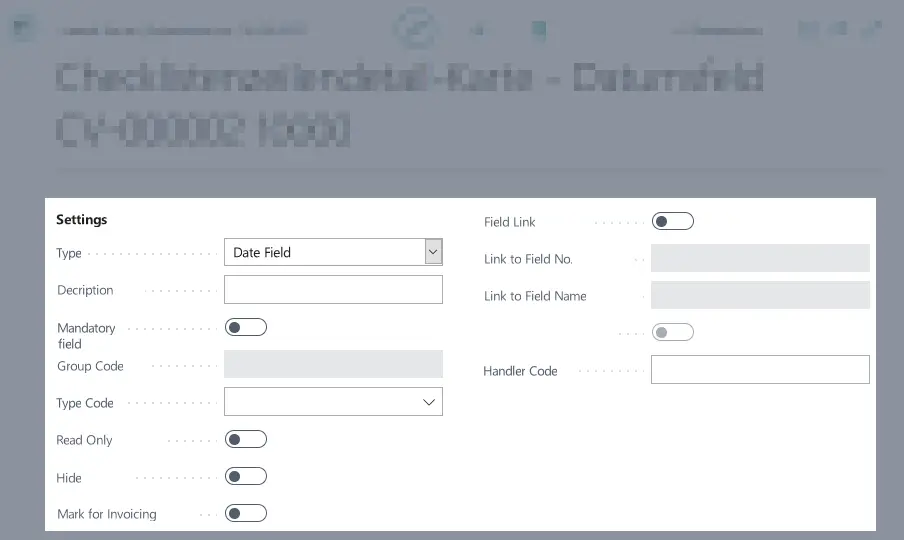
| Option | Description |
|---|---|
| Type Code | Here, select the type code to narrow down the filter and assignment options. |
| Read Only | Activate this slider if you want the field to be write-protected. You can find information on the status of the toggle switch in the 'Toggle Switch' Table. |
| Hide | Activate this slider if you want the line to be hidden on the checklist print-out. You can find information on the status of the toggle switch in the 'Toggle Switch' Table. |
| Mark for Invoicing | Activate this slider if you want the line and the value to be transferred to the invoice. You can find information on the status of the toggle switch in the 'Toggle Switch' Table. |
| Field Link | Activate this slider if you want to link this line to a field. The field Link to Field No. appears and you can enter something into the field. You can find information on the status of the toggle switch in the 'Toggle Switch' Table. |
| Link to Field No. | Select the number of the field that you would like to link to the line. To be able to enter something here, the slider Field Link has to be activated. You can find information on the status of the toggle switch in the 'Toggle Switch' Table. |
| Link to Field Name | Specifies the name of the field selected in the Link to Field No. field. |
| Automatic Option Value | Activate this toggle switch if you want to use automatic option values. |
| Handler Code | Here, enter a handler code that you would like to link to the line. |
- Close the Checklist Line Detail Card
- Close the Checklist Template Card.
- Close the page Checklists Template List.
You have successfully created a new checklist template. You can now assign this checklist template to a rent class or a rent class type so that the template is displayed during certain rent processes. For information on assigning checklists to a rent class or a rent class type please check out Assigning Checklist Template.
Assigning Checklist Template
After creating a new checklist template you must assign the template to a rent process so it is displayed at the right time. The system needs to know when to display the checklist. That is why you need to assign the checklist template to a rent class.
To assign a checklist template to a Rent Class, proceed as follows:
- Use the quick search (ALT+Q) to find the page Rent Classes in TRASER DMS 365.
- A list of all rent classes is displayed.
- If there are no rent classes, create a rent class as described in Create Rent Class.
- Open a rent class that you would like to assign a checklist template to by clicking Class Name.
- In the header of the rent class card, click on Process Flow > Status Flow.
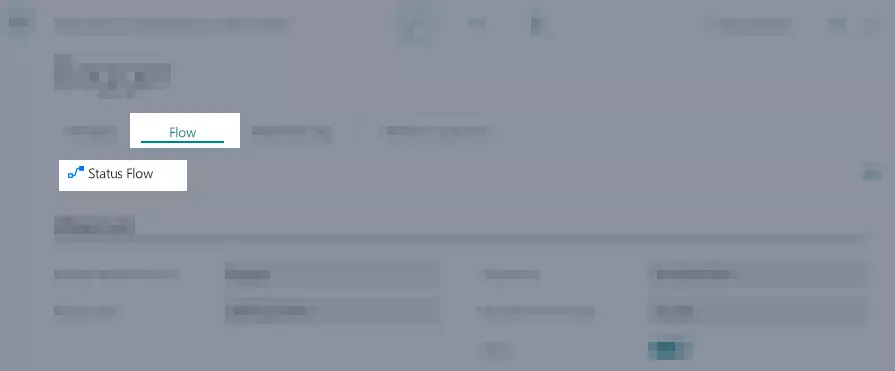
- The page Edit – Rental Reservation will open.
- Scroll to the Preparation Checklist Template, Checklist Template and Finishing Checklist Template columns on the right-hand side of the table.
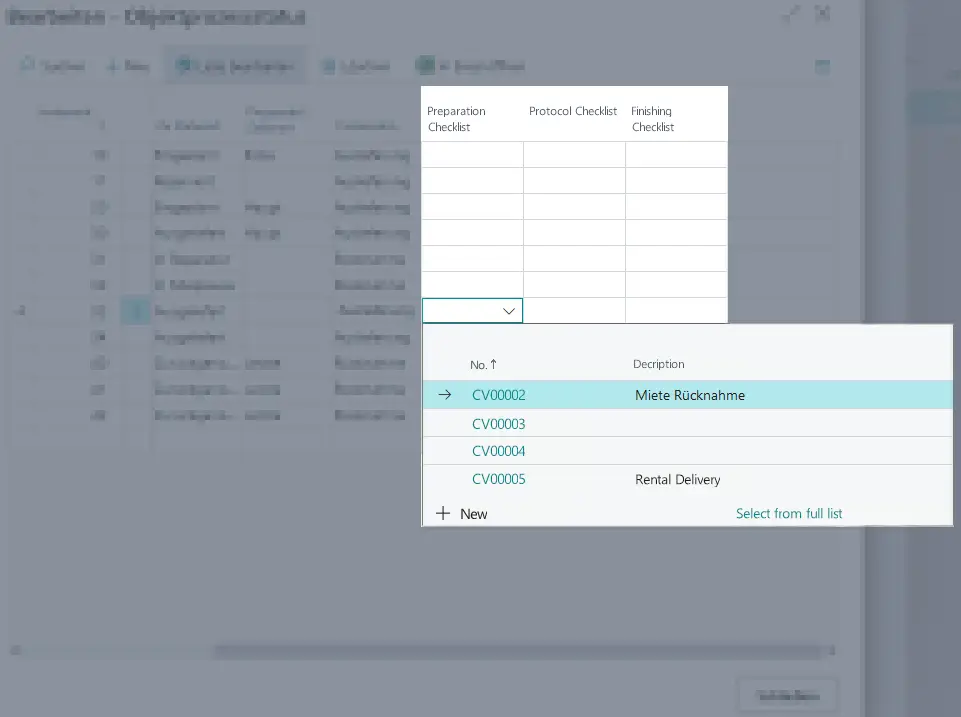
- Select the line of the process status that you would like to assign the checklist to. The checklist will now be shown whenever the status changes to a status that you have set up a checklist for. If a checklist template is selected for a flow for which no delivery/return is created (e.g. from Start to Planned), this checklist has to be opened and completed via the menu bar of the rental contract before the rental contract can be further processed.
Important!
Checklist templates can only be assigned to the following status types: Delivered, In Repair, In Rent Break and Returned.
- Select the checklist template according to the following formula:
- Optional Select a checklist from the drop-down list in the Preparation Checklist Template column that you want to use when the status type is set to Delivered.
- Optional Select a checklist from the drop-down list in the Checklist Template column that you want to use before creating a delivery/return.
- Optional Select a checklist from the drop-down list in the Finishing Checklist Template column that you want to use when the status type is set to Returned.
- The changes are saved automatically.
- Click Close.
- Close the Rent Class Card.
- Close the Rent Classes page.
Editing Checklist Templates
You can always delete checklist templates, even if they are already in use. The changes will only be applied to newly created checklists.
To edit a checklist template, proceed as follows:
- Use the quick search (ALT+Q) to find the page Checklists Template List in TRASER DMS 365.
- A list containing all checklist templates opens.
- Open the checklist template you would like to edit by clicking on the number of the checklist template.
- The related Checklist Template Card is displayed.
Note
Please make sure that the checklist template is in edit mode. You can only edit the checklist template if in edit mode.
If the pen icon is encircled, the edit mode is active.

If needed, click on the pen icon to change to edit mode.
- Update the parameters that you would like to change (please check the table in Creating a Checklist Template). You can:
- edit any field in the General register,
- delete Lines,
- Click on the line you would like to delete.
- Click on Manage > Delete Line.
- The line will be deleted and can’t be restored.
- Add New Lines,
- Click on the line beneath the line you would like to add.
- Click on Manage > New Line.
- A new line will be added above the selected line.
- Change the Line Description and other Parameters,
- Click on the line you would like to edit.
- Click on Manage > Penalty Allocation.
- Update the parameters (please check Setting up Checklist Lines).
- Activate/deactivate the check box Mandatory Field.
You can find information on the status of the toggle switch in the 'Toggle Switch' Table.
- The changes are saved automatically.
- Close the Checklist Template Card.
- Close the page Checklists Template List.
Copy Checklist Template
If you have several checklist templates that are similar it might be helpful to copy an existing template so that you only have to change a few things. If you copy a checklist template, all fields except for the No. field will be copied and can be edited afterwards.
To copy a checklist, proceed as follows:
- Use the quick search (ALT+Q) to find the page Checklists Template List in TRASER DMS 365.
- A list containing all checklist templates opens.
- Mark the checklist template you would like to edit.
- Click on Copy Template.

- A copy of the checklist template will be created.
- The number will be assigned according to the selected Number Series.
- Open and edit the checklist according to your needs (please see Editing Checklist Template).
- Close the Checklist Template Card.
- Close the page Checklists Template List.
Deleting Checklist Template
You can always delete checklist templates, even if they are already in use. They will no longer be available for new processes.
Important!
You cannot restore deleted checklist templates. So make sure that a checklist won’t be needed anymore before deleting it. In some cases, it might be enough to update the checklist (see Editing Checklist Template).
To delete a checklist template, proceed as follows:
- Use the quick search (ALT+Q) to find the page Checklists Template List in TRASER DMS 365.
- A list containing all checklist templates opens.
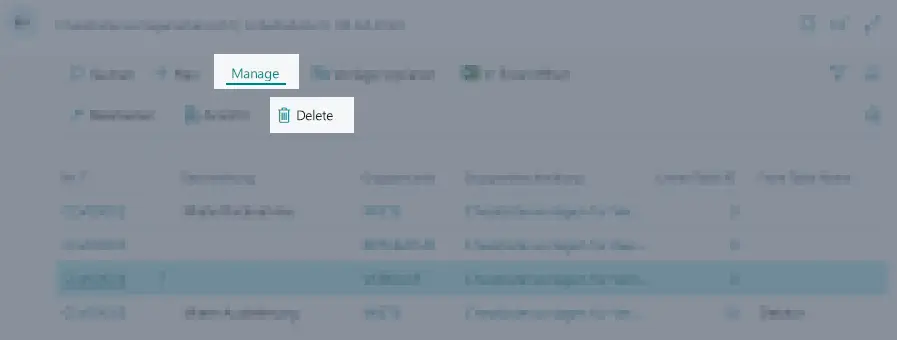
- Mark the checklist template you would like to delete.
- Click on Manage > Penalty Allocation.
- Click Yes to confirm the shown dialog box.
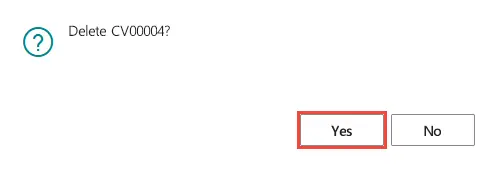
- The checklist template will be deleted and cannot be restored.
- Close the page Checklists Template List.
Removing Checklist Template Assignments
If you have already assigned the deleted checklist template to a rent class or rent class type, you must remove the deleted checklist template from it or assign a new checklist template. To do so, please proceed as follows:
Delete a checklist template from a rent class
- Open the page Rent Classes.
- A list containing all rent classes is displayed.
- Open the rent class that you would like to delete the checklist from by clicking on the class name.
- Click on Flow > Status Flow to open the object status flow of the rent class.

- Scroll to the Preparation Checklist Template, Checklist Template and Finishing Checklist Template columns on the right-hand side of the table.
- Select the field of the deleted checklist template and:
- Optional delete the assigned checklist by deleting the line and confirming the step with the TAB key
or - Optional Assign a new checklist template by selecting a new template from the drop-down list of the field.
- Optional delete the assigned checklist by deleting the line and confirming the step with the TAB key
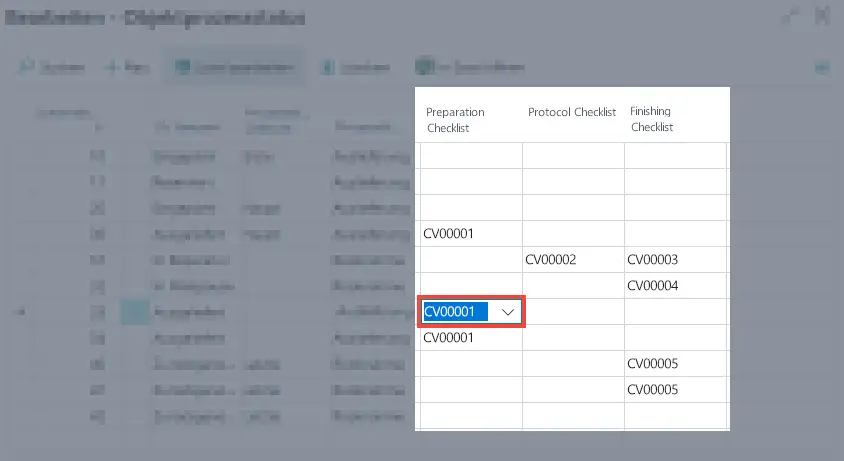
- Repeat this step for all relevant Rent Classes.
- Close the Object Status Flow page.
- Close the Rent Classes page.
- Close the Rent Classes page.
Removing a checklist template from a rent class type
- Open the page Rent Class Types.
- A list containing all rent class types opens.
- Select the rent class type that contains a checklist template you would like to delete.
- Click on Flow > Status Flow to open the object status flow of the rent class.
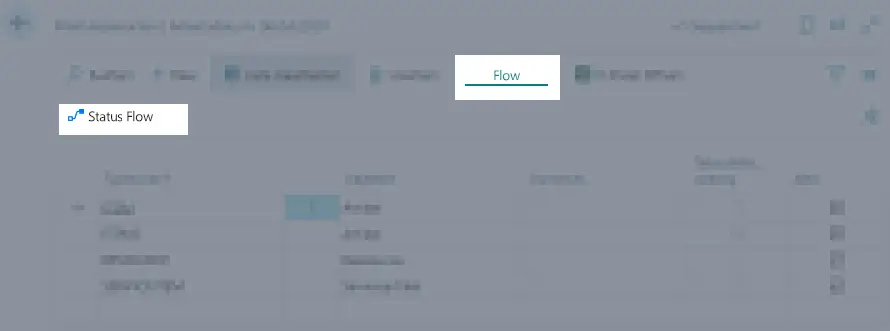
- Scroll to the Preparation Checklist Template, Checklist Template and Finishing Checklist Template columns on the right-hand side of the table.
- Select the field of the deleted checklist template and:
- Optional delete the assigned checklist by deleting the line and confirming the step with the TAB key
or - Optional Assign a new checklist template by selecting a new template from the drop-down list of the field.
- Optional delete the assigned checklist by deleting the line and confirming the step with the TAB key

- Repeat this step for all relevant Rent Class Types.
- Close the page Object Status Flow.
- Close the Rent Class Types page.
'Toggle Switch' Table
| Symbol | Status | Description |
|---|---|---|
 |
Deactivated | The option is not activated and the related function not available. |
 |
Active | The option is activated and the related function available. |
The next chapter covers everything you need to know about working with deliveries/returns.
Continue with the next chapter

