Working with Rental Purchase Protocols
Über Anmietungsprotokolle können weitere Funktionen genutzt werden.
This chapter is divided into the following sections:
- Rental Purchase Protocol Card
- Add Several Contacts to Rental Purchase Protocol
- Set Rent End Date in a Rental Purchase Return Protocol
Rental Purchase Protocol Card
This section explains the different fields on a rental purchase protocol card.
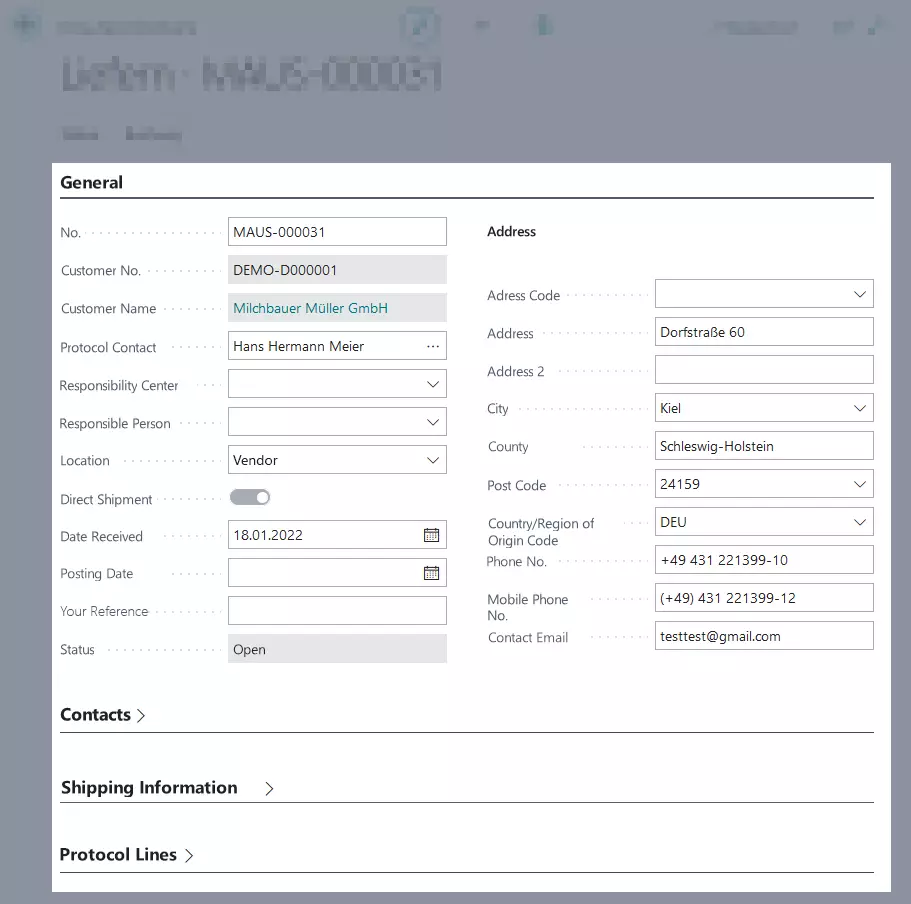
| Option | Action | Description |
|---|---|---|
| General | No. | This field shows the number of the protocol card. |
| Customer No. | This field shows the number of the customer the rental contract applies for. | |
| Customer Name | This field shows the name of the customer the rental contract applies for. | |
| Protocol Contact | Optional Here, you can enter a contact from the list that the rental contract should apply for. The contact list has been filtered by company number and contact number. | |
| Responsibility Center | Optional Here, you can enter an internal responsibility center for the rental contract. | |
| Responsible Person | Optional Here, you can enter an internal reference person for the rental contract. | |
| Location | This field shows the location from where the rent object will be delivered. | |
| Direct Shipment | This field specifies whether the vendor wants the rental object to be delivered directly to the customer/ to be returned directly from the customer. If this field has been activated, you can enter several other contacts in the protocol. | |
| Date Received / Return Date | Depending on the rental purchase protocol, this field either displays the date the object has been received or the date the object has been returned. | |
| Posting Date | Optional Here, you can enter a date for the posting. | |
| Your Reference | Optional Here, you can enter a customer reference if necessary. | |
| Status | Status | This field shows the current status of the protocol. |
| Address | Address Code | Optional Here, you can enter a name of a person or company that this protocol is aimed at. |
| Address | Optional Here, you can enter the first part of the address, for example the street name or street number. | |
| Address 2 | Optional Here, you can enter additional address information such as c/o. | |
| City | This field shows the third part of the address, for example the city or location. | |
| County | Optional Here, you can enter a county or region in order to avoid confusion with place names that sound the same and to make it easier for the vendor to find the right direction. | |
| Post Code | This field shows the second part of the address, for example the post code. | |
| Country/Region Code | This field shows the country/region code for the delivery. If you want to deliver a rent object to another country, this field must be filled out. When it comes to deliveries within the same country, this field is optional. | |
| Phone No. | Optional Here, you can enter a phone number for the on-side contact person. This might come in handy if the vendor has to contact the customer. | |
| Mobile Phone No. | Optional Here you can enter a mobile phone number for the on-side contact person. | |
| Contact Email | Optional Here, you can enter an email address for the on-side contact person. | |
| Shipping Information | Shipping Agent Code | Optional Here, you can select a code for the vendor from the drop-down list. This might be an internal shipping agent or an external shipping agent such as a package service or a goods transport agency. |
| Shipping Agent Service Code | Optional Here, you can select a code for the shipping type. For example, this might be a standard delivery period of 7 days, an express delivery or a forwarding delivery. | |
| Shipping Time | Optional Here, you can enter the expected shipping time. If you select a code for the Shipping Agent Service Code the transport time will be taken from the value you entered for this shipping agent service code. |
Add Several Contacts to Rental Purchase Protocol
You can add multiple contacts to the same rental purchase protocol. This way, the person in charge has the possibility to call another contact person in case the main contact is not available. This is only possible if the vendor has specified that they want the rental object to be delivered directly to the customer/ to be returned directly from the customer. To add several contacts, proceed as follows:
- Open a Rental Purchase Protocol.
- Open the Contacts tab. If the Contacts register isn’t visable, please check if direct shipment/direct return is set for the vendor.
- If you select a contact for the Protocol Contact in the General tab, the contact will already be added to the table.
- To add several contacts to a rental purchase protocol, click on the three dots in the Contact Name column.
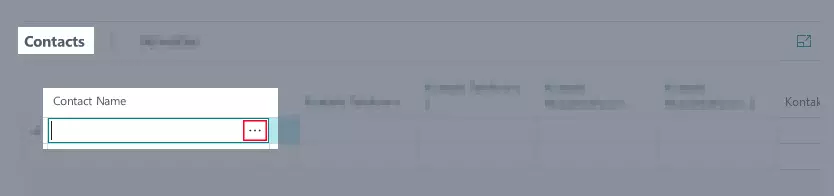
- A list with all contacts that are linked to the rental purchase contract opens.
- Select a contact from the list.
- All other columns will be filled in automatically.
- Repeat this step as often as needed. You might also add a contact manually so that it doesn’t get added to the system.
- If you activate the check box in the Default Contact column, the contact will always be listed first and will be automatically transferred to the Protocol Contact field in the General register.

Set Rent End Date in a Rental Purchase Return Protocol
You can specify the ending date of the rent period in the rental purchase return protocol. This way, no invoices will accidentally be sent to the customer. To specify the rent end date in a rental purchase return protocol, proceed as follows:
Note
To be able to enter an rent end date, the following requirements have to be met:
- The protocol must be marked as a Direct Return.
- The rental purchase return protocol status has to be set to Open.
- The column Quantity to Process must be filled in in the protocol lines. You can only enter an ending date if the Full Quantity has been returned. You cannot enter an ending date when it comes to partial returns.
- All checklists in the rental purchase return protocol must be completed. For more information on checklists click here.
- Open a Rental Purchase Return Protocol.
- In the Protocol Lines, enter the ending date for the rental purchase period in the Rent End Date (Rental Purchase) column. Either, select a date from the calendar or enter h to select the current date.
- Optional In the Protocol Lines, enter the ending date for the rent period in the Rent End Date (Rental) column. Either, select a date from the calendar or enter h to select the current date. This is only possible if the rental contract is linked to a rental purchase document.
- Enter the date on which the rent end was set into the Rent End Reported On Date column under the Protocol Lines register. Either, select a date from the calendar or enter h to select the current date.
- Enter the time on which the rent end was set into the Rent End Reported On Time column under the Protocol Lines register.
- Select Rent End Date > Register Rent End Date from the menu bar.
- The check box in the Rent End Date registered column will be set automatically. The field in the Quantity to Process column can no longer be edited.
- The dates you have entered into the Rent End Date (Rental Purchase) and Rent End Date (Rental) columns will be automatically transferred to the respective documents.
- If you want to edit the rent end date at a later time, you can do this by clicking Rent End Date > Undo Rent End Date Registration in the menu bar of the rental purchase return protocol.
The next chapter covers everything you need to know about invoicing of rental purchase contracts.
Continue with next chapter