Invoice Plans
In TRASER Rental 365, invoices can either be created via the Create Billing for Rent page or directly from a rental contract. Both the individual lines and the related costs and credit memos can be compiled individually for an invoice. This allows various types of invoicing, like for example consumption invoices, final invoices or partial invoices.
Each action in a contract can change the number, type and value of the invoice plan lines. With every new posting, the invoice plan is recalculated by TRASER DMS 365. This includes e. g.:
- Entering or modifying the invoice frequency,
- Entering or modifying the contract duration,
- Entering or modifying rent class (packages),
- Creating additional contracts,
- Creating credit memos.
Here you can find the relevant sections on managing invoice plans:
- Checking Invoicing Status
- Viewing Invoice Plan Preview
- View Invoice Plan
- Creating Invoice
- Creating Combined Invoice
- Creating Invoice From Rental Contract
- Creating Invoices For Certain Invoice Plan Lines
- Allocating Rent Revenues
- Adding Text Lines to Invoice Document
- Create Credit Memo
- Updating All Invoice Plans
- Consumption Invoices
- Final Invoice Summary Setup
Checking Invoicing Status
If several contracts exist in parallel, it becomes difficult to maintain overview of all parameters and pending invoicings. For you to not lose the overview, color codes were implemented to see the status of a rental contract at one glance.
To find out if a contract is already closed but not yet invoiced, please do the following:
- Use the quick search in Dynamics NAV (ALT+Q) to find the page Rental Contracts.
- A list with all rental contracts is displayed.
-
Optional Sort the list in ascending order by the column Estim. Contract End Date.
- Rental contracts in a yellow font are currently being invoiced.
- Rental contracts in a red font have exceeded their estimated end date and have not been invoiced yet.
- Rental contracts in a black font have not reached their estimated end date yet.
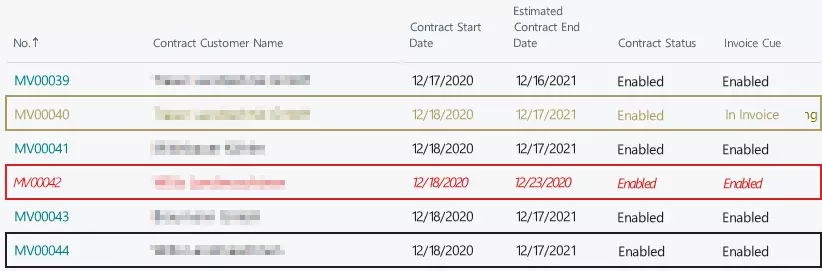
This way you can quickly find out which rental contracts need action like for example invoicing or adjusting the estimated end date. Furthermore, you can track the invoice status of the rental contracts by doing so.
In the next session you will learn how to view the invoice plan preview of a rental contract or rental quote.
Viewing Invoice Plan Preview
To maintain a detailled overview on the invoice lines of a rental contract or rental quote, you can view the invoice plan preview in TRASER Rental 365. The invoice plan preview contains all information like for example the status, the invoice type and all price information. Furthermore you can apply filters to view all invoice information regarding consumption. To view the invoice plan preview, please proceed as follows:
- Use the quick search (ALT+Q) to find the page Rental Quotes or Rental Contracts in TRASER DMS 365.
- A list containing all rental contracts or rental quotes is displayed.
- Open the contract or quote for which you want to view the invoice preview.
- Select Actions > Invoice > Preview Invoice Plan from the menu bar.
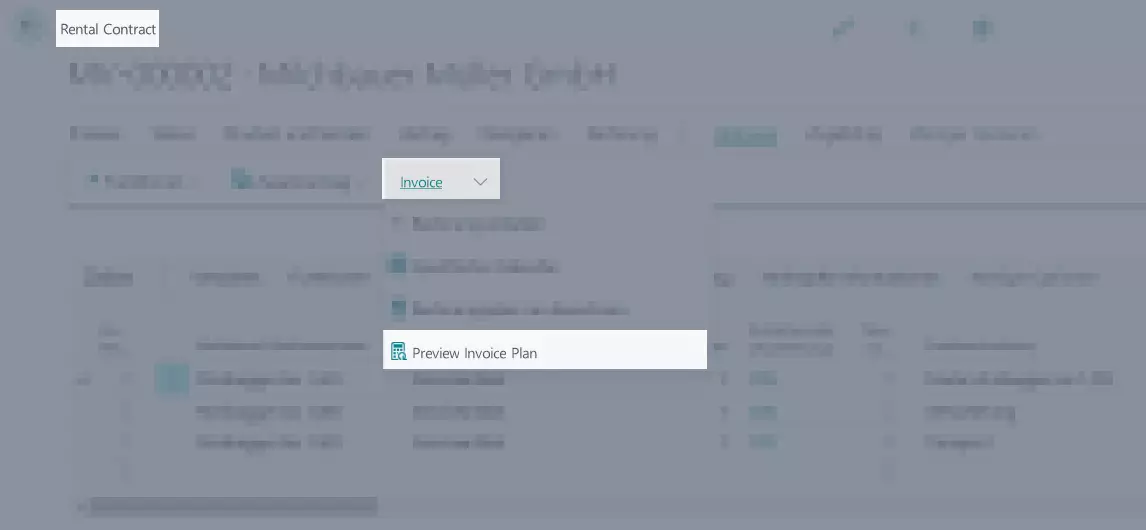
- A preview of the invoice plan with all its invoice lines is displayed.
- If you want to view the consumption plan instead, select the option Consumption under Plan Type.
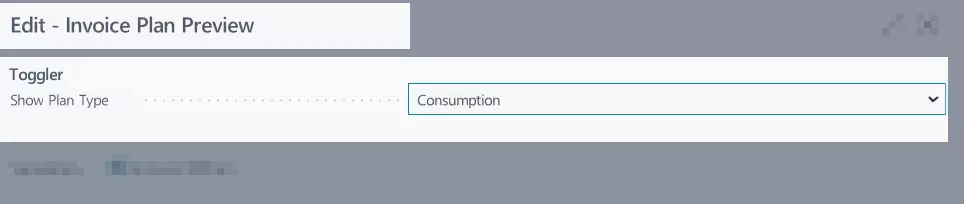
- A preview of the consumption plan with all its invoice lines is displayed.
View Invoice Plan
To create for example invoices, you need the invoice plan of a rental contract. This contains all information like for example the status, the invoice type and all price information. To open the invoice plan of a rental contract, please proceed as follows:
Note
The invoice plan of a rental contract is not available until the rental contract has been signed and the status was changed to Active.
- Use the quick search (ALT+Q) to find the page Rental Contracts in TRASER DMS 365.
- A list with all rental contracts is displayed.
- Open the contract for which you want to view the invoice preview or create a new one.
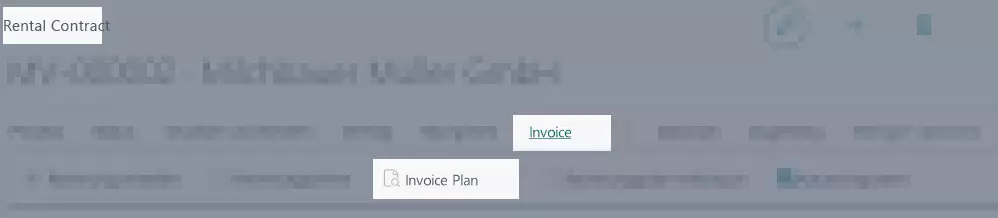
- Select Invoice > Invoice Plan from the menu bar.
- The respective invoice plan of the related rental contract with all invoice lines is displayed.
In the next section you will learn how to create an invoice from a rental contract.
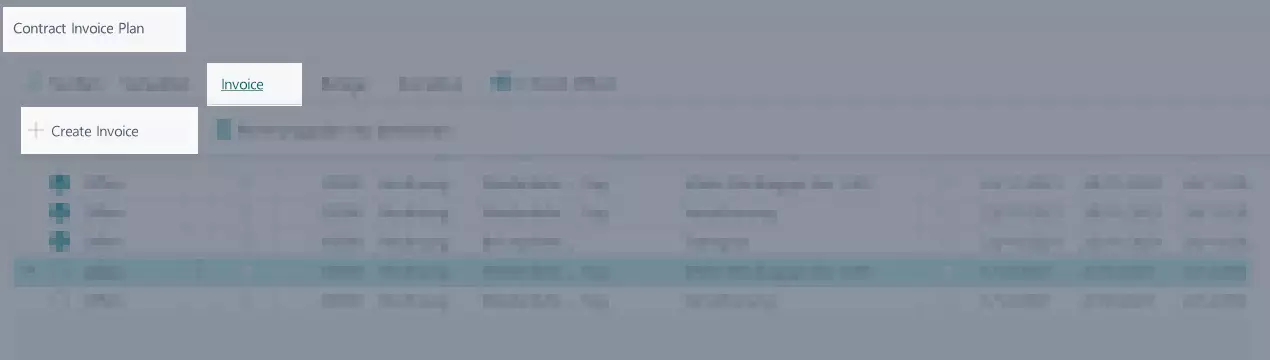
Creating Invoice
Depending on the invoice frequency, an invoice can be created before or after closing a rental contract. Partial or consumption invoices can also be invoiced. To create an invoice, please proceed as follows:
- Use the quick search in Microsoft Dynamics 365 Business Central to find the command Create Billing for Rent.
- A page for creating a rental invoice is displayed.
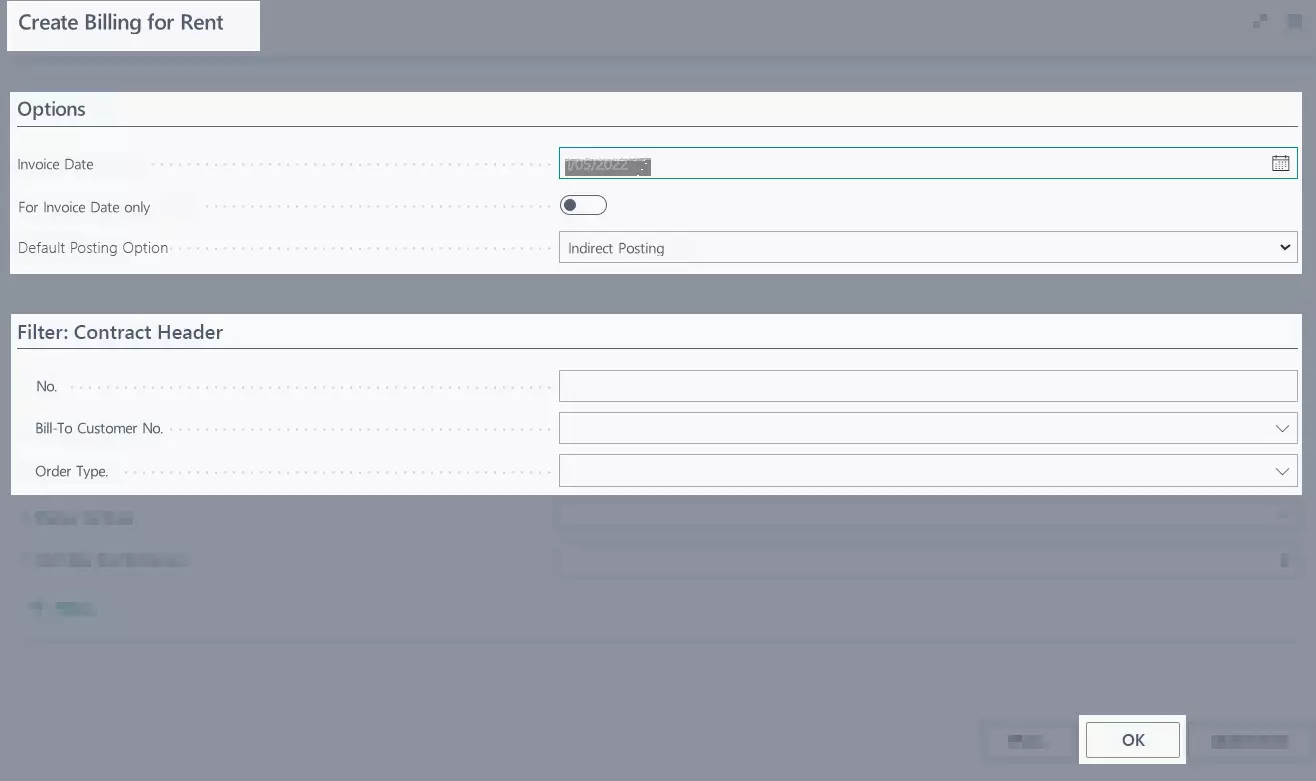
- Please fill in the fields according to the specifications in the table below to create a rental invoice.
| Register | Option | Action |
|---|---|---|
| Options | Invoice Date | Enter the date on which the invoice should be issued. All invoice plan lines that are ready for invoicing are included in the invoice. |
| For Invoice Date only | Activate this boolean if you want to invoice only the invoice plan lines for the date in the Invoice Date field. Lines before or after this date are being ignored and not included in the invoice. | |
| Posting Option | Select here if the rental invoice should be automatically posted directly after it has been created. An indirect posting will creating an invoice that has to be posted manually at a later time. Using Direct Posting + Send will post and send the rental invoice directly when it is created. | |
| Filter: Contract Header | You can define filters for invoicing in this register. | |
| No. | Select the number of the document to be invoiced from the drop-down list. | |
| Bill-to Customer No. | Select from the drop-down list the number of the customer who shall receive the invoice. | |
| Order Type | Select from the drop-down list for which order type an invoice should be created. The order type will affect the posting process. | |
| Contract Status | Select from the drop-down list for which contracts the invoicing should be performed. |
More filters can be activated, if needed.
- Click on OK to create the rental invoice based on the defined parameters.
- Click on Yes in the then displayed dialogue window to open the created rental invoice.
- The Rent Order card is displayed.
- Check the data and click on Posting > Post or Post and Send if you want to send the invoice directly to the customer.
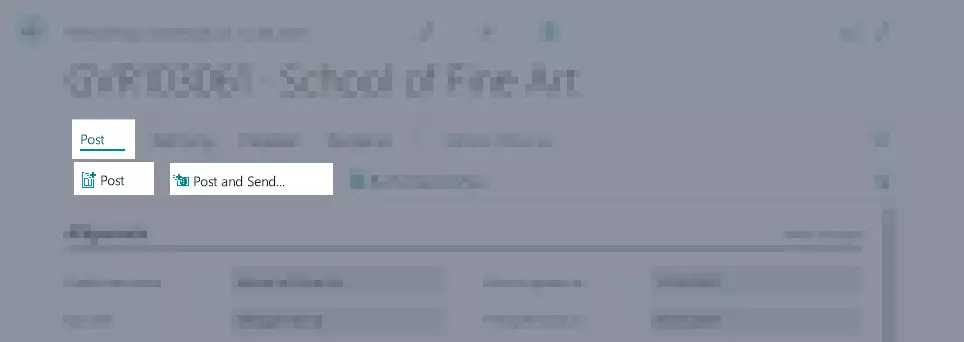
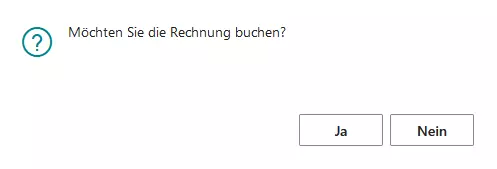
- Click on Yes in the displayed dialogue window to post the invoice.
- The invoice is posted.
- Close the Rental Order card.
- Close the Create Billing for Rent card.
Tip
To gain an overview of all unposted invoices and credit memos, you can open the page Rent Orders by using the quick search (ALT+Q) in TRASER DMS 365.
Creating Combined Invoice
If a customer has made several contracts, you can use the function to create combined invoices. All contracts that have the same customer and were concluded in a specific period are then being included in a single invoice.
Note
For several contracts with the same customer to be included in an invoice, the option Combine Contracts in the Invoice Details register has to be activated for the respective rental contracts. You can find more information on creating rental contracts as well as the different settings options in the Creating a rental contract section.
To create a combined invoice, please proceed as follows:
- Use the quick search in Microsoft Dynamics 365 Business Central to find the command Create Billing for Rent.
- A page for creating a rental invoice is displayed.

- Please fill in the fields according to the specifications in the table below to create a combined invoice.
| Register | Option | Action |
|---|---|---|
| Options | Invoice Date | Enter the date on which the invoice should be issued. All invoice plan lines that are ready for invoicing are included in the invoice. |
| For Invoice Date only | Activate this boolean if you want to invoice only the invoice plan lines for the date in the Invoice Date field. Lines before or after this date are being ignored and not included in the invoice. | |
| Posting Option | Select here if the rental invoice should be automatically posted directly after it has been created. An indirect posting will creating an invoice that has to be posted manually at a later time. Using Direct Posting + Send will post and send the rental invoice directly when it is created. |
- After that, navigate to the register Filter: Contract Header.
- Select from the drop-down list the Yes option under Combine Contracts.
- Click OK to create the combined invoice.
- Click on Yes in the then displayed dialogue window to open the created combined invoice.
- The Rent Order card is displayed.
- Check the data and click on Posting > Post or Post and Send if you want to send the combined invoice directly to the customer.
- Click on Yes in the displayed dialogue window to post the combined invoice.
- The invoice is posted.
- Close the Rental Order card.
- Close the Create Billing for Rent card.
Tip
To gain an overview of all unposted invoices and credit memos, you can open the page Rent Orders by using the quick search (ALT+Q) in TRASER DMS 365.
Creating Invoice From Rental Contract
Depending on the invoice frequency, an invoice can be created before or after closing a rental contract. Partial or consumption invoices can also be invoiced. To create an invoice from a rental contract, please proceed as follows:
- Use the quick search (ALT+Q) to find the page Rental Contracts in TRASER DMS 365.
- A list with all rental contracts is displayed.
- Open the rental contract that you want to invoice.
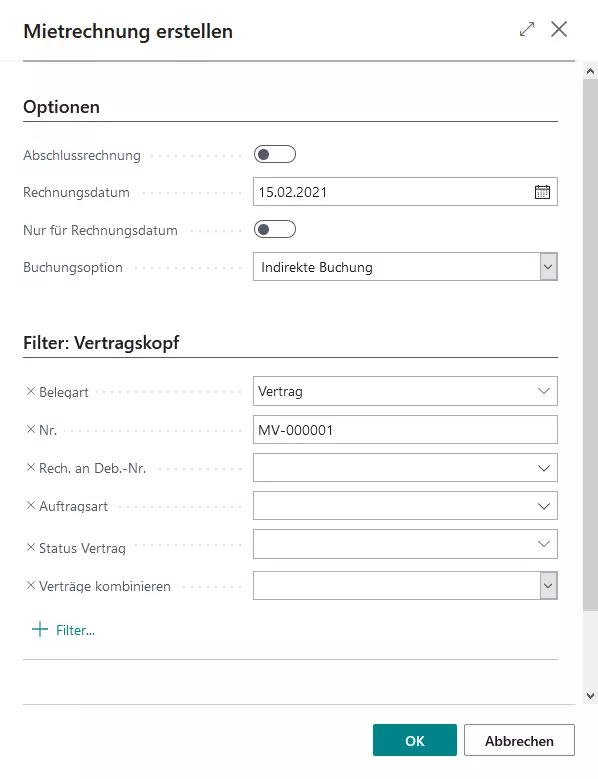
- To create a new invoice, select Invoice > Create Billing.
- The window Create Billing for Rent is displayed.
- Please fill in the fields according to the specifications in the table below to create a rental invoice.
| Register | Option | Action |
|---|---|---|
| Options | Final Invoice | Optional Activate this boolean once you create the final invoice for the rental contract. All invoice lines that are open at this point are being invoiced and posted. In addition, any deposit amounts will be returned. The fields Invoice Date and For Invoice Date only are hidden and cannot be changed. You can find information on the status of the boolean in the Table 'Boolean'. You can only activate this boolean if the Contract Status = Final Settlement. |
| Invoice Date | Enter the date on which the rental contract should be invoiced. All invoice plan lines that are ready for invoicing are included in the invoice. This option is not available if the Final Invoice boolean is enabled. |
|
| For Invoice Date only | Activate this boolean if you want to invoice only the invoice plan lines for the date in the Invoice Date field. Lines before or after this date are being ignored and not included in the invoice. | |
| Posting Option | Select here if the rental invoice should be automatically posted directly after it has been created. An indirect posting will creating an invoice that has to be posted manually at a later time. Using Direct Posting + Send will post and send the rental invoice directly when it is created. | |
| Filter: Contract Header | You can define filters for invoicing in this register. The filter Document Type and No. should always be selected to invoice only the desired rental contract. | |
| Document Type | Select in this drop-down menu if you want to invoice a contract or additional contract. If you create an invoice from a contract, this value is already pre-filled with the respective document. Other documents cannot be invoiced. |
|
| No. | Select the number of the document to be invoiced from the drop-down list. If you create an invoice from a contract, this value is already pre-filled with the respective document number. |
More filters can be activated, if needed.
- Click on OK to create the rental invoice based on the defined parameters.
- Click on Yes in the then displayed dialogue window to open the created rental invoice.
- The Rent Order card is displayed.
- Check the data and click on Posting > Post or Post and Send if you want to send the invoice directly to the customer.
- Click on Yes in the displayed dialogue window to post the invoice.
- The invoice is posted.
- Close the Rental Order card.
- Close the Rental Contract card.
- Close the Rental Contracts page.
Creating Invoices For Certain Invoice Plan Lines
To create an invoice for certain invoice plan lines only, please proceed as follows:
- Use the quick search (ALT+Q) to find the page Rental Contracts in TRASER DMS 365.
- A list with all rental contracts is displayed.
- Open the rental contract that includes lines you want to invoice.
- Select Invoice > Invoice Plan from the menu bar.
- The invoice plan with all available invoice plan lines is displayed.
- Mark the lines you want to invoice. For this, click on the button with the three dots.
- Select Invoice > Create Invoice.
- A pop-up window is displayed in which you can select the posting option.
- Confirm the posting optionby clicking OK.
- Click on Yes to open the document.
- Check the data and click on Posting > Post or Post and Send if you want to send the invoice directly to the customer.
- Click on Yes in the displayed dialogue window to post the invoice.
- The invoice is posted.
- Close the Rental Order card.
- Close the Contract Invoice Plan card.
- Close the Rental Contracts page.
Allocating Rent Revenues
If two rental objects of the same kind are registered for one customer, e.g. in case of repair or replacement, you can split the costs between two rental objects. The billing will then be on one invoice line but with different percentages or fixed prices. This way you avoid invoicing rental objects that were returned or replaced twice in full. You can find more information on replacements or returning rental objects under Repairs, Replacement, Consumption.
To register revenue allocations, please proceed as follows:
- Use the quick search (ALT+Q) to find the page Rental Contracts in TRASER DMS 365.
- Select Invoice > Invoice Plan from the menu bar.
- The invoice plan with all available invoice plan lines is displayed.
- Mark the line for which you want to enter the revenue allocation.
- Select Invoice > Create Invoice.
- A pop-up window is displayed in which you can select the posting option.
- Confirm the posting optionby clicking OK.
- Click on Yes to open the document.
- Navigate to the Lines register inside the document.
- Select Line > Related Information > Revenue Allocation Specification.
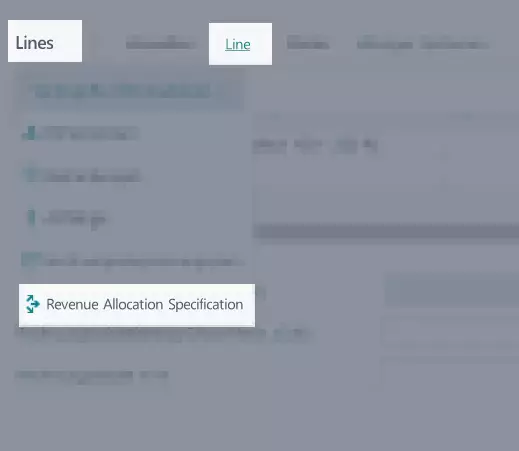
- The page Sales Revenue Alloc. Specification is displayed.
- You can now enter the revenue allocation for the relevant rent objects. For this, complete the columns according to the specifications in the table below.
| Column | Description |
|---|---|
| Revenue Allocation Type | Use this field to define how the revenue distribution should be performed. The revenue allocation can either be done via percentages or fixed prices. |
| Allocation Percentage | Use this field to enter the percentage that should be invoiced. If the revenue allocation is calculated by percentage, the value cannot be zero. Additionally, all allocation lines have to add up to 100 %. |
| Amount | If the revenue allocation is made by using fix prices, enter the allocated amount here. All allocation lines have to add up to the revenue amount in the sales line. |
| Posting Description | Enter a significant description here that will be shown on the document. |
- Close the Sales Revenue Alloc. Specification page.
- To finish the posting, select Posting > Post or Post and Send in the document.
Adding Text Lines to Invoice Document
You can add text lines to an invoice document including additional information that will later be shown on the posted invoice. To add text lines to an invoice document, please proceed as follows:
- Create an invoice. Proceed as described above.
- Open the Rental Order card.
- Navigate to the Lines register.
- Select a random line in the invoice document.
- Click on the button with the three dots and subsequently on New Line.
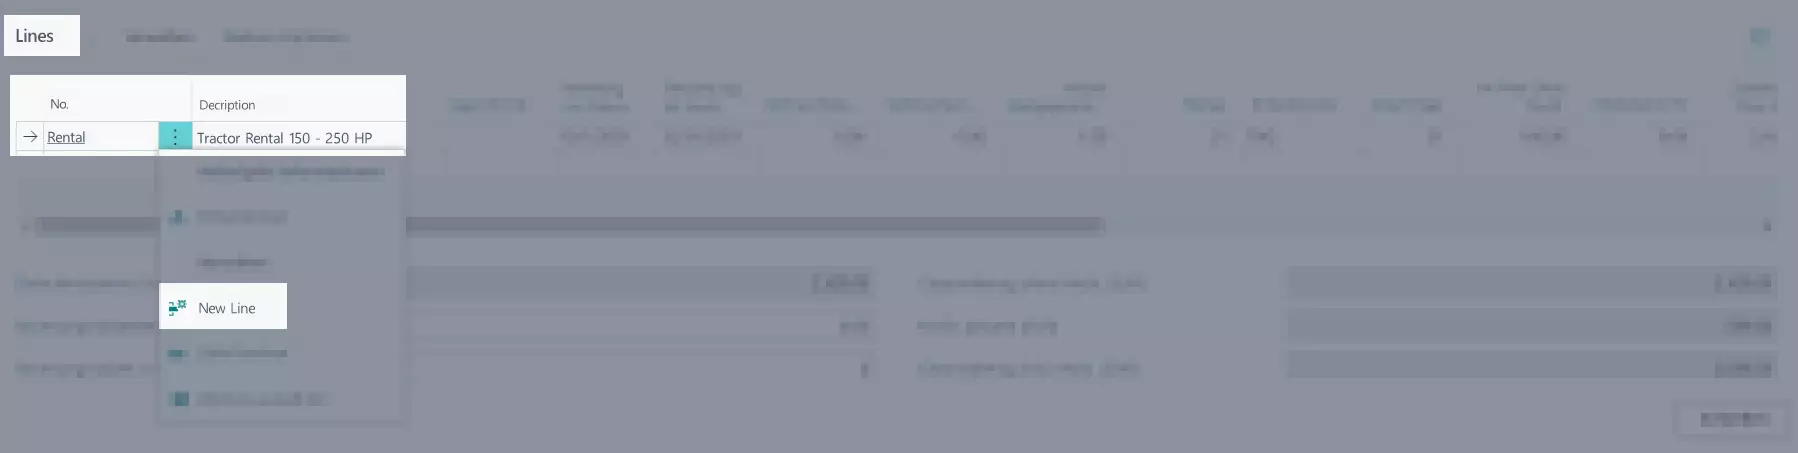
- Add a description to the line which is then shown on the posted invoice later.
- If you want to subsequently post the invoice, click on Posting > Post or Post and Send if you want to send the invoice directly to the customer.
- Click on Yes in the displayed dialogue window to post the invoice.
- The invoice is posted.
Create Credit Memo
To create a credit memo for an invoice, please proceed as follows:
Note
You can only create a credit memo if the respective line in the invoice plan has the Invoiced status.
- Use the quick search (ALT+Q) to find the page Rental Contracts in TRASER DMS 365.
- A list with all rental contracts is displayed.
- Open a rental contract or create a new contract.
- Select Invoice > Invoice Plan from the menu bar.
- The invoice plan with all available invoice plan lines is displayed.
- Mark the line for which you want to create a credit memo. For this, click on the button with the three dots.
- Select Correction > Create Credit Memo in the menu bar.

- A window is opened in which you can create a credit memo line.
- Complete the applicable fields. You can enter the price of the credit memo under Unit Price.
- Click OK.
- The credit memo is listed in the invoice plan lines and receives the Open status.
- To invoice the credit memo, mark the respective line und select Invoice > Create Billing from the menu bar.
- A pop-up window is displayed in which you can select the posting option.
- Confirm the posting optionby clicking OK.
- Click on Yes to open the document.
- Only the credit memo is listed in the document.
- Check the data and click on Posting > Post or Post and Send if you want to send the invoice directly to the customer.
- Click on Yes in the displayed dialogue window to post the invoice.
Tip
To gain an overview of all unposted invoices and credit memos, you can open the page Rent Orders by using the quick search (ALT+Q) in TRASER DMS 365.
Updating All Invoice Plans
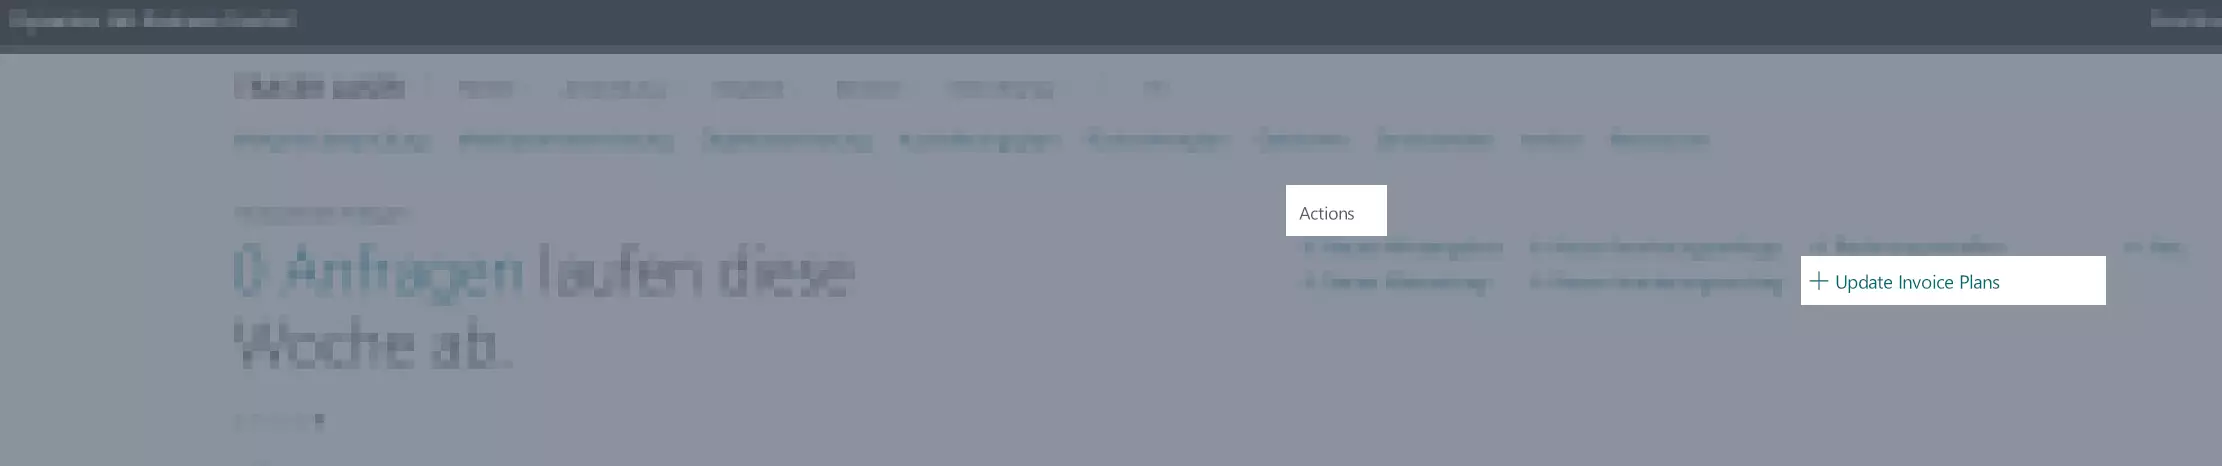
In the Role Center, you can update the invoice plans of all existing rental contracts at once. This can for example be useful to avoid overlooking invoices that have already been created. To update all invoice plans at once, please proceed as follows:
- Open the Role Center for the rental area.
- In the Actions area of the role center, select Update Invoice Plans.
- The window Update Invoice Plans is displayed.
- Optional If necessary, you can filter to limit the number of the invoice plans that should be updated.
- Confirm with OK.
- The selected invoice plans have been updated.
Consumption Invoices
Note
This section is currently under construction.
Show Invoice Plan Consumption
To create for example consumption invoices, you need the consumption invoice plan of a rental contract. This contains all information like for example the status, the invoice type and all price information. To open the consumption invoice plan of a rental contract, please proceed as follows:
Note
The consumption invoice plan of a rental contract is not available until the rental contract has been signed and the status was changed to Active.
- Use the quick search (ALT+Q) to find the page Rental Contracts in TRASER DMS 365.
- A list with all rental contracts is displayed.
- Open the contract for which you want to view the invoice preview or create a new one.
- Select Invoice > Invoice Plan Consumption from the menu bar.
- The respective consumption invoice plan of the related rental contract with all invoice lines is displayed.
Creating Consumption Invoice
Note
This section is currently under construction.
Creating Consumption Credit Memo
Note
This section is currently under construction.
Final Invoice Summary Setup
You can define text lines that contain information on the contract header or the contract object lines. These text lines are then integrated in the rental contract during creation of the final invoice. To set up the final invoice summary, please proceed as follows:
Note
In order for the text lines of the final invoice summary to be shown in the contract during creation of the final invoice, you have to active the Add Final Invoice Summary boolean on the TRASER Rental Setup page under the Invoice Setup register. You can find more information on the setup here.
- Use the quick search (ALT+Q) to find the page Final Invoice Summary.
- The page Final Invoice Summary is displayed.

- In the Sorting No. column, assign numbers to set the order in which the text lines are later to be shown in the contract.
- In the Type column, select whether you want to define contract header information (Contract option) and object line information (Object Line option) for the text lines.
- In the description Beschreibung column, enter a significant description of the defines text line.
You have now set in a first step that a text line is to be defined in the final invoice which either contains information from the contract header or the contract object lines. Please proceed as follows to define the text contents of these text lines:
- Mark the desired text line on the Final Invoice Summary page for which you want to define text contents.
- Select Edit Text from the menu bar.
- The Final Invoice Summary Lines window opens.
- Here you can also assign numbers in the Sorting No. column to set the order in which the text lines are later to be shown in the contract.
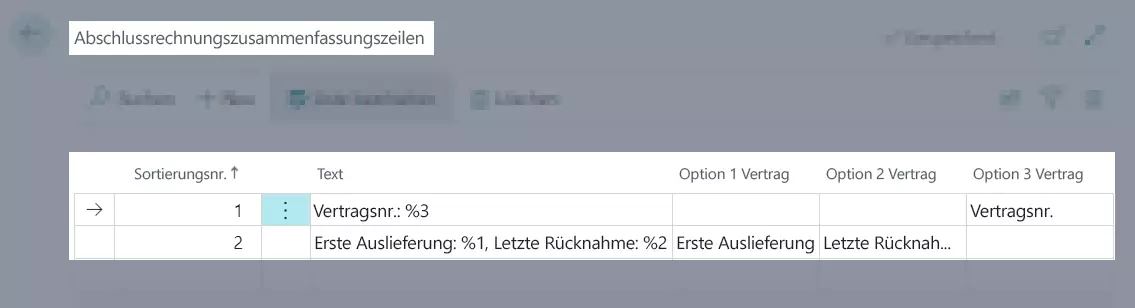
- In the respective columns Option 1 line to Option 6 line, select which information should be shown in the text line (e.g. First Delivery or First Return). There is a different number of columns and options for the Contract or Object Line options that can be selected.
The Text column works with placeholders. A placeholder consists of a percent sign '%' and a following number (e.g. '%1'). The number inside the placeholder refers to the respective column that contains the number in its column name. The information that was selected in this column will be inserted into the text line instead of the placeholder.
For example: '%3' would show the information that was selected in the Option 3 Line. If you have selected the Contract No. option in the Option 3 column, the respective contract number will be automatically inserted into the Text column instead of the placeholder.
- In the Text column, enter the desired information.
- Your changes are saved automatically. Close the page Final Invoice Summary Lines as well as Final Invoice Summary.
'Boolean' Table
The following table describes the boolean status for this chapter.
| Symbol | Status | Description |
|---|---|---|
  |
Disabled | The option is not activated and the related function not available. |
  |
Active | The option is activated and the related function available. |
In the next chapter you will learn everything important about rental purchasing of rent objects.
Continue with next chapter