Working with Protocols
Every time a rental object is
shipped or
returned, a delivery/return protocol will be created. In a protocol, you can make use of different functions.
This page describes how to use protocols and is separated into the following sections:
- Protocol Card
- Process Several Rent Objects in a Protocol
- Add Several Contacts to Protocol
- Set Rent End Date in a Return Protocol
- Deposit additional texts in the protocol
- Open (service) item card from protocol
Protocol Card
This section describes the different fields found on a protocol card.

| Option | Action | Description |
|---|---|---|
| General | No. | This field shows the number of the protocol card. |
| Customer No. | This field shows the number of the customer the rental contract applies for. | |
| Customer Name | This field shows the name of the customer the rental contract applies for. | |
| Protocol Contact | Optional Here, you can enter a contact from the list that the rental contract should apply for. The contact list has been filtered by company number and contact number. | |
| Responsibility Center | Optional Here, you can enter an internal responsibility center for the rental contract. | |
| Responsible Person (Service) | Optional Here, you can enter an internal reference person for the service processing of the rental contract. | |
| Responsible Person (Transport) | Optional Here, you can enter an internal reference person for the transport processing of the rental contract. | |
| Location | This field shows the location from where the rent object will be delivered. | |
| Posting Date | Optional Here, you can enter a date for the posting. | |
| Your Reference | Optional Here, you can enter a customer reference if necessary. | |
| Process In | Optional Here, you can select an external application from the list with which the protocol should be processed. | |
| Status | Status | This field shows the current status of the protocol. |
| Delivery Status / Return Status | This field shows the current delivery/return status of the rent object. | |
| Address | Name (Address) | Optional Here, you can enter a name of a person or company that this protocol is aimed at. |
| Ship-to Code | Optional Here, you can enter a delivery address code so that the rest of the delivery address information will be filled out automatically. | |
| Address | Optional Here, you can enter the first part of the address, for example the street name or street number. | |
| Address 2 | Optional Here, you can enter additional address information such as c/o. | |
| City | This field shows the third part of the address, for example the city or location. | |
| County | Optional Here, you can enter a county or region in order to avoid confusion with place names that sound the same and to make it easier for the vendor to find the right direction. | |
| Post Code | This field shows the second part of the address, for example the post code. | |
| Country/Region Code | This field shows the country/region code for the delivery. If you want to deliver a rent object to another country, this field must be filled out. When it comes to deliveries within the same country, this field is optional. | |
| Contact Phone No. | Optional Here, you can enter a phone number for the on-side contact person. This might come in handy if the vendor has to contact the customer. | |
| Mobile Phone No. | Optional Here you can enter a mobile phone number for the on-side contact person. | |
| Contact Email | Optional Here, you can enter an email address for the on-side contact person. | |
| Shipping Information | Shipping Agent Code | Optional Here, you can select a code for the vendor from the drop-down list. This might be an internal shipping agent or an external shipping agent such as a package service or a goods transport agency. |
| Shipping Agent Service Code | Optional Here, you can select a code for the shipping type. For example, this might be a standard delivery period of 7 days, an express delivery or a forwarding delivery. | |
| Shipping Time | Optional Here, you can enter the expected shipping time. If you select a code for the Shipping Agent Service Code the transport time will be taken from the value you entered for this shipping agent service code. | |
| Additional Text | In this register you can create additional texts which will then be shown on the printed protocol. For more information on depositing additional texts, click here. | |
| Attributes Delivery/Return Object | This table shows the attributes which were entered in a rental contract. You can find more information on assigning attributes here. |
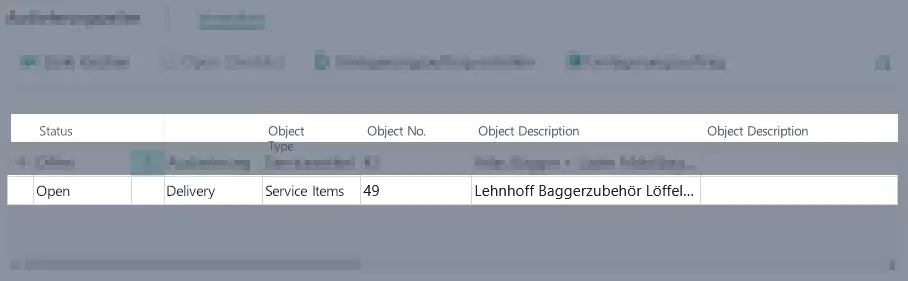
Delivery and Return Lines on Protocol Card
This section describes the columns in the delivery/return lines of a protocol card.

| Column | Description |
|---|---|
| Status | This column shows the status of the delivery/return line. |
| Protocol Type | This column shows whether the line is a delivery or a return line. |
| Object Type | This column shows whether the rent object is an item, service item or a resource. |
| Object No. | This column specifies the (service) item number of the rent object. This field is only filled if a specific rent object has been reserved or planned. For more information, click Assign specific object numbers to lines. |
| Object Description | This column specifies the description of the rent object as it is stored in the (service) item. This field is only filled if a specific rent object has been reserved or planned. For more information, click Assign specific object numbers to lines. |
| Object Description 2 | See Object Description |
| Quantity | This column shows the rent object quantity that is ought to be delivered/returned. |
| Unit of Measure Code | This column shows the unit of measure of the rent object. |
| Location Code | This column shows the unit of measure of the rent object. More information on rent locations you will find here Rent Objects. |
| Bin Code | This column shows the bin code from where the rent object will be delivered/returned. More information on rent locations you will find here. |
| Picklist Exists | This column shows whether the protocol line is being used in a picklist document. |
| Current Location | This column specifies the current location of the rent object. |
| Qty. Available | This column specifies what quantity of the selected rent object is available at the current location. |
| Quantity to Process | This column shows the rent object quantity for that should be processed in the protocol. |
| Quantity to Sell | Only in Return Lines This column shows how many of the returned rent object are ought to be resold. This step is only possible if a sales location has been assigned to the selected location. If the rent object should be rented out again, you can leave this column empty. You will find further information under: Return Rental Object for Repair. |
| Quantity to Scrap | Only in Return Lines This column shows how many of the returned rent object are no longer fit for use. This step is only possible if a sales location has been assigned to the selected location. If the rent object should be rented out again, you can leave this column empty. You will find further information under: Return Rental Object for Repair. |
| Unit of Measure Code (Process) | This column shows the unit of measure code of the rent objects that are ought to be processed. |
| Interruption Type | This column shows the interruption type of the rental contract. |
| Quantity Processed | This column shows the processed quantity after the protocol has been posted. |
| Shipment Date / Return Date | This column shows the date on which the rent object should be delivered/returned. |
| Shipment Date Prefix / Return Time Prefix | This column shows whether the rent object should be delivered/returned by or from a certain date. |
| Shipment Date / Return Time | This column shows the date/time on which the rent object should be delivered/returned. |
| Ship-to Date | Only in Delivery Lines This column shows the date by which the rent object must be delivered to the customer. |
| Ship-to Time Prefix | Only in Delivery Lines This column shows whether the rent object should be delivered by or from a certain time. |
| Ship-to Time | Only in Delivery Lines This column shows the time at which the rent object is to be delivered. |
| Rent Start Date | Only in Delivery Lines This column shows the starting date of the rent period. |
| Requested Rent Period Start Date | Only in Delivery Lines This column shows the requested starting date of the rent period as specified in the contract line. |
| Rent End Date Registered | Only in Return Lines This column shows whether an ending date has been registered for the rental period. |
| Rent End Date | Only in Return Lines This column shows the registered ending date for the rental contract. |
| Full Return | Only in Return Lines This column shows whether the posting of the protocol line will result in a full return of the contract line. This check box has to be activated for the rent end date to be registered. |
| Rent End Reported On Date | Only in Return Lines This column shows the date on which the end date of the rent period was reported. |
| Rent End Reported On Time | Only in Return Lines This column shows the time on which the end date of the rent period was reported. |
| New Rent Status Object | Only in Return Lines In this column you need to enter a new rent status for the rent object when posting the protocol line. For more information on rent statuses, click Rent Status. |
| Consumption Type Code 1 | This column shows the main type of consumption. You can find information on creating consumption types under Tracking consumption mileage. |
| Consumption Value 1 | This column shows a registered value for the main type of consumption. You can find information on creating consumption types under Tracking consumption mileage. |
| Consumption Type Code 2 | This column shows the second main type of consumption. You can find information on creating consumption types under Tracking consumption mileage. |
| Consumption Value 2 | This column shows a registered value for the second main type of consumption. You can find information on creating consumption types under Tracking consumption mileage. |
| Shipment Comment / Return Comment | Here, you can enter a comment for the delivery/return. |
Process Several Rent Objects in a Protocol
You can process multiple rent objects in the same protocol. Please proceed as follows:
- Open a shipment/return protocol. For more information on Delivery or Return go the the respective sections.
- Select Process > Add another line from the menu bar.

- A new window with all rental contract lines opens.
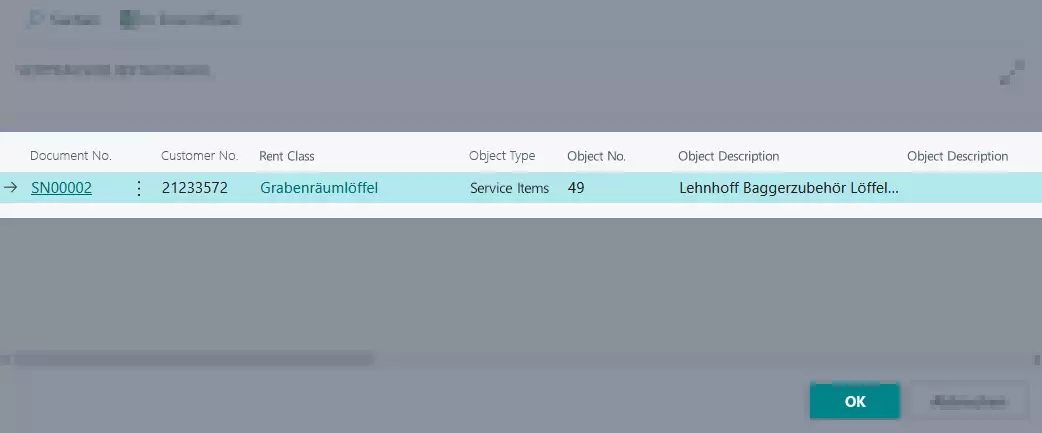
- Select an object line you would like to add to the protocol and then click OK.
- The line will be added to the Delivery Lines / Return Lines and can be processed in the same protocol.
Add Several Contacts to Protocol
You can add multiple contacts to the same protocol. This way, the person in charge has the possibility to call another contact person in case the main contact is not available. Please proceed as follows:
- Open a shipment/return protocol. For more information on Delivery or Return go the the respective sections.
- Open the Contacts tab.
- If you select a contact for the Protocol Contact in the General tab, the contact will already be added to the table.
- To add several contacts to a protocol, click on the three dots in the Contact Name column.
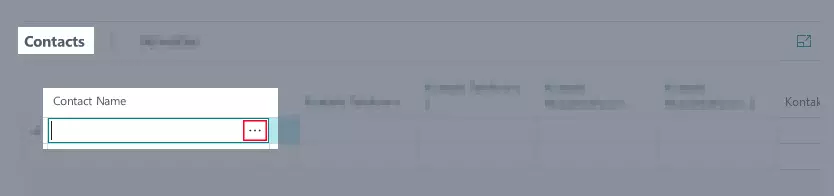
- A list with all contacts that are linked to the rental contract opens.
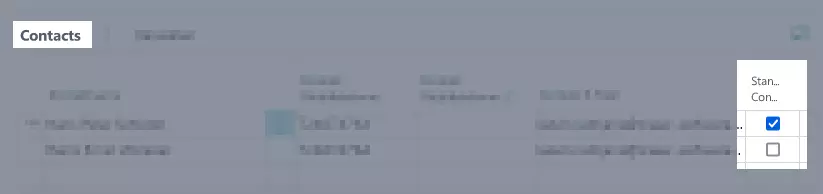
- Select a contact from the list.
- All other fields will be filled in automatically.
- Repeat this step as often as needed. You might also add a contact manually so that it doesn’t get added to the system.
- If you activate the check box in the Default Contact column, the contact will always be listed first and will be automatically transferred to the Protocol Contact field in the General register.
Set Rent End Date in a Protocol
You can specify the ending date of the rent period in the return protocol. This way, no invoices will accidentally be sent to the customer. To set the rent period end in a return protocol, proceed as follows:
Note
To be able to enter an ending date for the rent period, the following requirements have to be met:
- The return protocol status has to be set to Open.
- The column Quantity to Process must be filled in in the return protocol. You can only enter an ending date if the Full Quantity has been returned. You cannot enter an ending date when it comes to partial returns.
- All checklists in the return protocol must be completed. For more information on checklists click here.
- Open a Return Protocol. For more information on this, click here.
- In the Return Lines, enter the ending date for the rent period in the Rent End Date column. Either, select a date from the calendar or enter h to select the current date.
- In the Rent End Date Reported On Date column under the Return Lines register, enter the date on which the rent end was reported. Either, select a date from the calendar or enter h to select the current date.
- In the Rent End Date Reported On Time column under the Return Lines register, enter the time on which the rent end was reported.
- Select Rent End Date > Register Rent End Date from the menu bar.
- The check box in the Rent End Date registered column will be set automatically. The field in the Quantity to Process column can no longer be edited.
- The date which has been entered in the Rent End Date column will be automatically transferred to the Invoice To column in the Lines register of the corresponding rental contract.
- If you want to edit the rent end date at a later time, you can do this by clicking Rent End Date > Undo Rent End Date Registration in the menu bar of the return protocol.
Deposit additional texts in the protocol
Additional texts that are deposited in a printed will also be shown on the printed protocol. You can enter free text or work with modules from Standard Text Codes. To deposit additional texts in protocol, please proceed as follows:
- Open a shipment/return protocol.
- Navigate to the Additional Text register.
- Optional Select a standard text code in the Text Code column. The text modules that are stored there, if applicable, will be automatically entered in the Additional Text column and can also be edited there, if needed. For more information on creating standard text codes, click here.
- In the Additional Text column, enter a free text which should be shown on the printed protocol.
- Your changes are saved automatically.
Open (service) item card from protocol
You can directly open the respective (service) item from the delivery or return lines of a protocol. Please proceed as follows:
- Open a shipment/return protocol.
- Navigate to the Delivery Lines or Return Lines register.
- Select Related > Rental Object from the menu bar.
- The respective (service) item card is opened.
In the next chapter, you will learn everything you need to know about the process of shipping/returning rental objects in case repairs have to be carried out.
Continue with next chapter