


Financing Module
This chapter covers everything you need to know about the Financing Module. The financing module allows you to create, calculate, analyze and manage financings and loans in our ERP solution. This is particularly helpful for larger investments that need to be financed over a longer period of time, e.g. expensive machines. In addition, the financing module makes postings of repayments and interest rates much easier. The contents of this chapter are divided into the following sections:
Setup
Before you can use the financing module, you have to set up certain parameters. The next sections explain in more detail how to set up the financing module.
Setting Up Financing Default Dimensions
To set up financing dimensions, proceed as follows:
- Use the quick search (ALT+Q) to find the Dimensions page.
- Select the Financing dimension.
- Click Actions > Function > Other > Automatic Dimension Setup in the menu bar.
- On the Automatic Dimension Setup page, fill in the columns according to the following table:
| Column | Description |
|---|---|
| Table ID | Select the table you would like to set up dimensions for. |
| Table Name | This field is filled in automatically by the system once you have selected a Table ID. |
| Field No. | Select which field should automatically receive a dimension value. |
| Field Name | This field is filled in by the system once you enter a Field No.. |
| Dimension Code | This field is filled in by the system. If correctly set up, this field should show the Financing value. |
| Value Posting | Select a value posting method. Click here for more information on the dimension posting. |
Your changes are saved automatically. You have successfully set up the dimensions for the financing module. The next section explains how to set up the general parameters for the financing module.
Setting Up General Parameters for Financings
Before you can work with financings, you have to set up certain general parameters. To do so, proceed as follows:
- Use the quick search (ALT+Q) to find the Financing Setup page.
- Fill in the fields in the General FastTab according to the following table:
| Field | Description |
|---|---|
| Financing Nos. | Enter a number series for financings. |
| Financing Dimension Code | Enter a dimension code for financings. |
| General Journal Template Name | Enter a general journal template name for financings. |
| General Journal Batch Name | Enter a general journal batch name for financings. |
| Recurring General Journal Template Name | Enter a value for recurring general journal template names. |
| Recurring General Journal Batch Name | Enter a value for recurring general journal batch names. |
| Line Color | Enter a line color for posted financing lines. |
| Automatic posting to short/mid/long-term loan accounts | Activate this toggle switch to enable the automatic posting to loan accounts according to maturity. |
| Automatic posting method to short/mid/long-term loan accounts | This field is only displayed when you activate the Automatic posting to short/mid/long-term loan accounts toggle switch. In this field, you can specify whether the short or long posting method should be used. When using the long posting method, the system initially posts to the account specified in the Financing Account No. (Short) field in the Financing Posting Setup when filling in the general journal with financing postings. This is because short-term liabilities always get paid back first. When using the short posting method, the system directly posts to the account specified in the Financing Account No. (Long) field in the Financing Posting Setup. The outcome of both posting methods is the same. |
| Automatic posting to short/mid/long-term Interest accounts | Activate this toggle switch to enable the automatic interest posting. The interest is calculated based on the amounts with short, mid and long Maturity. |
You have successfully completed the general setup. The next section describes how to set up maturities for financings.
Tip
You can also use the financing wizard to set up the entire financing module. The wizard assists you through all the steps that are needed to set up the financing module. You can open the wizard via the menu bar. If you would like to use this wizard, click Related > Financing Wizard.
Setting Up Maturities
Before creating a financing, you can set up specific maturities that can later be used for financings. To define maturities, proceed as follows:
- Use the quick search (ALT+Q) to find the Financing Setup page.
- Select Related > Maturity Setup in the menu bar.
- To set up a new maturity, click New in the menu bar.
- Fill in the columns according to the following table:
| Column | Description |
|---|---|
| Code | Enter a specific code for the maturity. |
| Maturity Type | Enter the type of maturity, e.g. short. |
| Description | Enter a specific description for the maturity. |
| Period Month (Min) | Enter the minimum period for the maturity in months. |
| Period Month (Max) | Enter the maximum period for the maturity in months. |
| Period Length | Enter the period length for the maturity. |
You have successfully set up a new maturity. The next section describes how to set up financing partners.
Setting Up Financing Partners
Before creating a financing, you can set up financing partners or lenders for later use in financings. To set up a new financing partner, proceed as follows:
- Use the quick search (ALT+Q) to find the Financing Setup page.
- Click Related > Financing Partners in the menu bar.
- To set up a new financing partner, click New in the menu bar.
- Fill in the columns according to the following table:
| Column | Description |
|---|---|
| Code | Enter a specific code for the financing partner. |
| Description | Enter a specific description (name) for the financing partner. |
| Currency Code | Enter the currency code for the financing partner. |
| Credit Limit | Enter the credit limit amount for the financing partner. |
| Credit Limit (LCY) | If the financing partner is from a different country, enter the credit limit amount in the local currency. |
| Posting Type | Enter the posting type that you would like to assign to this financing partner. |
| Balancing Account | Enter the balancing account that you would like to assign to this financing partner. |
| Data Exchange Definition for Import | From this dropdown list, select the data exchange definition to be used for importing financing plans for the respective financing partner. For more information on how to set up data exchange definitions, click here. |
You have successfully set up a new financing partner. The next section describes how to set up the posting of financings.
Setting Up Financing Posting
Before you can create a financing, you have to specify the accounts for posting the repayments. This can be set up per financing partner or financing number. To set up the financing posting, proceed as follows:
- Use the quick search (ALT+Q) to find the Financing Setup page.
- Select Related > Financing Posting Setup in the menu bar.
- To create a new setup, click New in the menu bar.
- Fill in the columns according to the following table:
| Column | Description |
|---|---|
| Financing Partner | Enter the financing partner you would like to set up the financing posting for. |
| Financing Type | Optional Enter the financing type, choosing between Active and Passive. For active financings, all posting lines contain a negative sign in front of the amount. |
| Financing No. | Optional Enter a financing number for the posting setup. If you do not enter a number, the setup is used for all postings by the selected financing partner. |
| Loan Type | Enter a loan type for the posting setup. Click here for an overview of the different loan types. |
| Financing Account No. (short) | Enter an account to which short-term financings should be posted. |
| Financing Account No. (mid) | Enter an account to which medium-term financings should be posted. |
| Financing Account No. (long) | Enter an account to which long-term financings should be posted. |
| Interest Financing Account No. (short) | Enter an account to which short-term interest rates should be posted. |
| Interest Financing Account No. (mid) | Enter an account to which medium-term interest rates should be posted. |
| Interest Financing Account No. (long) | Enter an account to which long-term interest rates should be posted. |
| Expense Account No. | Enter an account for other expenses. |
| Deferral Account No. | Enter a deferral account. |
You have successfully set up the financing posting for a specific financing partner. The next section describes how to set up processing statuses for financings.
Setting Up Processing Statuses
Before creating a financing, you can set up processing statuses that you can assign to a financing manually, e.g., In Progress or Loan Discharged. To set up a processing status, proceed as follows:
- Use the quick search (ALT+Q) to find the Financing Setup page.
- Click Related > Processing Status in the menu bar.
- To set up a new status, click New in the menu bar.
- Use the Code column to enter a significant code for the status.
- Use the Description column to enter a description for the processing status. The description should contain a full description of the status, e.g. Checking.
Your changes are saved automatically. You have successfully set up a new processing status that you can assign to a financing manually. You can filter financings by their processing status. The next section covers everything you need to know about working with financings.
Financings
After setting up the financing module, you can finally create financings. The next section describes how to create a financing.
Creating Financings
To create a new financing, proceed as follows:
- Use the quick search (ALT+Q) to find the Financing List page.
- To create a new financing, click New in the menu bar.
- A new financing card opens.
- In the General FastTab, fill in the fields according to the following table:
| Field | Description |
|---|---|
| No. | Enter the number for the financing. If you have specified a number series in the Financing Nos. field of the financing setup, this field is filled in automatically by the system. |
| Description | Enter a description for the financing. |
| Comment | Optional Add a comment to the financing. |
| Financing Partner Code | Enter a financing partner or lender. |
| Financing Category Code | Optional Enter a financing category code. |
| Currency Code | Optional Enter a currency code if the financing is in a different currency. |
| Contact No. | Optional Enter a contact person for this financing. |
| Name | This field is filled in by the system if you enter a private person. |
| External Loan No. | Optional Enter an external loan number. This number is also automatically used as the External Document No. when completing the general journal to post financing lines. |
| Account Type | Optional You can add this field via the Personalize function to specify the related account type of the financing. Possible options are G/L Account and Bank Account. |
| Loan G/L Account | Optional Enter a loan G/L account. |
| Balance | This field is filled in automatically and shows the balance of the loan G/L account. |
- Optional Fill in the remaining fields in the General FastTab as needed.
- Navigate to the Financing Information FastTab.
- Fill in the fields according to the information in the following table:
| Field | Description |
|---|---|
| Loan Type | Enter the loan type. You can choose between the following types: Annuity Loan, Leasing, Repayment Loan, Maturity Loan. Click here for an overview of the different loan types. |
| Loan Sum | Enter the net loan sum. |
| Loan Sum (LCY) | This field is filled in by the system and cannot be edited. |
| Debt Discount & Costs | Enter a sum for the debt discount and other costs, such as the processing fee, that affect the amount paid out to the borrower. To avoid errors, only enter costs that are posted to the same account as the interest amount. |
| Nominal Interest (%) p.a. | Enter the nominal interest that was agreed upon in the loan agreement. |
| Effective Interest (%) p.a. | This field is filled in by the system and cannot be edited. The effective interest also contains further credit costs. |
| Interest Calculation per Day | Optional Activate this toggle switch if the interest should be calculated per day. |
| Repayment Amount (Period) | Only if loan type = Repayment Loan Enter the repayment amount. |
| Installment Amount (Period) | This field is filled in by the system once you enter a time period for the financing. |
| Outstanding Liability | This field is filled in by the system. |
| Starting Date | Enter the starting date for the financing. |
| End Date | Enter the end date for the financing. Once you have entered a starting and end date, the system calculates the installment amount and the run-time of the financing. |
| Run-time (Months) | This field is filled in by the system once you enter a starting and end date. |
| Payout Date | Specify when the loan amount is paid to the borrower. |
| Period ends at Month-End | Optional Activate this toggle switch if the financing period should always end at the end of the month. If you activate this toggle switch, the first billing period for a financing that was created in the middle of the month ends at the end of the same month. |
| Add Period Null | Optional Activate this toggle switch if you always want to add a period null to the financing lines. This way, the system can show the period between the payout date and starting date. |
- Optional Enter a service item in the Service Item No. field in the Service Item FastTab if the financing you are creating is for a specific service item. The information and dimensions stored on the service item as well as related purchase or sales document data are automatically transferred into the financing.
- In the menu bar, click Calculate so the system calculates the financing lines in the Lines FastTab.
Tip
You can add the Residual Value field via the Personalize function to track the residual value of a service item during the financing period.
You have successfully set up a new financing. The next section explains how to import financing plans, if needed.
Tip
If needed, you can add attachments and links to a financing. To do so, open the financing card and display the FactBox area (ALT+F2). In the FactBox area, click the Attachments FactBox tab. Here, the Attachments and Links FactBoxes can be used to add supporting documents or links to the financing.
Importing Financing Plan
Note
Before you can import financing plans, you must define the data exchange definition for the respective financing partner. For more information on setting up financing partners, click here.
As an alternative to automatically calculating financing lines, as described in the previous section, you can also import entire financing plans as a CSV file directly from financing partners (e.g. banks) into the financing lines. This enables the use of flexible interest models, the mapping of irregular repayment schedules and reduces manual data entry. Proceed as follows to import a financing plan:
- Use the quick search (ALT+Q) to find the Financing List page.
- Open an existing financing card for which you want to import a financing plan.
- Navigate to the Lines FastTab.
- In the menu bar of the FastTab, click Import > Import Financing Plan.
- In the following window, select the financing plan you want to import.
- Confirm your selection with OK.
You have successfully imported a financing plan. The financing lines are filled in automatically based on the data exchange definition and the information on the financing card. The next section explains how to post financing lines.
Posting Financing Lines
This section describes how to post specific financing lines. The following description assumes that you have already created a financing. Proceed as follows to post a financing line:
- Use the quick search (ALT+Q) to find the Financing List page.
- Open an existing financing with the line you want to post.
- Navigate to the Lines FastTab.
Note
If no financing lines are displayed, you may have to click Calculate in the menu bar of the page.
- Select the line you want to post.
- In the menu bar, click Fill Gen. Journal.
- Navigate to the Options FastTab.
- Fill in the fields according to the information in the following table:
| Field | Description |
|---|---|
| Starting Date | Enter the start date for the posting period. The start date should be the same as the Start Date (Period) in the selected line. |
| End Date | Enter the end date. The end date should be the same as the end date specified in the selected line. |
| Posting Date | Enter the posting date for the financing line. |
| Document No. | Enter an individual number to identify the posting. |
| Posting Description | Optional Add a description to the posting. If you leave this field empty, the system automatically enters Debt Discount, Nominal Interest Amount or Repayment Amount in the corresponding journal lines. |
| Insert Balance G/L Account | Optional Activate this toggle switch if a balance G/L account has been assigned to the financing partner. This results in complete posting records for the repayment and interest postings. |
| Show Debt. Discount separated | Optional Activate this toggle switch if you want the debt discount and the nominal interest amount to have two separate lines for the null period. If the toggle switch is deactivated, the cumulative amount is shown in one single line. |
- Confirm your entries with OK.
- The General Journals page opens, showing all postings for the financing line(s).
- Check all information.
- Then, click Post/Print > Post or Post and Print.
- Confirm the dialog window with Yes to post the lines.
- The lines are posted.
- Close the General Journals page to return to the financing overview.
- Navigate to the Lines FastTab.
- The Posted Repayment Amount and Posted Interest Amount columns should now contain values. The values are highlighted in blue. In addition, the checkbox in the Posted column should be selected for the posted lines.
- To view the G/L entries, click these values.
Tip
You can also open the Fill Gen. Journal window directly from the Financing List page by selecting the desired line and clicking Actions > Fill Gen. Journal in the menu bar. If this option is not displayed, first click More Options.
You have successfully posted a financing line. The next section describes how to make changes to an existing financing.
Changing Financings
This section describes how to make changes to an existing financing. The following description assumes that you have already created a financing. To make changes to a financing, proceed as follows:
- Use the quick search (ALT+Q) to find the Financing List page.
- Open a financing you would like to change.
- Click Changes in the menu bar.
- Fill in the columns according to the information in the following table:
| Column | Description |
|---|---|
| Start Date | Enter the start date of the change for the financing in this column. |
| Type | Select the type of change in this column, e.g., Change Nominal Interest %. |
| Value | Enter the new value in this column, e.g., 8, if you want the new nominal interest to be 8 percent. |
| Description | Enter meaningful information in this column, e.g., who approved the change or why the change occurred. |
- Close the page. Your changes are saved automatically.
- To apply the change, click Calculate in the menu bar of the Financing List page again.
- Navigate to the Lines FastTab.
- Check whether the changes made are displayed. The Information column should also display the change in red.
You have successfully changed a financing. The next section describes how to access financing information via the service item card.
Looking Up Financing Information on Service Item Card
If you have added a service item to a financing, you can access the financing information at any time via the service item card. To do so, proceed as follows:
- Use the quick search (ALT+Q) to find the Service Items page.
- Select the service item for which you want to view the financing information.
- Click into the Financing field in the General FastTab.
Note
If several financings exist for the same service item, a list filtered to this service item is displayed. Select the desired financing from this list.
- The corresponding financing card opens, where you can view all important financing information for this service item.
You have successfully accessed financing information via the service item card.
Printing Financing List
This section describes how to print a financing list report via the financing list. To do so, proceed as follows:
- Use the quick search (ALT+Q) to find the Financing List page.
- Click Reports > Financing List in the menu bar.
- The Print Wizard is displayed.
- Optional Customize the settings in the Options FastTab as needed.
- Click Print to print the report.
You have successfully printed a financing list containing all current financings.
Printing Financing Plan
To print the financing plan for a specific financing, proceed as follows:
- Use the quick search (ALT+Q) to find the Financing List page.
- Select the desired financing.
- Click Reports > Financing Plan in the menu bar of the financing list.
- The Print Wizard is displayed.
- Optional Customize the settings in the Options FastTab as needed.
- Click Print to print the report.
You have successfully printed the financing plan for a financing.
Printing Credit Limit List
To print a credit limit list for all current financings, proceed as follows:
- Use the quick search (ALT+Q) to find the Financing List page.
- Click Reports > Credit Limit List in the menu bar.
- The Print Wizard is displayed.
- Optional Customize the settings in the Options FastTab as needed.
- Click Print to print the report.
You have successfully printed a credit limit list containing all current financings.
Loan Type Overview
The following table shows an overview of the different loan types.
| Loan Type | Diagram |
|---|---|
| Annuity Loan | 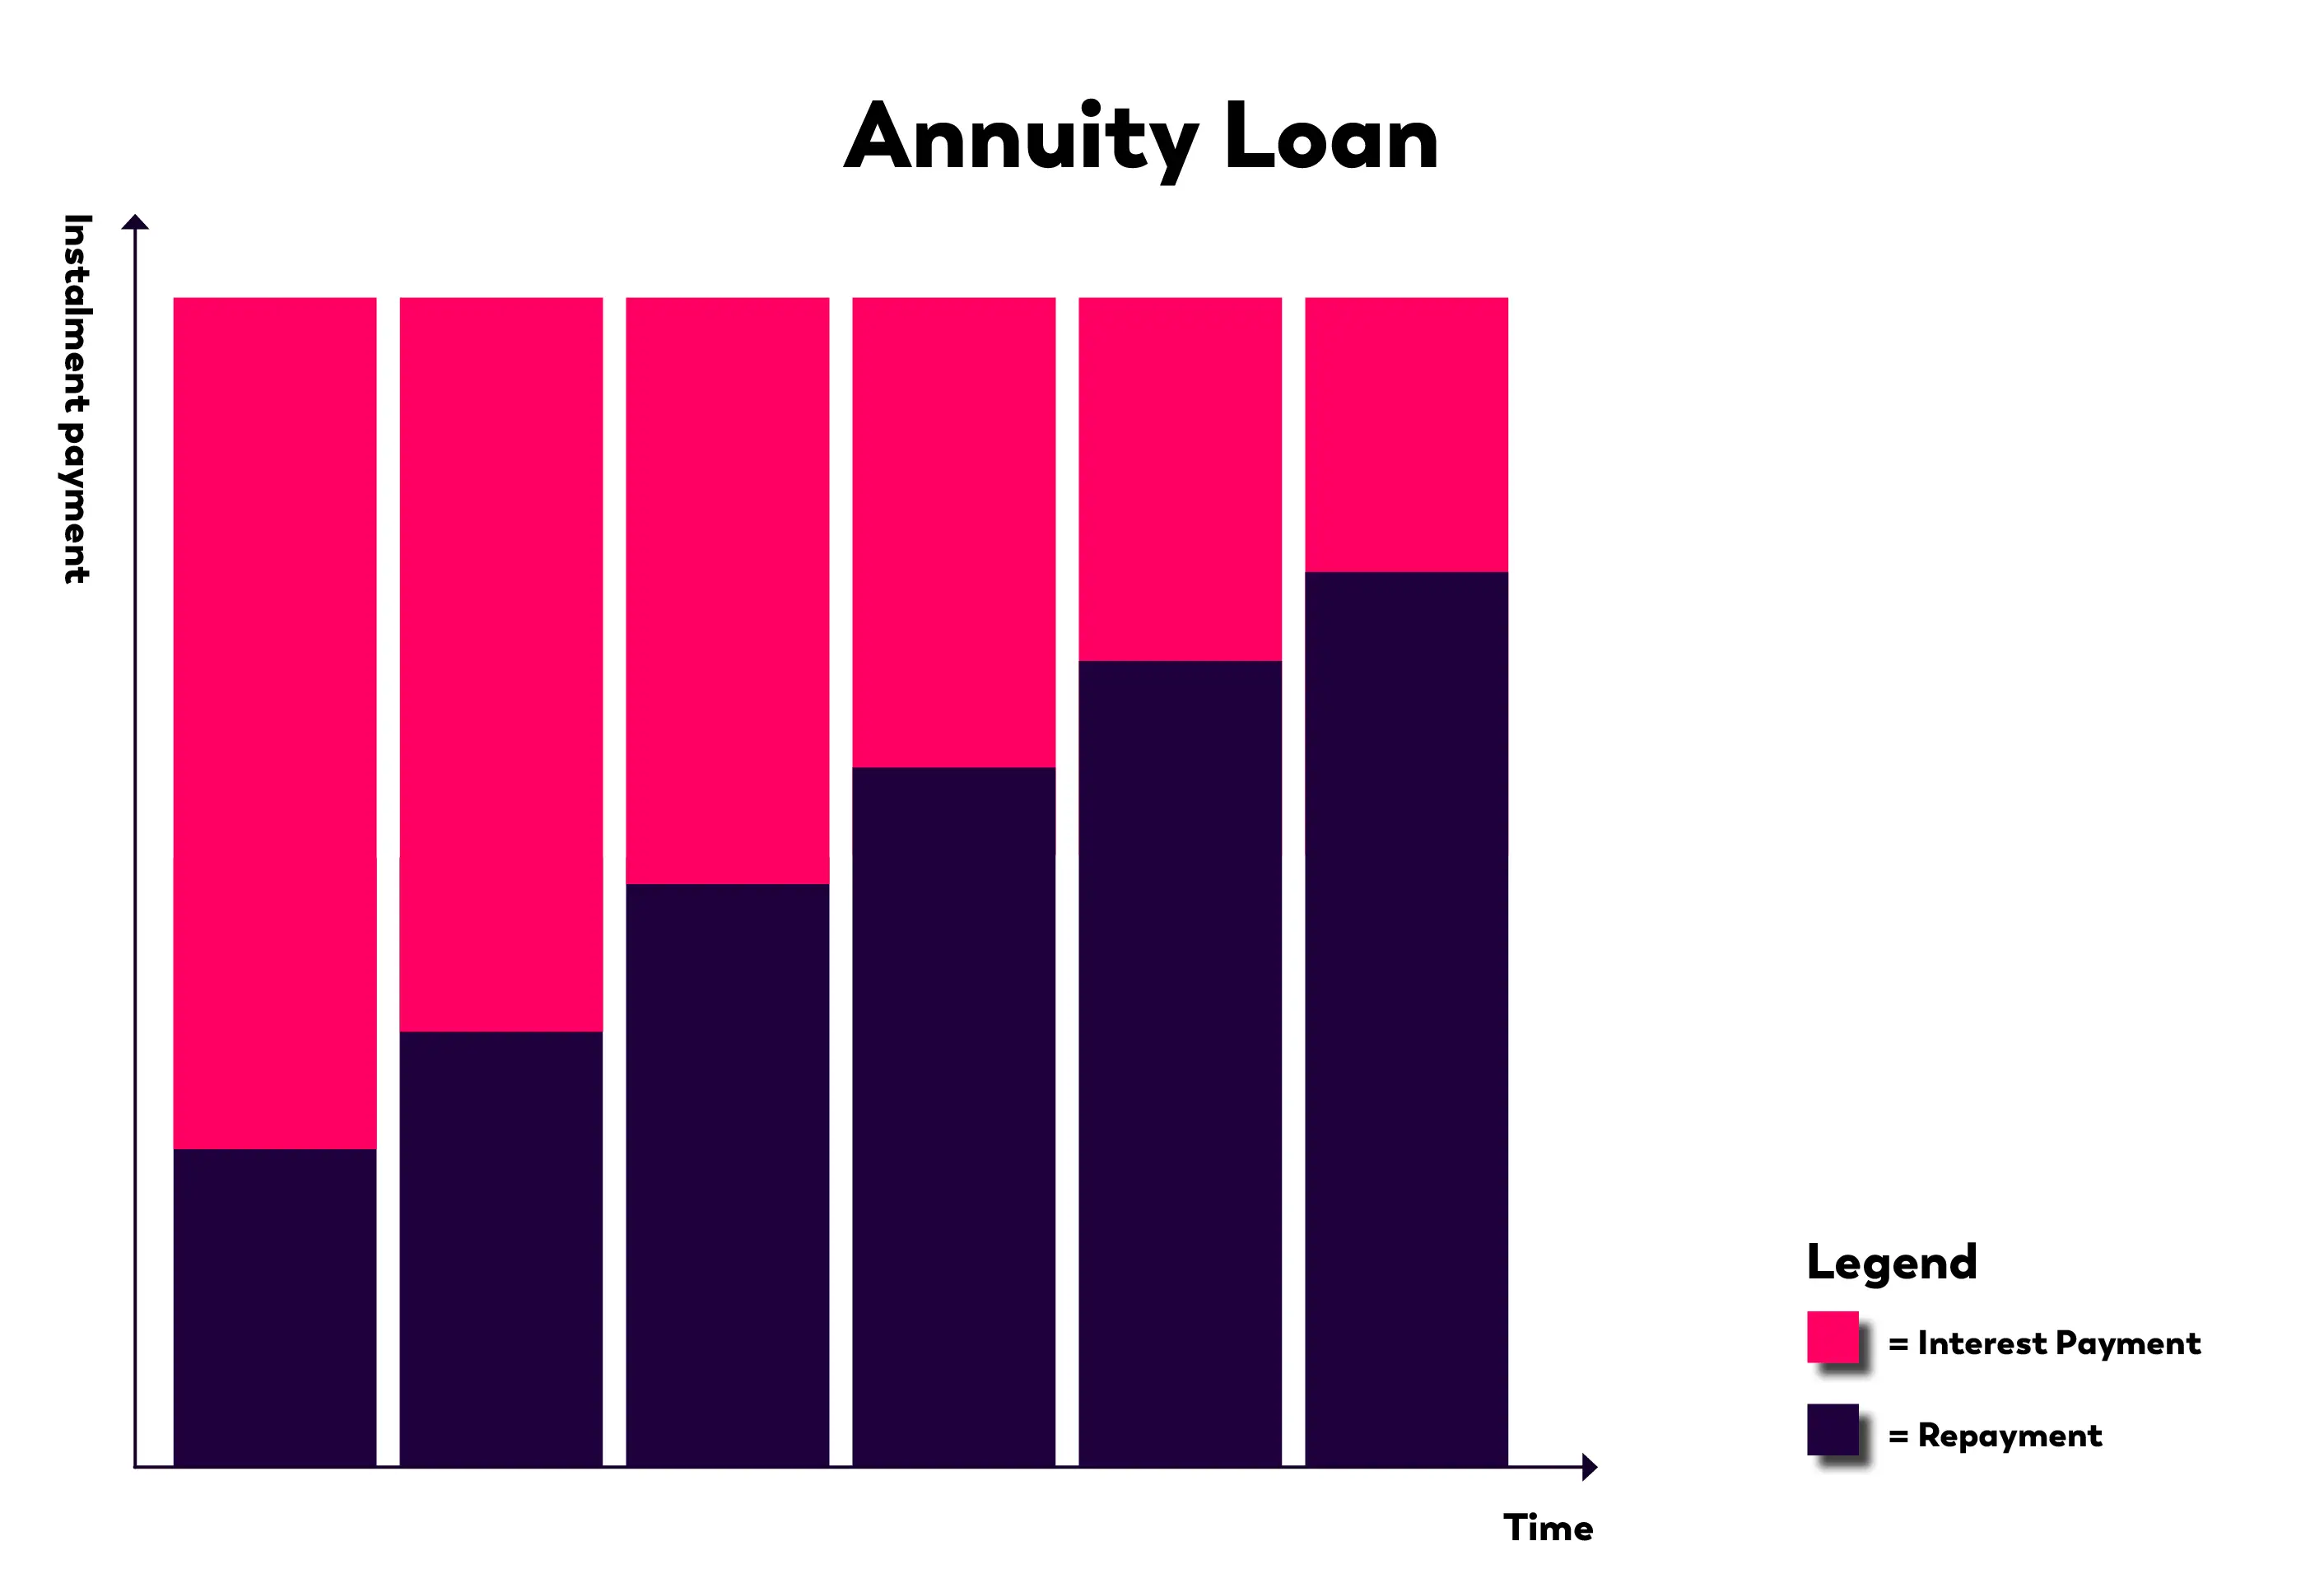 |
| Repayment Loan | 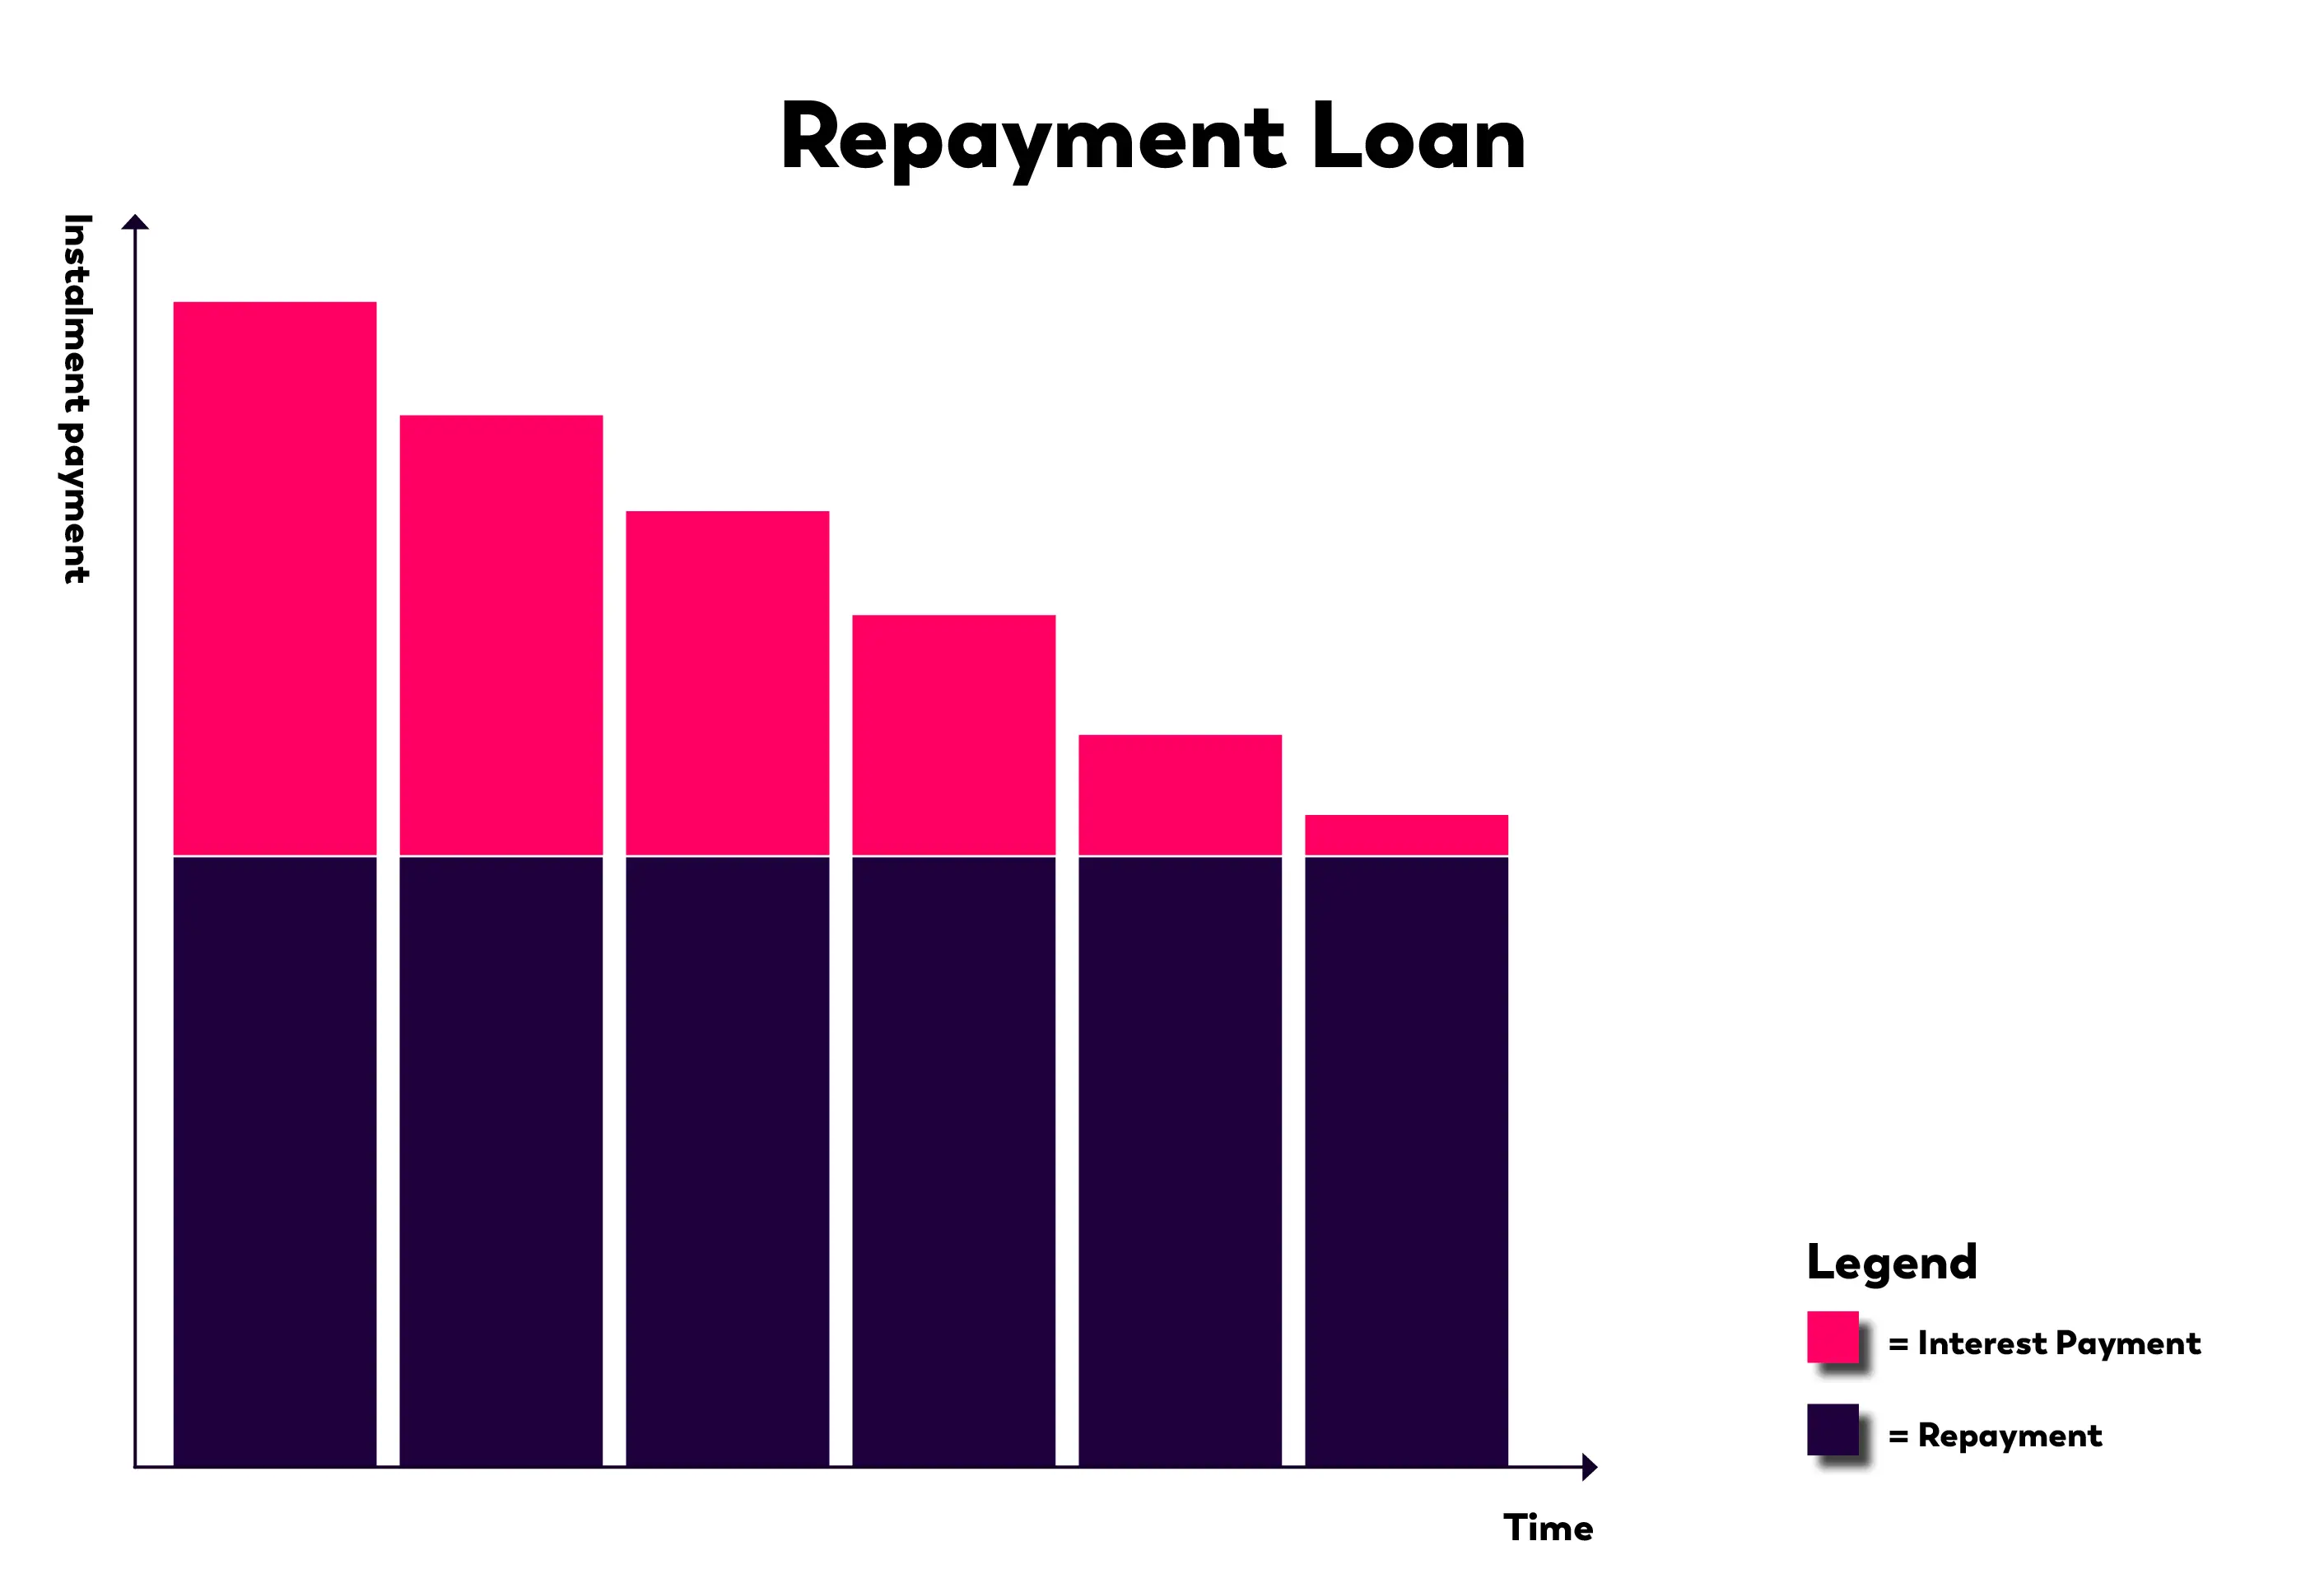 |
| Maturity Loan | 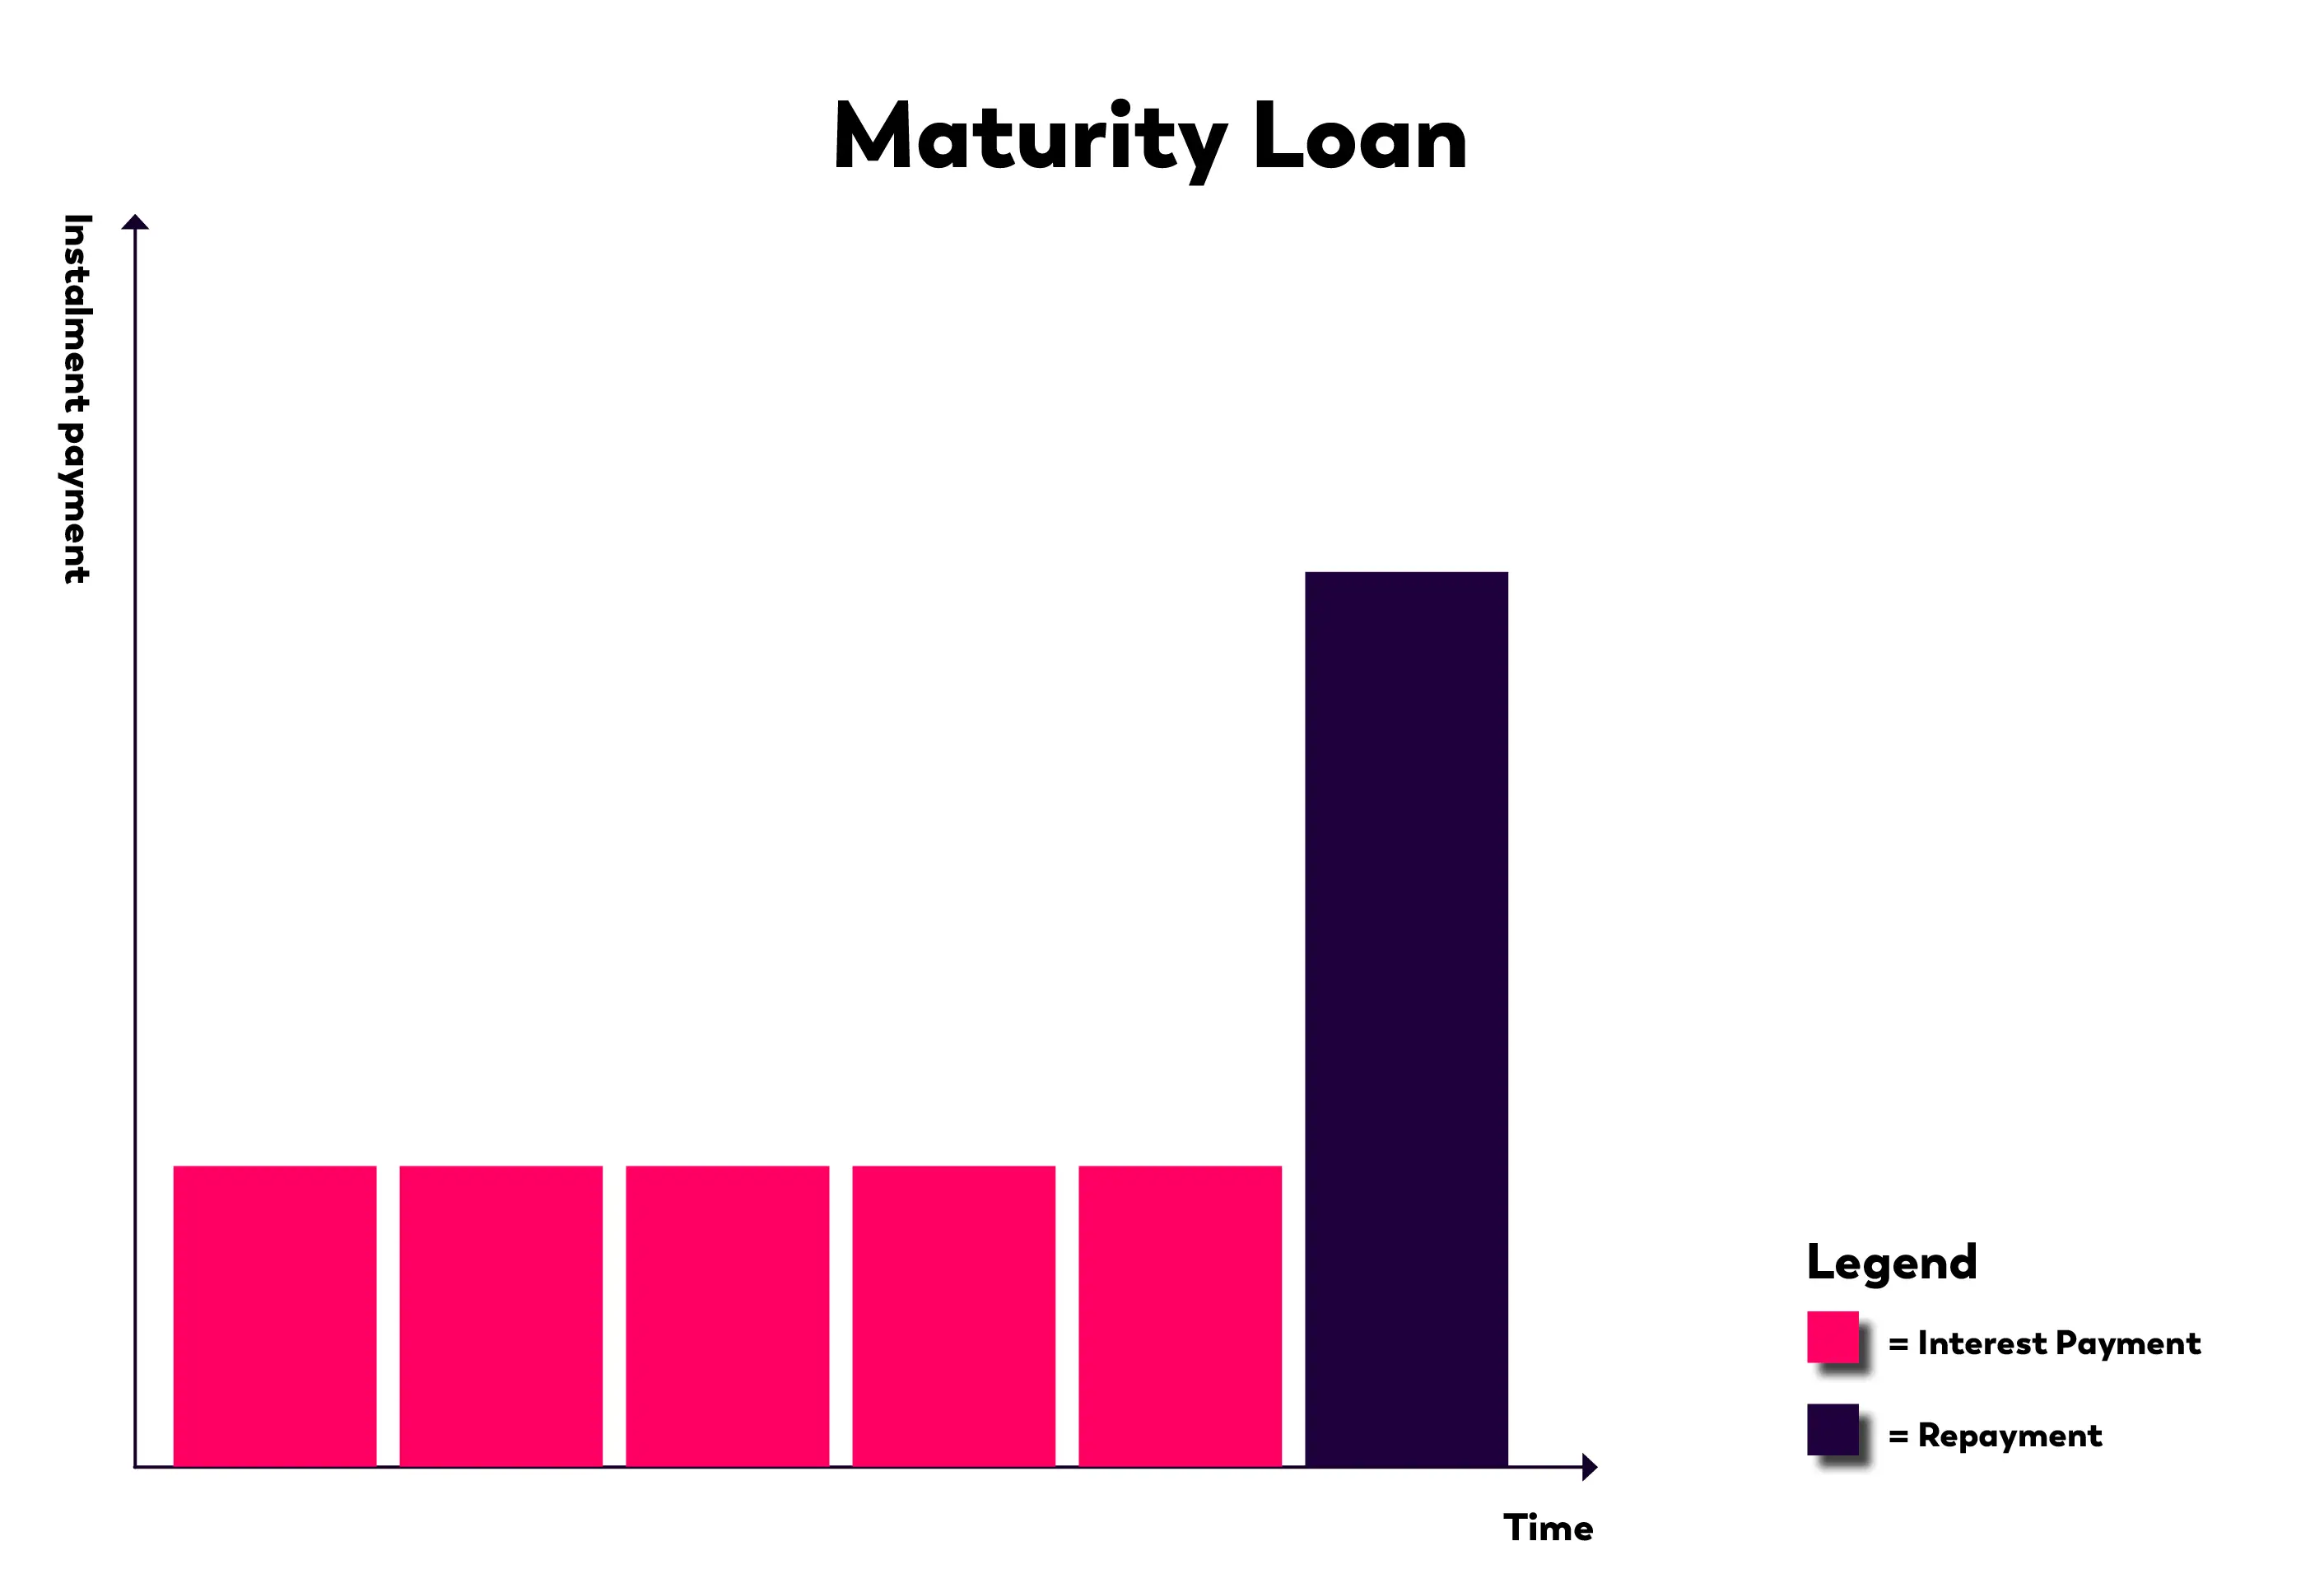 |