


Deployment of Azure Resources
Before you can use Aptean Equipment BI Connect, you must deploy several resources in the Azure Portal and create an app registration. These form the technical foundation for the connection to Microsoft Fabric and enable secure data exchange between Microsoft Dynamics 365 Business Central and Azure. This chapter describes all necessary steps and is divided into the following sections:
- Creating a Resource Group
- Creating a Fabric Capacity
- Creating an App Registration
- Creating a Client Secret
- Adding API Permissions
Creating a Resource Group
A resource group bundles all Azure resources you need for the connection to Microsoft Fabric and must be created before the Fabric capacity. To create one, proceed as follows:
- Log in to the Azure Portal and open the Resource groups page.
- Click on Create in the menu bar.
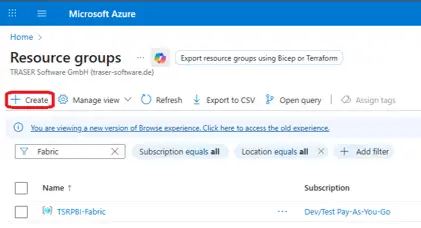
- In the Subscription field, select a suitable subscription.
- In the Resource group name field, enter a meaningful name for the resource group, e.g., Fabric-RGroup.
- In the Region field, select a suitable region.
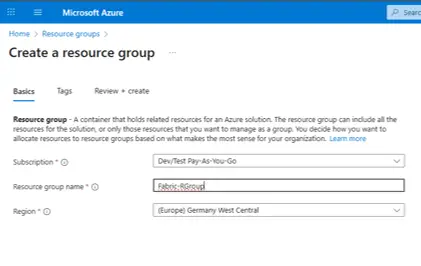
- Click on Review + create, then click Create.
The resource group is created. The next section explains how to create a Fabric capacity within it.
Creating a Fabric Capacity
The Fabric capacity provides the compute power required for your Fabric workspaces. To create one, proceed as follows:
- In the Azure Portal, search for Microsoft Fabric and click Create Fabric Capacity.
- In the Subscription field, select the same subscription, and in the Resource group field, select the resource group you created earlier.
- In the Capacity name field, enter a meaningful name for the Fabric capacity, e.g., fabricdmo.
- In the Region field, select the same region as for the resource group, as a rule.
- Under Size, select the capacity size F2.
- In the Fabric capacity administrator field, enter the user who will manage the Fabric capacity and the Power BI workspace.
Note
Only users saved as Fabric capacity administrator can later select this capacity when creating the Fabric workspace.
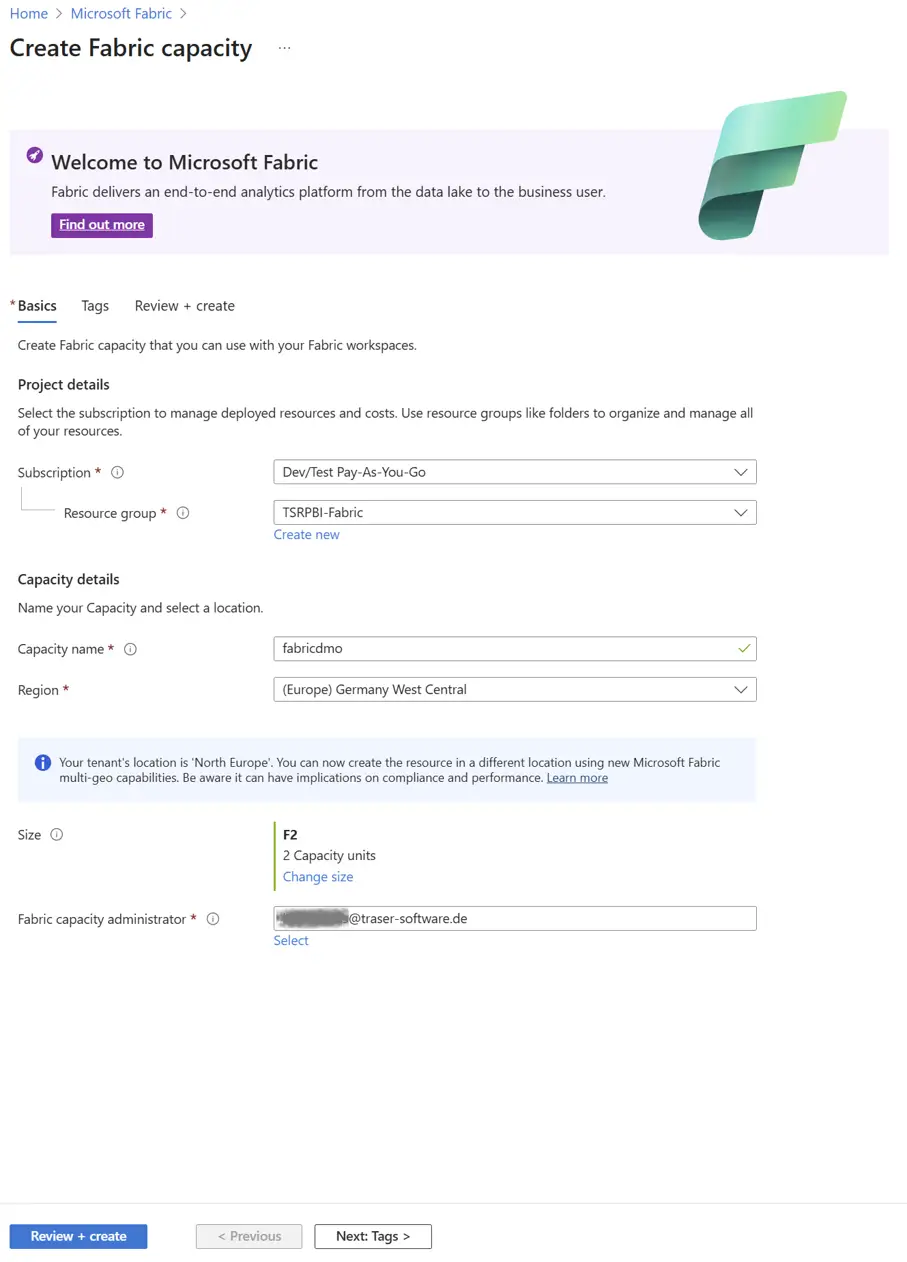
- Click on Review + create, then click Create.
The Fabric capacity is created. The next section explains how to create an app registration.
Creating an App Registration
Microsoft Dynamics 365 Business Central uses an app registration in Microsoft Entra ID to authenticate against Azure. To create one, proceed as follows:
- In the Azure Portal, search for App registrations and click New registration in the menu bar.
- In the Name field, enter a meaningful name for the app registration, e.g., bc-powerbi-auth.
- Under Supported account types, select Accounts in this organizational directory only (Single tenant).
- Under Redirect URI, select the Web platform from the dropdown menu and enter the address
https://businesscentral.dynamics.com/OAuthLanding.htmin the field next to it.
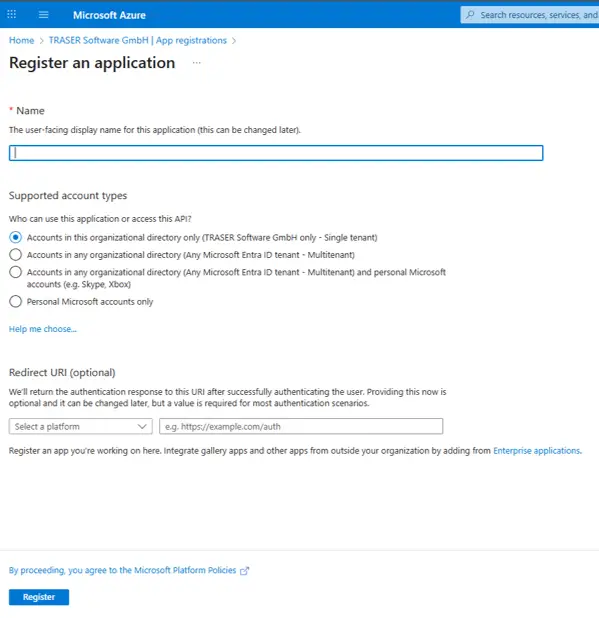
- Click on Register.
The app registration is created, and the overview page is displayed.
Note
On the app registration's overview page, note down the Application (client) ID and the Directory (tenant) ID. You will need both values for Setting up Export to Azure Data Lake Storage in our ERP solution.
Creating a Client Secret
To allow Microsoft Dynamics 365 Business Central to authenticate with the app registration, you also need a client secret. To do so, proceed as follows:
- On the app registration, navigate to Certificates & secrets in the left navigation pane.
- Switch to the Client secrets tab and click New client secret.
- In the Description field, enter a meaningful description for the client secret.
- In the Expires field, select a validity period.
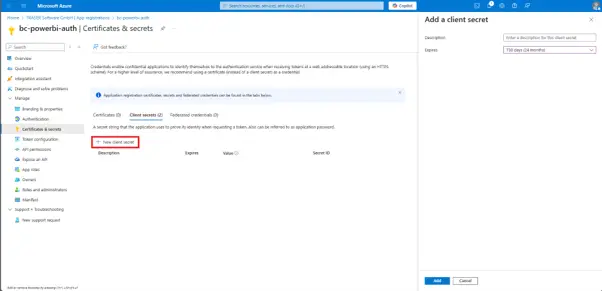
- Click on Add.
Important
Note down the value in the Value field immediately after creating the client secret. For security reasons, this value is only displayed once and cannot be viewed afterward.
The client secret is created. Also note down the value in the Secret ID field. You will need both the secret value and the secret ID for Setting up Export to Azure Data Lake Storage in our ERP solution.
Adding API Permissions
To allow the app registration to access Azure Data Lake Storage and user data, you must assign it the corresponding API permissions. To do so, proceed as follows:
- On the app registration, navigate to API permissions in the left navigation pane.
- Click on Add a permission and add the following permissions:
| API | Permission type | Permission |
|---|---|---|
| Azure Data Lake | Delegated | user_impersonation |
| Microsoft Graph | Delegated | User.Read |
- Finally, click on Grant admin consent to release the permissions for all users in the organization.
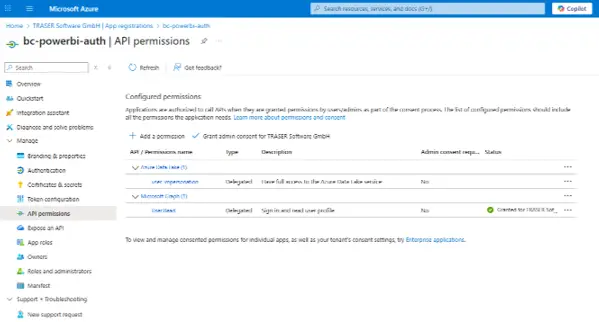
The app registration now has all necessary API permissions. You have successfully deployed all Azure resources and the app registration for Aptean Equipment BI Connect and can now continue with Setup in Aptean Equipment DMS.