


Service Orders Worksheet
This chapter describes how to process the Worksheet of a service order. It is divided into the following sections:
- Accessing Worksheets
- Changing Repair Status
- Entering Operating Hours
- Adding Work Templates (Standard Service Codes)
- Adding Images
- Adding Documents
- Adding Resources
- Spare Parts
- Filling in Checklists
- Entering Resolution Description
- Adding Signature
- Open as PDF
- Send via Email
- Finishing Worksheets
Accessing Worksheets
To open the worksheet of a service order in TRASER Mobile Service 365, please proceed as follows:
- Tap on the tile of the desired service order.
- The service order overview is displayed.
- Tap on the Worksheet tab.
- The worksheet of the service order is displayed.
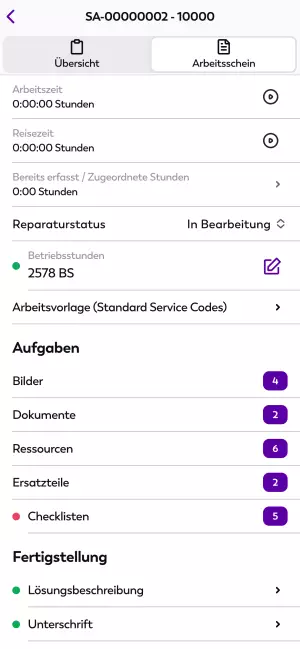
Here you can track working hours and travel time as well as display tracked time records and working hours assigned to the service order. How to track time using these fields is described under Starting Time Tracking.
On the worksheet, you can also change the repair status, enter the operating hours of the service item, and add work templates (standard service codes). Further actions are available in the Tasks and Functions tabs, which are described in more detail below.
Important
Mandatory fields, i.e. lines that are required to complete a worksheet, are marked with an indicator. This indicator is red for mandatory fields that have not been filled in yet, and green for mandatory fields that have been filled in.
The following section describes how to change the Repair Status of a service order.
Changing Repair Status
By changing the repair status, you can communicate different phases of a service order to office staff, e.g. if an order is already in process. How to set up customized repair statuses in Microsoft Dynamics 365 Business Central is described here.
To change the repair status, proceed as follows:
- Navigate to the Worksheet of the desired service order.
- Tap into the Repair Status line.
- Select the relevant status and confirm with OK.
You have successfully changed the repair status of the service order. The following sections describes how to enter the operating hours of a service item.
Entering Operating Hours
The Operating Hours line displays 0 BS by default and must be updated to the current operating hours of the service item for each service order.
To enter the operating hours of a service item, please proceed as follows:
- Navigate to the Worksheet of the desired service order.
- Tap in the Operating Hours line.
- Enter the current operating hours of the service item. Tap on the + icon or - icon to increase or decrease the value by 1.
You have successfully entered the operating hours of the service item. The following section describes how you can add a work template (standard service code).
Adding Work Templates (Standard Service Codes)
Über Arbeitsvorlagen bzw. Standard-Servicecodes können Sie standardisierte Aufgaben (z. B. Inspektionen) als Servicepakete zu einem Serviceauftrag hinzufügen. Relevante Verbrauchs- und Ersatzteile können in dem entsprechenden Servicepaket hinterlegt werden und müssen dadurch nicht manuell vom Monteur angegeben werden.
To add a work template to a service order, please proceed as follows:
- Navigate to the Worksheet of the desired service order.
- Tap into the Work Template (Standard Service Codes) line.
- A list of all available work templates is displayed.
- Tap on the + icon of the desired work template to add it.
You have successfully added a work template to a service order. The following section describes how you can add images to a worksheet.
Adding Images
You can store images on a worksheet to document damage or repair work.
Note
To use this function of the app, access rights to the gallery and camera on your mobile device are necessary.
To add images to a worksheet, please proceed as follows:
- Navigate to the Worksheet of the desired service order.
- Tap in the Images line in the Tasks FastTab.
- A overview of the stored images is displayed.
- Tap on the Camera icon to take a picture with the camera of your mobile device, or to add a picture from the gallery.
- Tap on the green Checkmark to add the image to the worksheet. Tapping on the grey X icon discards the image.
You have successfully added an image to a worksheet. The number of stored images is displayed in the line with an indicator. The following section describes how you can edit stored images.
Editing Images
You can edit stored images in the app. To do so, please proceed as follows:
- Navigate to the Worksheet of the desired service order.
- Tap in the Images line in the Tasks FastTab.
- A overview of the stored images is displayed.
- Tap on the image you want to edit.
- The Image Editor is displayed.
- Tap on the pen icon in the top right screen corner to begin editing.
- Select one of the colors on the right side of the screen by tapping on it.
- Tap on one of the three line icons in the bottom section of the screen to select the desired line thickness.
- Add customized highlights or notes to the image. You can revert unwanted changes by tapping on the reverse arrow icon at the top of the screen.
- Tap on the Done button in the top right screen corner to save your changes.
- You can cancel editing the image by tapping on the X icon in the top left corner of the screen.
You have successfully edited a stored image. The following section describes how to remove a stored image.
Removing Images
To remove images from a worksheet, please proceed as follows:
- Navigate to the Worksheet of the desired service order.
- Tap in the Images line in the Tasks FastTab.
- A overview of the stored images is displayed.
- Tap on the image you want to remove.
- The Image Editor is displayed.
- Tap on the trashcan icon in the bottom left screen corner to delete the image.
You have successfully deleted a stored image. The following section describes how to add documents to a worksheet.
Adding Documents
You can store relevant documents (e.g. external invoices for consumables and spare parts that should be invoiced via the work order) on a worksheet.
To add a document to a worksheet, please proceed as follows:
- Navigate to the Worksheet of the desired service order.
- Tap in the Documents line in the Tasks FastTab.
- Tap on the paperclip icon and select the image icon for documents in an image file format, or select the document icon for documents in a text file format.
- Select the file you want to upload.
You have successfully added a document to a worksheet. The number of stored documents is displayed in the line with an indicator. The following section describes how to add resources to a worksheet.
Adding Resources
You can add different resources to a worksheet, e.g. working hours, travel allowances or consumables. To do so, please proceed as follows:
- Navigate to the Worksheet of the desired service order.
- Tap in the Resources line in the Tasks FastTab.
- An overview of the allocated resources including quantity is displayed.
- Tap on the + button in the bottom right corner of the screen to add a new resource.
- A list containing allocatable resources is displayed.
- Select the resource you want to add from the list or via the search field. To do so, tap on the + icon in respective line.
- Enter the correct quantity of the allocated resource. Tap on the + icon or - icon to increase or decrease the value by 1.
- Confirm your entries or tap on Cancel to cancel the changes.
You have successfully added a resource to a worksheet. The number of assigned resources is displayed in the line with an indicator. The following section describes how to change the quantity of an allocated resource.
Changing Resource Quantity
To change the quantity of an allocated resource, please proceed as follows:
- Navigate to the Worksheet of the desired service order.
- Tap in the Resources line in the Tasks FastTab.
- An overview of the allocated resources including quantity is displayed.
- Tap on the Pen icon to change the displayed quantity.
- Enter the correct quantity of the allocated resource. Tap on the + icon or - icon to increase or decrease the value by 1.
- Confirm your entries or tap on Cancel to cancel the changes.
You have successfully changed the quantity of a resource. The following section describes how you can add spare parts to a service order.
Spare Parts
With TRASER Mobile Service 365, you can view spare parts stored in your service vehicle as well as in other locations directly in the app and add spare parts to a service order as needed. This facilitates service processes, as no external inventory inquiry is required. Additionally, allocated or ordered spare parts are stored in the local memory of the app and can therefore also be accessed offline, i.e. without network access.
To view the stored spare parts, please proceed as follows:
- Navigate to the Worksheet of the desired service order.
- Tap in the Spare Parts line in the Tasks FastTab.
- A list of the stored spare parts is displayed. In addition to the name of the spare part, the following information is displayed:
| Line | Description |
|---|---|
| Vendor Item No. | Specifies the vendor item number of a spare part. |
| Item No. or No. | Specifies the item number of a spare part. |
| Quantity | Specifies the available quantity at the selected location. |
| Bin Code | Specifies the current bin code of the spare part. |
| Location Code | Specifies the current location code of the spare part. |
The number of stored spare parts is displayed in the line with an indicator. The following section describes how to add spare parts to a service order.
Adding Spare Parts
To add spare parts to a service order, please proceed as follows:
- Navigate to the Worksheet of the desired service order.
- Tap in the Spare Parts line in the Tasks FastTab.
- A overview of the stored spare parts is displayed.
- Tap on the + button to add a spare part.
- A list of all available spare parts is displayed.
- Select the spare part you want to add from the list or via the search field. To do so, tap on the + icon in respective line.
- Optional Tap on the Carton icon to select a different location (e.g. due to a stockout) from a list.
- Tap on the + icon in the line to select the desired spare part or Optional the desired location.
- Enter the desired quantity of the spare part. Tap on the + icon or - icon to increase or decrease the value by 1.
- Optional Tap on Select Location to select a different location (e.g. due to a stockout) from a list.
- Confirm your entries or tap on Cancel to cancel the selection.
Tip
With the integrated code scanner, you can also use barcodes or QR codes to search for a specific spare part in TRASER Mobile Service 365. To do so, tap on the scanner icon in the top right screen corner of the parts list, scan the code using the camera of your mobile device, and then follow the previously described steps for adding a spare part.
You have successfully added spare parts to a service order. The following section describes how to change the quantity of a stored spare part.
Changing Spare Parts Quantity
To adjust the quantity of a stored spare part, please proceed as follows:
- Navigate to the Worksheet of the desired service order.
- Tap in the Spare Parts line in the Tasks FastTab.
- A overview of the stored spare parts including quantity is displayed.
- Tap on the Pen icon to change the displayed quantity.
- Enter the correct quantity of the stored spare part. Tap on the + icon or - icon to increase or decrease the value by 1.
- Confirm your entries or tap on Cancel to cancel the changes.
You have successfully changed the quantity of a spare part. The following section describes how to edit checklists.
Filling in Checklists
Checklists can be stored on service orders to ensure and standardize certain work processes. The number of stored checklists is displayed in the line with an indicator. To fill in a stored checklist, please proceed as follows:
- Navigate to the Worksheet of the desired service order.
- Tap in the Checklists line in the Completion FastTab.
- A overview of the stored checklists is displayed.
- Click on the checklist you want to fill in.
- Select the checkboxes in the lines of the tasks you completed.
- Optional Enter the required values in the input fields, e.g., current meter values.
- Tap on the Complete Checklist button in the bottom section of the screen to finish the checklist.
Note
Once you finish a checklist, the entries will be synchronized with Microsoft Dynamics 365 Business Central and grayed out in TRASER Mobile Service 365, so they can no longer be edited. To correct mistakes, you have to reopen the checklist for editing by tapping on the Reset Checklist button and then complete it again.
You have successfully filled in a checklist. The following section describes how to enter a resolution description.
Entering Resolution Description
A resolution description is required to complete a service order. Please proceed as follows to enter a resolution description:
- Navigate to the Worksheet of the desired service order.
- Tap in the Resolution Description line in the Completion FastTab.
- The Resolution Description page is displayed.
- Tap on the Pen icon to enter a resolution description. Your changes are effective immediately.
Tip
You can use the Improve Resolution Description (Beta) button to revise your resolution description with the help of AI. The revised resolution description is displayed in a dialog window. Tap on Apply to keep the revised version. Otherwise, tap on Cancel.
You have successfully entered a resolution description. The following section describes how to add a signature to a worksheet.
Adding Signature
Üblicherweise ist eine Kundenunterschrift zum Abschließen eines Serviceauftrags erforderlich. Um eine Unterschrift zu einem Arbeitsschein hinzuzufügen, gehen Sie wie folgt vor:
- Navigate to the Worksheet of the desired service order.
- Tap in the Signature line in the Completion FastTab.
- The Signature page opens.
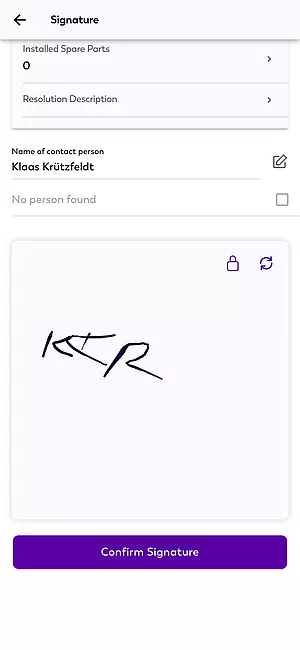
- Tap in the Name of contact person line and enter the name of the contact person.
- Tap on the Lock icon to activate the drawing field.
- Let the customer sign in the drawing field.
Note
To reset the drawing field in case of an incorrect entry, tap on the arrow circle icon and confirm the dialog with Yes.
- Tap on the Lock icon again to lock the drawing field.
- Then, tap on the Confirm Signature button.
Important
If you did not meet with a contact person and therefore could not get a signature, select the the No person found checkbox. In this case, the Name of contact person line must not be filled in, or an error message will be displayed when you tap on Confirm Signature.
You have successfully added a signature. The following section describes how to open a worksheet as a PDF.
Open as PDF
With TRASER Mobile Service 365, you can display a print preview of the worksheet as a PDF. To do so, please proceed as follows:
- Navigate to the Worksheet of the desired service order.
- Tap into the Open as PDF line in the Completion FastTab.
- The worksheet is downloaded from TRASER DMS 365 as a PDF and opened in your default app to display PDF files.
You have successfully opened a worksheet as a PDF. The following section describes how to send a worksheet via email.
Send via Email
You can send a worksheet directly via email with the TRASER Mobile Service 365 app. To do so, please proceed as follows:
- Navigate to the Worksheet of the desired service order.
- Tap into the Send via Email line in the Completion FastTab.
- The worksheet is downloaded from TRASER DMS 365 as a PDF and attached automatically to a new email. Your default app for sending emails opens.
- Compose the email as usual, then send it.
You have successfully sent a worksheet via email. The following section describes how to finish a worksheet in the app.
Finishing Worksheets
Once you have completed the worksheet, you can finish it in the app.
Important
If not all mandatory fields have been filled in, the worksheet cannot be finished and an error message is displayed. Please also consider that finished worksheets can no longer be edited.
To finish a worksheet, please proceed as follows:
- Navigate to the Worksheet of the desired service order.
- Scroll to the bottom of the screen and tap on the I am done! button.
- A dialog window opens.
- Confirm the dialog with Yes or tap on No, if you do not want to finish the worksheet yet.
Once you confirm the dialog, the service order data is synchronized with TRASER DMS 365. Once all allocated resources have finished the worksheet, the service order automatically receives the repair status Finished (e.g. ERLEDIGT), as configured in Microsoft Dynamics 365 Business Central, and is removed from the order overview in TRASER Mobile Service 365 at the next synchronization. You have successfully finished a worksheet.