


Service Orders Overview
This chapter describes how you can process a service order from its Overview. It is divided into the following sections:
- Accessing Overview
- Creating New Service Orders
- Starting Navigation
- Editing Fault Description
- Service Items
- Contacts
- Internal Notes
- New Worksheet
- Adding Resource Allocation
- Resetting Worksheets
Accessing Overview
To access the Overview of a service order, please proceed as follows:
- Tap on the tile of the desired service order.
- The service order overview is displayed.
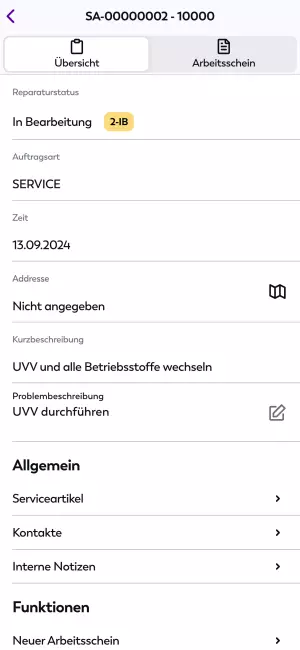
It contains information on the Repair Status of the service order, the Order Type (e.g. SERVICE), the Time specified for service order completion as well as the Address of the operating site.
The next section describes how to create a new service order in the app.
Creating New Service Orders
New service orders can be created directly from TRASER Mobile Service 365.
To create a new service order, please proceed as follows:
- Navigate to the Service Orders tab.
- Tap on the Rocket Icon in the lower section of the screen.
- Select New Order from the menu.
- A list of all customers is displayed.
- Select the customer you want to add to the service order from the list or via the search field.
- A list of all service items of the customer is displayed.
- Select the service item you want to add to the service order from the list or via the search field.
Tip
Activate the toggle switch in the top right corner of the screen to instead choose from a list of all available service items.
- A summary of the Worksheet Details is displayed.
- Tap into the Order Type line and select the desired order type from the dropdown list.
- Tap into the Fault Description line and enter a fault description.
- Then, tap on Create Worksheet to create the new service order.
You have successfully created a new service order. It will be displayed in the service order overview as a new order tile with the current date as the service order date.
The next section explains how to plan a route using the app.
Starting Navigation
You can use the TRASER Mobile Service 365 app to navigate to the address of a service order and even combine multiple operation site addresses into one route. To do so, please proceed as follows:
- Navigate to the Service Orders tab.
- Tap on the Rocket Icon in the lower section of the screen.
- Select Start Navigation from the menu. This changes the display of the order tiles:
- Selected service orders are displayed in gray and marked with a Checkmark icon. All tiles are selected by default.
- Not selected service orders are displayed in white and marked with a Circle icon.
- Tap on the service orders you want to select or deselect for navigation. You can also select all or none of the service orders via the button in the bottom section of the screen.
- Tap on the Checkmark icon in the top right of the screen to confirm your selection.
- The navigation app of your device opens and the optimal route from your location to the selected addresses is displayed.
- Edit the route as needed (e.g. due to heavy traffic) and then start the navigation.
Tip
To navigate to a single address, you can also tap on the Map icon in the Address line in the overview of the desired service order.
You have successfully started the navigation. The next section describes how to edit the fault description.
Editing Fault Description
The Fault Description contains important information about a service order and can be edited as needed. Proceed as follows to edit the fault description:
- Navigate to the Overview of the desired service order.
- Tap on the Pen icon in the Fault Description line.
- Add to the description as needed, e.g. not yet recorded damages. Your changes are effective immediately.
You have successfully edited the fault description. The next section describes the detailed view of service items.
Service Items
(At least) one service item is assigned to each service order. To display the details of an assigned service item, please proceed as follows:
- Navigate to the Overview of the desired service order.
- Tap in the Service Item line in the General FastTab.
- The service item card with all relevant information on the service item opens:
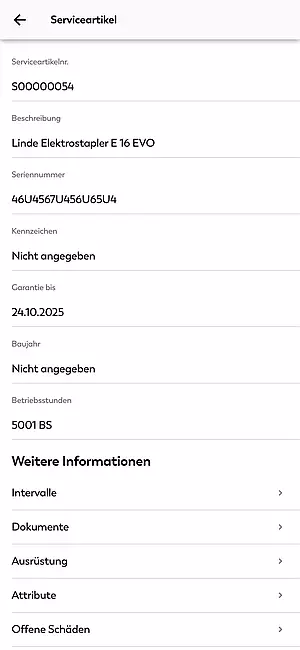
Important
The Operating Hours line displays 0 BS by default and must be updated to the current operation hours of the service item for each service order.
| Line | Description |
|---|---|
| Description | This line displays the description of the service item. |
| Serial No. | This line displays the serial number of the service item. |
| License Plate | This line displays the license plate of the service item. |
| Warranty to | This line displays the remaining warranty period of the service item. |
| Year of Construction | This line displays the year of construction of the service item. |
| Operating Hours | Tap into this line to enter the current operating hours of the service item. |
| Intervals | Tap into this line to display the previous service intervals and due dates. You can mark due dates as completed by selecting the corresponding checkbox. |
| Documents | Tap into this line to access stored documents (e.g. service manuals). You can store documents or images by tapping on the Paperclip icon. |
| Configuration | Tap into this line to display the configuration of the service item. |
| Attributes | Tap into this line to display additional attributes of the service item. |
| Open Damages | Tap into this line to display open damages of the service item. Tapping on a damage report displays more detailed information (e.g. stored images). |
| History | Tap into this line to display the service item history. |
The next section describes the contact details stored on the service order.
Contacts
The contact details of the customer are stored with each service order. To access the contact details, please proceed as follows:
- Navigate to the overview of the desired service order.
- Tap in the Contacts line in the General FastTab.
- The contact card with all relevant information on the customer opens:
| Line | Description |
|---|---|
| Customer | This line displays the name of the customer. |
| Customer Address | This line displays the address of the service order. Tap on the Map icon to start navigation. |
| Contact Person | This line displays the name of the contact person. |
| Mobile Phone No. | This line displays a mobile phone number for contact purposes. Tap on the Phone icon to start a phone call. |
| Phone No. | This line displays a phone number for contact purposes. Tap on the Phone icon to start a phone call. |
| Email Address | This line displays an email address for contact purposes. Tap on the Envelope icon to send an email. |
| Address | This line displays the address of the customer. |
| Extended | This line displays additional contact information. |
The next section describes how to store internal notes.
Internal Notes
In TRASER Mobile Service 365, you can use internal notes to pass on sensitive information to technicians. These notes will not be shown on the invoice. If Internal Notes exist, the corresponding line in the service order overview is marked with an exclamation mark.
To create an internal note, please proceed as follows:
- Navigate to the Overview of the desired service order.
- Tap in the Internal Notes line in the General FastTab.
- The Internal Notes page is displayed.
- Tap on the Pen icon in the Internal Notes line.
- Add to the notes as needed. Your changes are effective immediately.
You have successfully created an internal note. The next section describes how to create a new worksheet.
New Worksheet
You can create another worksheet for an additional service item from a service order. To create a new worksheet, please proceed as follows:
- Navigate to the Overview of the desired service order.
- Tap in the Create new Worksheet line in the Functions FastTab.
- A list of all service items of the customer is displayed.
- Select the service item for which you want to create a worksheet from the list or via the search field.
- A summary of the Worksheet Details is displayed.
- Tap into the Fault Description line and enter a fault description.
- Then, tap on Create Worksheet to create the new worksheet.
You have successfully added a new worksheet to a service order. The next section describes how to allocate a resource to a service order.
Adding Resource Allocation
If an additional resource (e.g. a technician with a specific expertise) is needed for a service order, it can be allocated to the service order directly in TRASER Mobile Service 365. To allocate a resource, please proceed as follows:
- Navigate to the overview of the desired service order.
- Tap in the Add Resource Allocation line in the Functions FastTab.
- The Add Resource Allocation page is displayed with a list of all available resources.
- Select the resource you want to add to the service order from the list or via the search field.
- Tap into the respective line to add the resource.
Once you successfully added a resource allocation to a service order, a notification highlighted in green will be displayed in the bottom section of the screen. The order will now also be displayed in the Service Orders tab of the allocated technician.
The next section describes how to reset an edited worksheet.
Resetting Worksheets
Once you have made changes to the worksheet of a service order, the button Reset Worksheet is displayed below the Functions FastTab. With this, you can revert incorrect changes, as long as they have not yet been synchronized with TRASER DMS 365.
Important
Once you confirm the dialog, the worksheet will be reset to the last valid state in TRASER DMS 365. All changes in the app that have not been synchronized yet will be lost.
To reset a worksheet, please proceed as follows:
- Navigate to the Overview of the desired service order.
- Tap on the Reset Worksheet button.
- A dialog window opens.
- Confirm the dialog with Confirm or tap on Cancel, if you do not want to reset the worksheet.
For information on filling out and finishing the worksheet of a service order, please refer to the Worksheet page.