


User Interface
Here you’ll find all important information on the user interface of TRASER Mobile Service 365. This chapter is divided into the following sections:
- General User Interface
- 'Service Orders' Tab
- 'Time Records' Tab
- 'Overview' Tab
- Settings
- Icons and Indicators
General User Interface
After successful login, you will be redirected to the user area of the TRASER Mobile Service 365 app. This is divided into the Service Orders, Time Records and Overview tabs at the bottom of the screen. The Service Orders tab is displayed by default when you open the app. Tap on the desired tab to access it.
'Service Orders' Tab
In the Service Orders tab, all orders assigned to you are displayed as tiles.

A service order tile contains the following information:
- Order Status
- Customer
- Service Items
- Order Period
- Service Order Number
- Serial Number
- Order Description
- Synchronization Status
You can use the Today, Week, and Month buttons to filter service orders by assignment date. If you tap on the magnifying glass icon in the top right of the screen, you can also filter by attributes such as Order Number, Serial Number, Customer, Manufactorer, or Service Item. The All button resets all filters.
Tapping on the rocket icon in the bottom right section of the screen allows you to add a New Order or to Start Navigation for route planning. For more information on these two functions, click here.
When you tap on a service order tile, a detailed view of the respective order is displayed, divided into the Overview and Worksheet tabs. How to use these tabs for processing orders is described under Service Orders.
'Time Records' Tab
The Time Records tab displays your working and travel times.
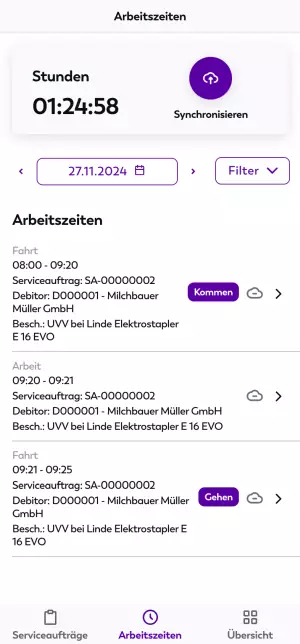
A live timer for time tracking as well as the Synchronize button are displayed in the top section of the screen. With this button, you can synchronize time records with TRASER DMS 365.
You can use the button with the date display to filter by a specific date in the calendar. All time records for the selected date are displayed in chronological order. You can use the arrows to the left and right of the button to switch to the previous or next date. You can also use the drop-down menu Filter to filter for All, Not Released, Not synchronized or Erroneous Time Records.
The time record with the earliest time stamp for the selected date is marked as the start of work with the clock in indicator. The time record with the latest time stamp is marked as the end of work with the clock out indicator. A red indicator shows that time is currently being recorded. Completed time records are marked with a cloud icon that indicates their synchronization status. More information on icons and indicators can be found here. How to use this tab for time tracking is described in the Time Records chapter.
'Overview' Tab
The Overview tab displays an overview of your working hours, your orders, and your service vehicle.

Tapping on the gear icon in the top right corner of the screen will take you to the Settings page, where you can change settings within the app and view further information about the app.
Analogously to the Time Records tab, a live timer for time tracking is displayed next to a button in the top section of the screen. Tapping on this button ends the time tracking for the current working day. The Service Orders Today tile shows the number of open service orders for the current working day. The All Service Orders tile shows the total number of assigned service orders. The Service Vehicle tile shows the license plate of the selected service vehicle. The quantity of the Spare Parts stored in the Service Vehicle is displayed in the corresponding tile.
Tip
The spare parts listed under Spare Parts stored in the Service Vehicle are stored in the local memory of the app and can therefore also be accessed offline, i.e. without network access.
The total number of your Finished Service Orders is displayed in the bottom section of the screen. How to use this overview for managing your service orders and service your vehicle is described in the Overview chapter.
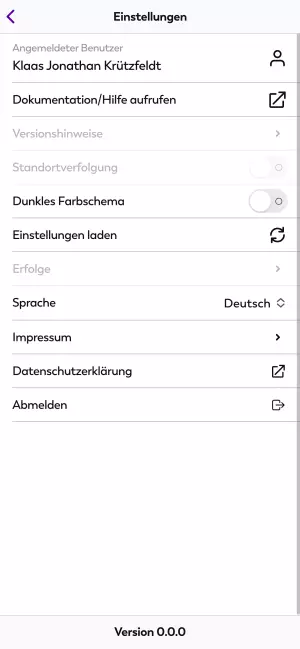
Settings
The Settings page provides an overview of the settings you can make in the app.
Note
Grayed-out lines are not yet available in the current version of the app.
| Option | Explanation |
|---|---|
| Logged in User | Tap into this line to display the assigned Environment, Company, and Resource. Tap on Close to return to the settings page. |
| Docs/Help Link | Tap on the arrow icon to be redirected to the app documentation, if you need support. |
| Release Notes | Tap into the line to display the version history. |
| GPS Tracking | This function is currently under construction. |
| Dark Mode | Activate the toggle switch to switch the app to dark mode. |
| Reload Settings | Tap in this line to reload the settings of the app, e.g. because order information or time tracking was changed in TRASER DMS 365. |
| Achievements | This function is currently under construction. |
| Language | Select the desired language of the app from the dropdown menu. |
| Imprint | Tap in this line to be redirected to the imprint. |
| Privacy Policy | Tap on the Arrow icon be redirected to the privacy policy. |
| Logout | Tap into this line to log out of the app. |
Changed settings are effective immediately. Tap on the arrow in the top left corner of the screen to return to the Overview tab. You will find more information on icons and indicators in the following section.
Icons and Indicators
This section contains all relevant information on icons and indicators used in TRASER Mobile Service 365.
| Symbol | Description |
|---|---|
| The cloud icon with an arrow marks the Synchronize button. | |
| The cloud icon marks tracked and released time records that can be synchronized. | |
| The cloud icon with a line marks tracked, but not yet released time records. | |
| The cloud icon with an exclamation mark marks a synchronization error. | |
| The cloud icon with a checkmark marks synchronized data. | |
| The rocket icon marks a button that can be used to create a new service order or to start navigation. | |
| The gear icon can be used to access the settings of the app. | |
| The magnifying glass icon can be used to utilize the search function. | |
| The map icon can be used to start the navigation. | |
| The pen icon can be used to enter text into a field. | |
| The checkmark icon marks service orders selected for navigation. | |
| The circle icon marks service orders not selected for navigation. | |
| The record icon can be used to start time tracking. | |
| The pause icon can be used to pause time tracking. | |
| The lock icon can be used to open or lock the signature field for editing. | |
| The arrow icon marks external links. | |
| The arrow circle icon can be used to reset the signature field. | |
| The phone icon can be used to call a contact. | |
| The envelope icon can be used to send an email to a contact. | |
| The camera icon can be used to start the camera of your mobile device. | |
| The paperclip icon can be used to store documents in the app. | |
| The codescanner icon can be used to scan barcodes and QR codes. | |
| The trashcan icon can be used to delete images and documents from the app. | |
| The carton icon can be used to select the location of a spare part. | |
 |
The red indicator marks not yet filled-in mandatory fields of a worksheet or active time tracking of a service order. |
 |
The green indicator marks filled-in mandatory fields of a worksheet. |
 |
In this position, the toggle switch is active and the corresponding function is activated. |
 |
In this position, the toggle switch is not active and the corresponding function is deactivated. |