


Handover
In the Handover FastTab, all assigned rent protocols are displayed regardless of whether they are return or delivery protocols. You will find more information on the options in the Handover FastTab under 'Handover' FastTab.
Handing Over a Delivery Protocol
To process the handover of a delivery protocol, proceed as follows:
- Click the rent protocol you want to process in the Handover FastTab.
- An overview of the rent protocol was displayed.
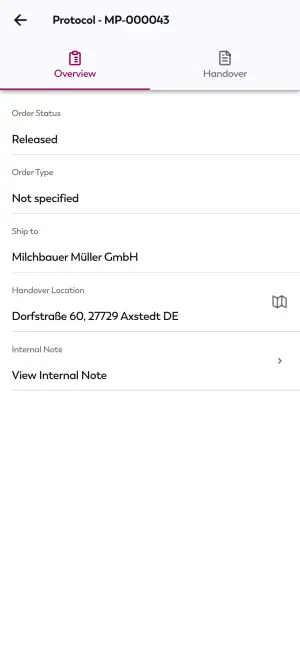
- In the overview, click the Handover option at the top of the screen.
- Click a protocol line in the Lines FastTab.
- An overview of the protocol line with additional information on the rent object was displayed.
- Navigate to the General FastTab.
- If the protocol line contains an item, activate the Quantity Handed Over toggle switch.
- Optional If the item quantity is greater than one, specify the quantity to be returned.
- Optional Specify whether items are to be sold or scrapped.
- If the protocol line contains a service item, click Damages and record any damages not captured during Preparation. Activate the Damages Recorded as well as the Quantity Handed Over toggle switches.
Note
If a Checklist was stored for the rent class during the object process status, it must also be filled in for the protocol line.
- Click Rental Handover in the Checklists FastTab.
- Fill in the checklist with the required information.
- Click Finish Checklist.
- Click the arrow icon in the top-left of the screen to return to the protocol line.
Note
If Checkpoints were set up for the service item, they must also be filled in for the protocol line.
- Click Checkpoints.
- Enter the required information for all checkpoints.
- Activate the necessary toggle switches for all checkpoints.
- Click the arrow icon in the top-left of the screen to return to the protocol line.
- Click the Confirm Protocol Line button.
- A dialog window was displayed.
- Confirm by clicking Yes to complete the handover of the protocol line.
- The protocol line was marked as Confirmed and highlighted in green.
- Repeat the previously mentioned steps for all protocol lines.
- In the Closing FastTab, click Signature.
- Enter the name of the signee in the Name of the Contact Person field.
- Deactivate the lock icon and sign the protocol.
- Then, reactivate the lock symbol.
- If no contact person was present for a signature, select the No Contact Person Present checkbox. That way, the protocol can be concluded without a signature.
- Click the Confirm Signature button.
Note
The following function requires the Report Setup to be completed first.
- Optional Save or send the delivery report via the Open as PDF and Send via Email fields.
- All necessary information is now confirmed. Click Complete Protocol to close the rent protocol and to finish the handover.
Tip
If necessary, you can also add other rent objects requested by the customer during handover to a delivery protocol. To do so, click Add New Rent Object in the Functions FastTab in the protocol, then click the + button next to the relevant object to enter the desired quantity. You will be redirected to the preparation of the added object. How to carry out a preparation is described under Preparation. Now you can return to the handover and complete it as usual.
The handover of the delivery protocol is complete. Thanks to the real-time synchronization, the Delivery Status in the protocol card was set to Delivered in our rent solution. If you enabled postings during Mobile Rental setup, the protocol will also be posted automatically upon handover. Otherwise, this must be done manually in our rent solution. More information on this can be found in the documentation for Aptean Rental.
Handing Over a Return Protocol
To carry out the handover of a return protocol, proceed as follows:
- In the Handover FastTab, click the return protocol you want to process.
- An overview of the rent protocol was displayed.
- In the overview, click the Handover option at the top of the screen.
- Click a protocol line in the Lines FastTab.
- An overview of the protocol line with further information on the rent object was displayed.
- Navigate to the General FastTab.
- If the protocol line contains an item, you only have to activate the Quantity Handed Over toggle switch.
- If the protocol line contains a service item, click Damages and record the damages from the return. Activate the Damages Recorded as well as the Quantity Handed Over toggle switches.
Note
If a Checklist was stored for the rent class during the object process status, it must also be filled in for the protocol line.
- In the Checklists FastTab, click Rental Returns.
- Fill in the checklist with the necessary information.
- Click Finish Checklist.
- Click the arrow icon in the top-left of the screen to return to the protocol line.
- If the service item requires information regarding meters or consumption, enter this information in the Meters and Consumptions FastTab.
Note
If Checkpoints were created for the service item, they must also be filled in for the protocol line.
- Click Checkpoints.
- Enter the required information for all checkpoints.
- Activate the necessary toggle switches for all checkpoints.
- Click the arrow icon in the top-left of the screen to return to the protocol line.
- Click the Confirm Protocol Line button.
- A dialog window was displayed.
- Confirm by clicking Yes to complete the return of the protocol line.
- The protocol line was marked as Confirmed and highlighted in green.
- Repeat the previously mentioned steps for all protocol lines.
- In the Closing FastTab, click Signature.
- Enter the name of the signing person in the Name of the Contact Person field.
- Deactivate the lock icon and sign the protocol.
- Then, reactivate the lock symbol.
- If no contact person was present for a signature, select the No Contact Person Present checkbox. That way, the protocol can be concluded without a signature.
- Click the Confirm Signature button.
Note
The following function requires the Report Setup to be completed first.
- Optional Save or send the return report via the Open as PDF and Send via Email fields.
- All necessary information is now confirmed. Click Conclude Protocol to conclude the rent protocol and to finish the return process.
You have successfully finished the handover of a return protocol. To finish the return process, it is necessary to carry out the follow-up of all return lines of a protocol. How to carry out a follow-up is described under Follow-Up.