Preparation
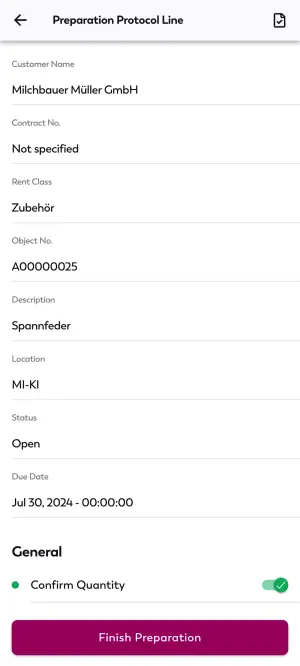
All assigned protocol lines for delivery are displayed in the Preparation FastTab. How to create protocol lines is described under Protocol. You will find more information on the options in the Preparation FastTab under 'Preparation' FastTab.
Preparing Protocol Lines with Items
To prepare a protocol line containing only items, please proceed as follows:
- Click on the protocol line you want to prepare in the Preparation FastTab.
- An overview of the protocol line with further information on the rent object is displayed.

- Navigate to the General FastTab.
- Click on Quantity to Confirm.
- A dialog is displayed in which you can enter the quantity of the rent object. If it is a partial delivery, you can adjust the quantity accordingly.
- Activate the Confirm Quantity toggle switch.
- Once you have confirmed the quantity, click on Finish Preparation.
- A dialog window is displayed. Confirm with Yes to finish the preparation of the protocol line.
The preparation of the protocol line is complete. Thanks to the real-time synchronization, the Mobile Status in the protocol card is set to Prepared in TRASER DMS 365. Once all protocol lines of a rent protocol have been prepared, you can start the handover. How to carry out a handover is described under Handing Over a Delivery Protocol.
Tip
If you have made incorrect changes and want to undo them, you can click the Reset Protocol Line button. This discards all changes and resets the previous state of the protocol line.
Preparing Protocol Lines with Service Items
To prepare a protocol line containing service items, please proceed as follows:
- Click on the protocol line you want to prepare in the Preparation FastTab.
- An overview of the protocol line with further information on the rent object is displayed.
- Navigate to the General FastTab.
- Click on Damages.
- A list of all damages is displayed. If previous damages exist, they will be listed here as well.
- If a damage occurred to the rent object that you want to record, click on the + icon in the bottom-right of the screen.
- In the Description field, enter a meaningful description of the damage and confirm your entry by clicking the check mark icon.
- To add pictures of the damage, click on the picture icon in the bottom-right of the screen.
- Capture the pictures directly via camera and add them to the damage report.
Note
In order to synchronize pictures with TRASER DMS 365, you must set up an Azure Blob Storage. For more information on this, click here.
- Click on Record Damage.
- When all damages have been recorded, activate the Damages Recorded toggle switch.
- Activate the Confirm Quantity toggle switch.
- Once you have confirmed the quantity as well as the damages, click on Finish Preparation.
- A dialog window is displayed. Confirm with Yes to finish the preparation of the protocol line.
Tip
If you have made incorrect changes and want to undo them, you can click the Reset Protocol Line button. This discards all changes and resets the previous state of the protocol line.
The preparation of the protocol line is complete. Thanks to the real-time synchronization, the Mobile Status in the protocol card is set to Prepared in TRASER DMS 365. Once all protocol lines of a rent protocol have been prepared, you can start the handover. How to carry out a handover is described under Handing Over a Delivery Protocol.

