


Setup
This chapter describes the setup of the Trackunit interface after successful installation. It is divided into the following sections:
Trackunit Interface Setup
After successful installation, you must set up the interface in Microsoft Dynamics Business Central. To do so, you need an access token. All important information on setting up an access token can be found here. Then proceed as follows to set up the interface:
- Use the quick search (ALT+Q) to find the Interface List page.
- A notification is displayed, indicating that a setup wizard is available for the interface.
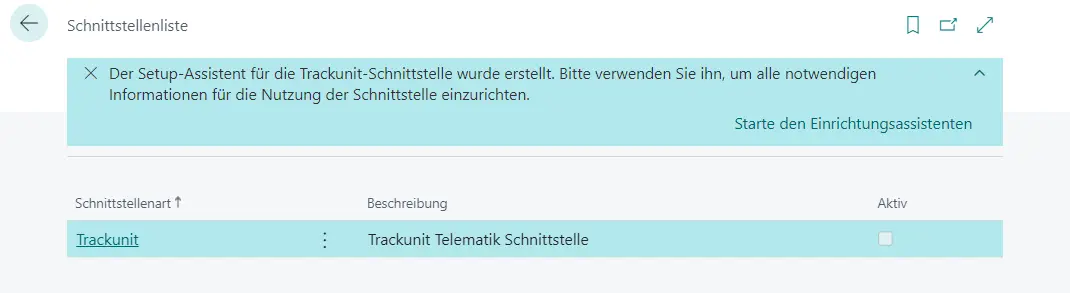
- Click Start Setup Wizard to complete the setup via setup wizard.
or
Close the notification by clicking X to complete the manual setup via interface card.
After completing the respective setup steps, you have successfully completed the basic setup of the interface.
Setup via Setup Wizard
If you have chosen setup via the wizard, the welcome page will open. Proceed as follows to complete the setup:
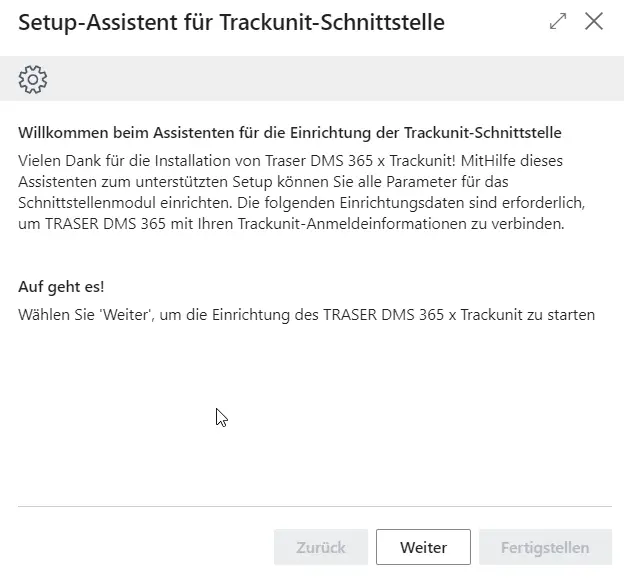
- Click Continue to go to the setup page.
- Fill in the fields according to the information in the following table:
| Field | Description |
|---|---|
| Trackunit User Name | Enter the name of the user of the interface. |
| Trackunit Password | Enter the password of the user of the interface. |
| Trackunit ClientID | Enter the ClientID for the interface. |
| Trackunit Client Secret | Enter the client secret for the interface. |
| Activate Trackunit Interface | Activate the toggle switch to activate the interface directly via the setup wizard. Alternatively, you can do this via the Interface List. |
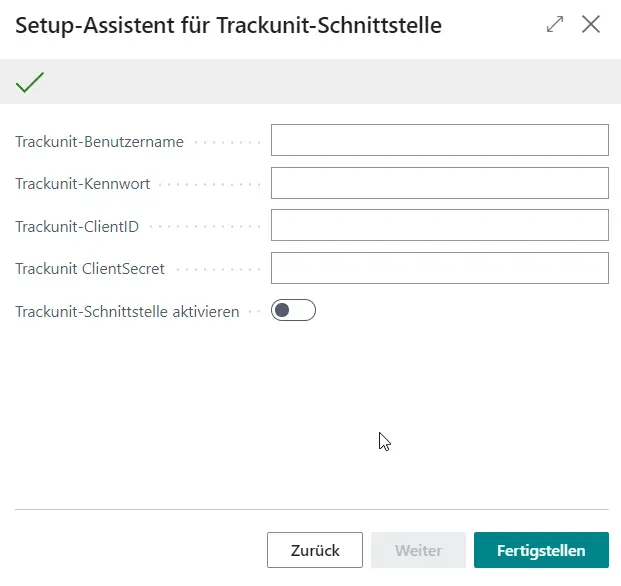
- Click on Finish to complete the setup wizard.
Tip
If user data changes during operation, you can use the setup wizard again. To do so, use the quick search (ALT+Q) in Microsoft Dynamics Business Central to search for Assisted Setup, then click the Set up Trackunit entry.
You have successfully completed the basic setup of the interface via the setup wizard.
Manual Setup via Interface Card
If you have chosen manual setup, proceed as follows to set up Trackunit via the Interface List:
- Click Trackunit in the Interface Type column to open the interface card.
- Navigate to the Authorization FastTab.
- In the Authorization Type field, select the Oauth2 option from the dropdown menu.
- In the Authorization Code field, select the TRACKUNIT option from the dropdown menu.
- Then, click Show details in the dropdown list to edit the OAuth2 application endpoint.
- Enter your Trackunit client ID in the Client ID field.
- Enter your Trackunit client password in the **Client Secret ** field.
- Return to the Trackunit interface card.
- Navigate to the Parameter FastTab.
- Enter your Trackunit user name in the Value column in the TRACKUNIT_USERNAME line.
- Enter your Trackunit password in the Value column in the TRACKUNIT_PASSWORD line.
- Click Activate Interface in the menu bar of the interface card to activate the interface.
Tip
To deactivate the interface, click Deactivate Interface in the menu bar.
You have successfully completed the basic manual setup of the interface.
Setting up Job Queue
When the interface is installed for the first time, a job queue entry named TSRM Telematics Management is automatically created. However, the general setup must be performed manually and applies to the entire system. Proceed as follows to set up the job queue:
- Use the quick search (ALT+Q) to find the Job Queue Entries page.
- Select the line where the value in the Object Caption to Run column is TSRM Telematics Management.
- Click Edit in the menu bar.
- Fill in the fields in the General FastTab of the job queue card according to the following table:
| Field | Description |
|---|---|
| Object Type to Run | This field specifies the type of the object that is to be run for the job queue entry and is filled automatically with the CodeUnit value. |
| Object ID to Run | This field specifies the ID of the object that is to be run for the job queue entry and is filled automatically with the 5445885 value. |
| Object Caption to Run | This field specifies the name of the object that is to be run for the job queue entry and is filled automatically with the TSRM Telematics Management value. |
| Description | This field specifies the description of the job queue entry and is filled automatically with the TSRM Telematics value. |
| Earliest Start Date/Time | Optional Specify the earliest date and time when the job queue entry should be run. If no value is specified, the job queue entry is run once the Status is set to Ready. |
| Job Timeout | Optional Enter the maximum time that the job queue entry is allowed to run in hours. |
| Status | This field is automatically set to On Hold by the system and is updated automatically. You can set the status manually to Ready or back to On Hold via the menu bar. |
- Navigate to the Recurrence FastTab.
- Activate the toggle switches for all days of the week.
- In the Starting Time field, specify the earliest time of the day that the recurring job queue entry is to be run. We recommend scheduling this just before regular business hours so that file import and processing are already complete by the start of the workday.
- In the Ending Time field, specify the latest time of the day that the recurring job queue entry is to be run. We recommend scheduling this outside of normal business hours to avoid generating unnecessary network traffic.
- In the No. of Minutes between Runs field, specify the minimum number of minutes that must elapse between runs of a task queue entry. We recommend a value between 60 and 360 minutes.
- Click Set Status to Ready in the menu bar.
You have successfully set up the job queue for the Trackunit interface and set it to Ready. From now on, fleet information will be retrieved from the Trackunit Portal and imported into the system for each run. Newly created service items (with a stored Serial No. and Manufacturer) will be automatically assigned to the telematics unit the next time the job queue runs. Service items that are already assigned to to a telematics unit in Microsoft Dynamics Business Central are automatically updated with the telematics data. More information on service item mapping can be found in the following section, Setting up Mapping.
Setting up Mapping
To ensure that fleet information is registered and assigned correctly, the OEM Name Mapping must be set up. In this process, the brand stored in fleet management is mapped to the Manufacturer Code in Microsoft Dynamics Business Central. To do so, proceed as follows:
Note
For correct mapping, the Serial No. (from the Trackunit Portal) and the Manufacturer must also be filled on the service items.
- In the OEM Name column, enter the brand name of the manufacturer, e.g., Manitou.
- In the Manufacturer Code column, enter the code of manufacturer, e.g., MANITOU.

You have successfully set up the service item mapping for the Trackunit interface.
Setting up User Permissions
You can give users permission to delete the telematics history. This is useful, e.g., if the volume of telematics data becomes too large and storage space needs to be freed up, or if old data records are no longer needed. Proceed as follows to set up the user permission:
- Use the quick search (ALT+Q) to find the User Setup page.
- From the list, select the user account that should have permissions for this area.
- Click Card in the menu bar.
- On the user setup card, navigate to the Machine/Service FastTab.
- Activate the Delete Telematics History toggle switch.
You have successfully set up the user permission to delete the telematics history.